
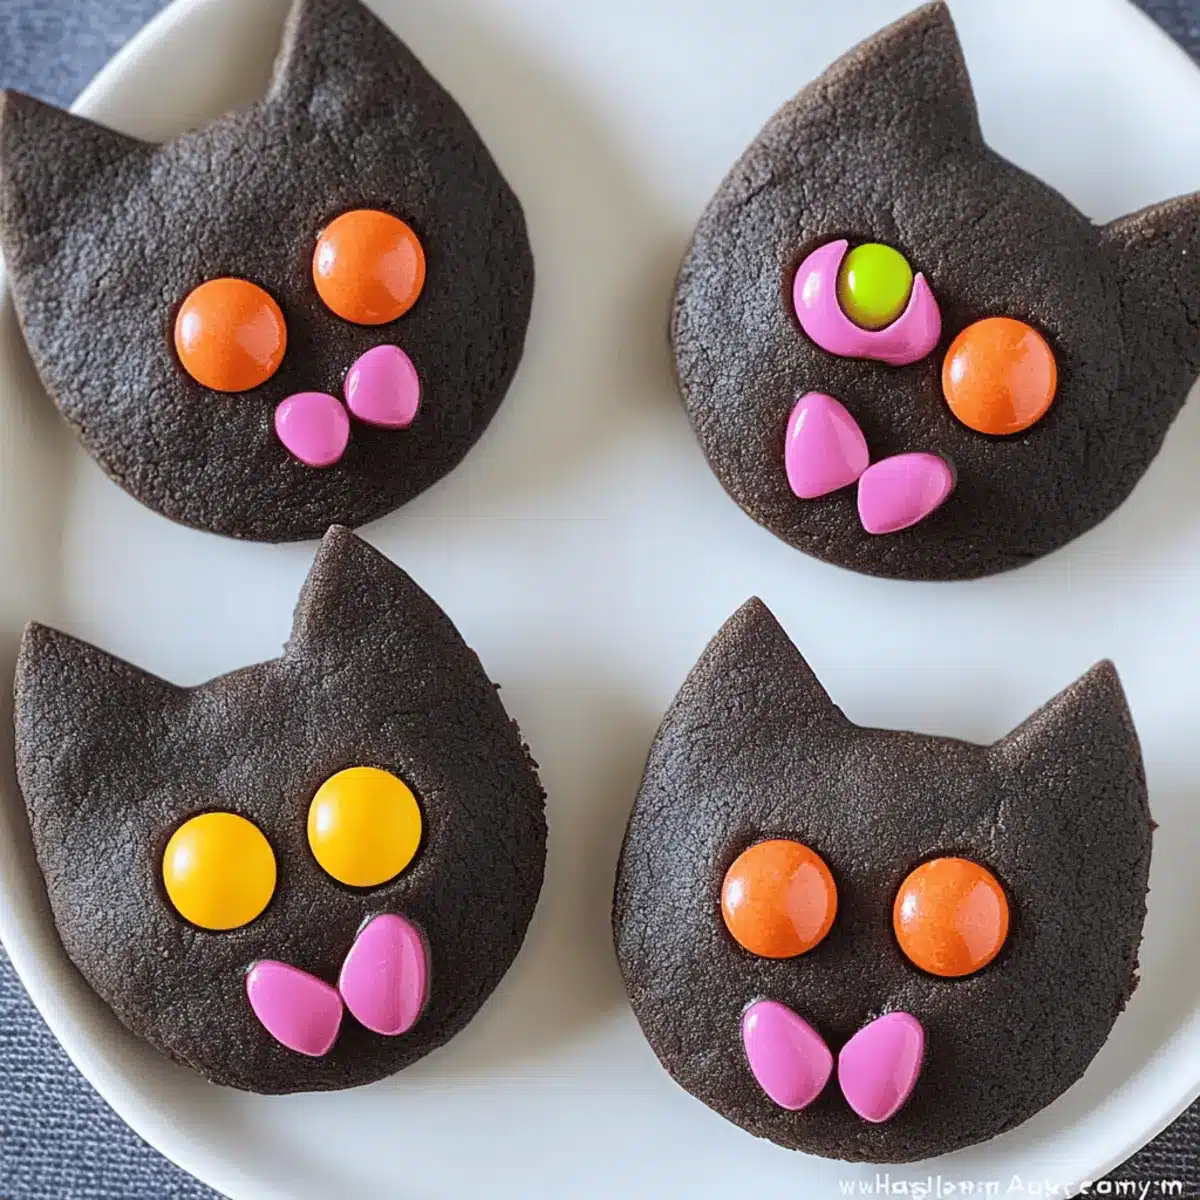
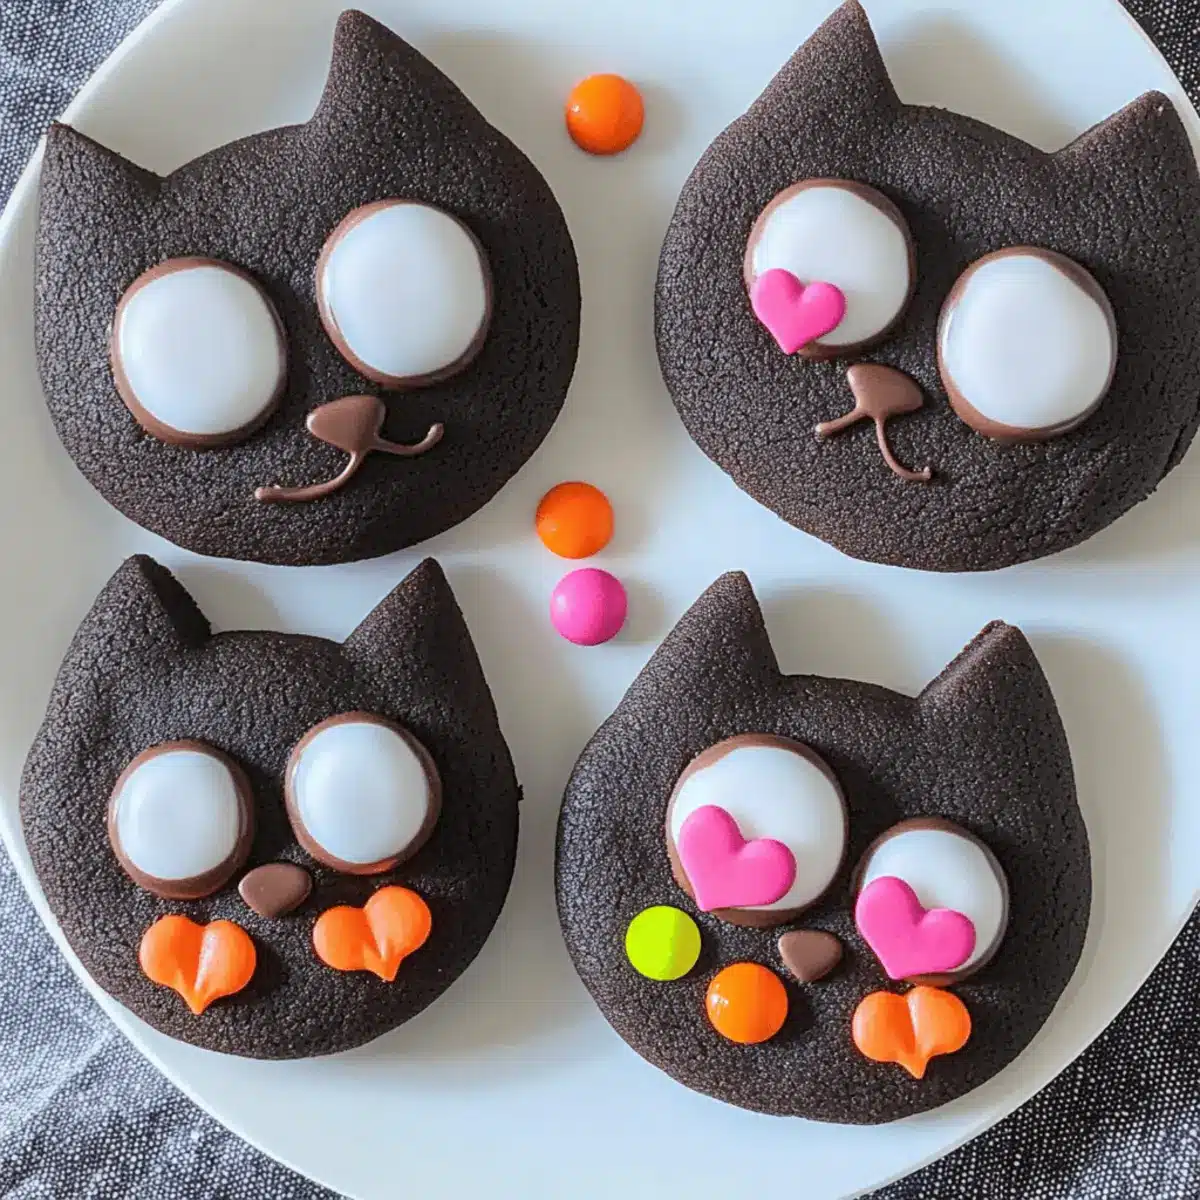
As Halloween approaches, I can’t help but feel a rush of excitement at the thought of baking treats that will spark joy and laughter. Enter my Candy-Filled Black Cat Cookies, a playful combination of rich chocolate cookies and a delightful surprise inside! These festive piñata-style cookies not only add a whimsical touch to your Halloween spread but also create an unforgettable experience for friends and family with every chewy, candy-filled bite. Ideal for those cozy gatherings, they’re quick to prepare and sure to be a crowd-pleaser, turning any ordinary celebration into a delightful memory. Ready to unleash your inner chef and create something truly magical this Halloween? Let’s get started!
Why are Candy-Filled Black Cat Cookies special?
Delightful Surprise: Each bite reveals a colorful candy treasure hidden inside, transforming an ordinary cookie into a fun experience that both kids and adults will love.
Wickedly Cute: These playful cookie designs are perfect for Halloween gatherings, making your dessert table a highlight of the party.
Simple Preparation: With straightforward instructions, even beginner bakers can whip up these charming cookies in no time.
Versatile Treats: Customize them with different fillings or decorations to fit various themes, from Halloween to any festive celebration.
Crowd-Pleasing Flavor: Rich chocolate meets sweet surprises, creating a flavor profile that resonates with all dessert lovers. For more fun cookie ideas, check out my Kitchen Sink Cookies or the delightful Velvet Crinkle Cookie.
Candy-Filled Black Cat Cookies Ingredients
For the Cookie Dough
- Butter – Provides moisture and richness; make sure it’s softened slightly for easy mixing.
- Granulated Sugar – Adds sweetness and helps achieve a fluffy cookie texture.
- Egg – Binds the ingredients together, contributing to the cookie’s structure.
- Vanilla Extract – Enhances flavor; can substitute with almond extract for a different profile.
- Cocoa Powder – Gives the cookies a rich chocolate flavor and dark color.
- Baking Powder – Leavening agent that helps the cookies rise.
- Salt – Enhances overall sweetness and balances flavors.
- All-Purpose Flour – Main structure component; for a gluten-free alternative, substitute with almond or coconut flour.
For the Candy Surprise
- Candy (e.g., Reese’s Pieces, M&M’s) – Fills the cookies, offering a fun surprise inside; pick colorful options for vibrant results!
For Decoration
- Jumbo Candy Eyes – Decorative finishing touch; can be replaced with fondant or modeling chocolate for customization.
- Candy Melts – Used as an adhesive for assembly; an alternative is royal icing for a stronger hold.
- Pink Heart Sprinkles – Add a cute touch for the nose; you can change to chocolate chips for a darker theme.
- Edible Pink Easter Grass – Decorative element; substitute with fondant or licorice laces for different looks.
Get ready to delight everyone with your Candy-Filled Black Cat Cookies!
Step‑by‑Step Instructions for Candy-Filled Black Cat Cookies
Step 1: Dough Preparation
In a large mixing bowl, cream together softened butter and granulated sugar until the mixture is light and fluffy, about 3-4 minutes. Next, crack in one egg and pour in the vanilla extract, mixing thoroughly until everything is combined and smooth. This mixture will serve as the base for your Candy-Filled Black Cat Cookies.
Step 2: Combine Dry Ingredients
In a separate bowl, whisk together cocoa powder, baking powder, salt, and all-purpose flour until well combined. Gradually add this dry mixture into the wet ingredients, stirring carefully until just incorporated. Be mindful not to overmix; the dough should come together while still being a bit soft, ready for chilling.
Step 3: Chill Dough
Flatten the dough into a disc shape and wrap it tightly in plastic wrap. Place it in the refrigerator to chill for at least 1 hour. This step helps firm up the dough, making it easier to handle and ensuring a better shape during baking for your Candy-Filled Black Cat Cookies.
Step 4: Cut Shapes
While the dough chills, preheat your oven to 350°F (175°C). Once ready, roll out the chilled dough on a lightly floured surface to about ⅛ inch thick. Use a cookie cutter to cut out 22 circles (2 ¼ inch) for the cookie bases, and 44 small triangles for the cat ears, ensuring each shape is visible and organized.
Step 5: Bake Base Cookies
Transfer the round cookie bases to a lined baking sheet, then press two triangles on top of each circle to represent cat ears. Bake in the preheated oven for 10-12 minutes, or until the edges look set and the tops are slightly firm. Once baked, allow the cookies to cool completely before moving to the next step.
Step 6: Create Domed Cookies
Roll out any remaining dough to 1/16th inch thickness and cut out 22 larger circles (2 ½ inch in diameter). Shape these larger circles over a cake pop pan to create a domed effect. Freeze the domes for about 15 minutes, then bake in the oven for 7-9 minutes until they are just set and ready for assembly.
Step 7: Assemble Cookies
After all cookie parts are cooled, carefully fill the domed cookies with your desired candy filling, like Reese’s Pieces or M&M’s. Use melted candy melts as adhesive to attach the flat cat cookie tops to the filled domes, pressing gently to secure them together.
Step 8: Decorate
Now, let your creativity shine! Use remaining melted candy melts to attach jumbo candy eyes, sprinkle on heart-shaped sprinkles for noses, and create whiskers with licorice or icing. This final touch brings your Candy-Filled Black Cat Cookies to life, making them not just a treat, but a delightful centerpiece for your Halloween festivities.
Step 9: Storage
To keep your Candy-Filled Black Cat Cookies fresh, store them in an airtight container at room temperature. They will stay delicious for up to 4 days, perfect for sharing with friends and family or enjoying on your own during the spooky season!

Tips for the Best Candy-Filled Black Cat Cookies
Butter Temperature: Keep butter slightly softened, not melted, to achieve a perfectly textured dough that isn’t greasy.
Chill Wisely: Don’t skip chilling the dough! It helps maintain cookie shape during baking and makes handling much easier.
Experiment with Fillings: Try different candies like chocolate chips, jelly beans, or seasonal sweets for exciting flavor variations in your Candy-Filled Black Cat Cookies.
Precision Cutting: Ensure all cookie shapes are evenly cut for uniform baking and a polished look on the final treats.
Decorative Touches: Get creative with decorations; substitute candy eyes or different sprinkles to personalize your cookies for various occasions!
What to Serve with Candy-Filled Black Cat Cookies?
As Halloween approaches, imagine the joy of pairing these playful cookies with delightful accompaniments that heighten the festive spirit.
-
Crisp Apple Slices: The tartness of fresh apples provides a refreshing contrast, balancing the sweetness of the cookies perfectly.
-
Pumpkin Spice Hot Chocolate: Embrace the season with a creamy, spiced drink that complements the rich chocolate flavors of your cookies wonderfully.
-
Ghostly Meringues: These delicate, airy treats add a whimsical element to your dessert table and provide a light counterpoint to the chewy cookies.
-
Witch’s Brew Punch: Create a colorful, spooky punch that captivates both kids and adults, tying in the fun and festive atmosphere of Halloween.
-
Savory Cheese Board: Include salty cheeses and crunchy crackers to provide a savory contrast to the sweet cookies, turning your snack spread into a balanced feast.
-
Decorated Sugar Cookies: The soft, buttery texture of these cookies, adorned in festive shapes, creates an eye-catching dessert table alongside your candy-filled creations.
-
Caramel Dipping Sauce: For an extra indulgent experience, serve a warm caramel sauce for dipping, enhancing the flavors with a luscious, gooey sweetness.
Indulge in these ideas to create a complete Halloween experience that showcases the fun of your Candy-Filled Black Cat Cookies!
Make Ahead Options
These Candy-Filled Black Cat Cookies are a fantastic option for meal prep aficionados! You can prepare the cookie dough up to 24 hours in advance by following the first three steps, then chilling it in the refrigerator. When you’re ready to bake, simply roll out the dough and cut your shapes as directed. Additionally, you can assemble the cookies up to 3 days ahead by storing the filled cookies in an airtight container to keep them fresh. If you’re concerned about quality, it’s best to decorate the cookies close to serving time to prevent any melting or damage to the icing. With these make-ahead strategies, you’ll save time and effort, allowing you to enjoy the spooky fun!
How to Store and Freeze Candy-Filled Black Cat Cookies
Room Temperature: Store cookies in an airtight container at room temperature for up to 4 days to maintain their delightful softness and flavor.
Fridge: If you want to extend their freshness, place cookies in an airtight container in the fridge for up to 1 week; just allow them to come to room temperature before serving.
Freezer: For longer storage, freeze cookies in a single layer, then transfer to a zip-lock bag for up to 2 months. Thaw them at room temperature before enjoying your Candy-Filled Black Cat Cookies.
Reheating: If desired, gently warm in the microwave for 10-15 seconds or in an oven at 300°F (150°C) for a few minutes to refresh their chewy texture.
Candy-Filled Black Cat Cookies Variations
Embrace your creativity with these sweet ideas to make your Candy-Filled Black Cat Cookies even more delightful and unique!
-
Dairy-Free: Swap butter with coconut oil and choose non-dairy chocolate candies for a tasty alternative.
Try it for a different texture and flavor that appeals to those avoiding dairy while still enjoying the fun! -
Gluten-Free: Use almond flour or a 1:1 gluten-free baking blend instead of all-purpose flour.
Your cookies will still be soft and chewy but friendly for those with gluten sensitivities! -
Colorful Fillings: Replace the classic candy with seasonal options like candy corn or Halloween-themed gummies.
This will not only brighten your cookies but also surprise your guests with fun, festive treats! -
Spicy Kick: Add a dash of cayenne pepper or cinnamon to the cookie dough for an unexpected heat.
It adds a delightful warmth that contrasts nicely with the sweet filling and will surprise your taste buds! -
Nutty Surprise: Include chopped nuts like almonds or pecans in the candy filling for added crunch.
This twist adds both texture and flavor, making each bite an exciting experience for nut lovers! -
Creative Shapes: Try using different cookie cutters for various holidays – hearts for Valentine’s Day, or stars for Christmas.
Being versatile not only keeps your baking fun but allows you to celebrate different occasions with unique designs! -
Frosting Decor: Instead of decorations, pipe royal icing patterns over the cookies for an elegant touch.
This simple finish elevates your cookies, making them perfect for a fancy gathering or special event!
For more delicious ideas, don’t miss out on the whimsical Kitchen Sink Cookies or the classic Velvet Crinkle Cookie that are sure to please the crowd at any gathering!
Candy-Filled Black Cat Cookies Recipe FAQs
How do I select the best ingredients for my Candy-Filled Black Cat Cookies?
When choosing your ingredients, make sure your butter is slightly softened but not melted for optimal dough texture. For the best flavor, use high-quality cocoa powder and fresh eggs. If you’re opting for candy fillings, colorful options like Reese’s Pieces or M&M’s not only add sweetness but also enhance the visual appeal of your cookies!
What is the best way to store Candy-Filled Black Cat Cookies, and how long will they last?
Store your Candy-Filled Black Cat Cookies in an airtight container at room temperature for up to 4 days. If you want to keep them fresh longer, you can place them in the refrigerator, where they’ll last for about a week. Just remember to allow them to come to room temperature before serving for the best flavor and texture!
Can I freeze Candy-Filled Black Cat Cookies?
Absolutely! To freeze your cookies, allow them to cool completely and then place them in a single layer on a baking tray. Once frozen, transfer them to a zip-lock bag or airtight container. They’ll stay fresh for up to 2 months. When you’re ready to enjoy them, simply thaw at room temperature, and if you’d like, warm them in the microwave for a few seconds to restore their softness.
What should I do if my cookie dough is too sticky?
If your dough feels sticky, try chilling it for an additional 20-30 minutes. This should help firm it up, making it easier to roll out. You can also dust your work surface with a bit of flour while rolling the dough to prevent sticking. Just be cautious not to add too much flour, as it can affect the cookie’s texture!
Are there any dietary considerations I should keep in mind with these cookies?
Yes! If you’re making these cookies for someone with dietary restrictions, you can substitute the all-purpose flour with almond or coconut flour for a gluten-free option. Additionally, be mindful of the candies you choose, as some may contain allergens like nuts or dairy. Always check labels to ensure safety, especially for guests with known allergies.

Candy-Filled Black Cat Cookies: A Spooky Sweet Surprise
Ingredients
Equipment
Method
- In a large mixing bowl, cream together softened butter and granulated sugar until light and fluffy, about 3-4 minutes.
- Crack in one egg and pour in the vanilla extract, mixing thoroughly until combined and smooth.
- In a separate bowl, whisk together cocoa powder, baking powder, salt, and all-purpose flour until well combined.
- Gradually add this dry mixture to the wet ingredients, stirring carefully until just incorporated.
- Flatten the dough into a disc shape and wrap tightly in plastic wrap; refrigerate for at least 1 hour.
- Preheat your oven to 350°F (175°C) and roll out the chilled dough to about ⅛ inch thick.
- Use a cookie cutter to cut out 22 circles for bases and 44 small triangles for ears.
- Bake the round cookie bases for 10-12 minutes and allow them to cool completely.
- Roll out remaining dough to 1/16th inch thickness and cut out 22 larger circles for domed cookies.
- Freeze the domes for about 15 minutes and then bake for 7-9 minutes.
- After cooling, fill the domed cookies with candy and use melted candy melts to attach flat cookie tops.
- Decorate with candy eyes, heart sprinkles, and create whiskers with licorice or icing.
- Store cookies in an airtight container at room temperature for up to 4 days.
Leave a Reply