
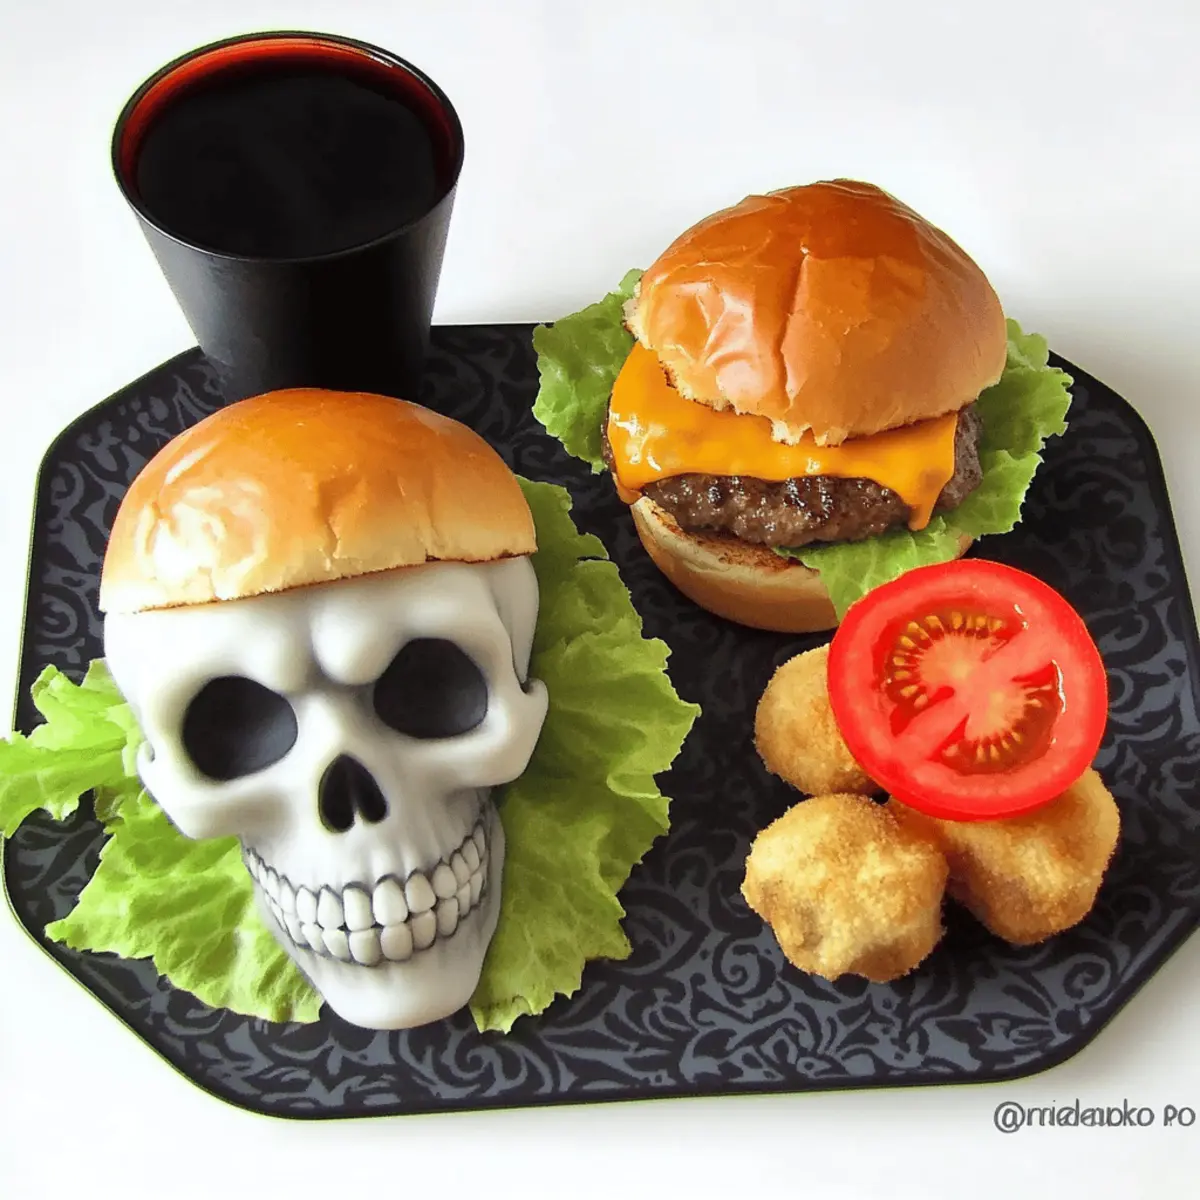
As the leaves start to crunch underfoot and the air grows crisp, I find myself daydreaming of Halloween feasts that blend whimsy and flavor. This year, I’m all about delighting my guests with my Halloween Cheeseburger Skulls, a playful twist that can transform any gathering into a festive work of art. These charming burgers, nestled within homemade skull-shaped buns, not only serve as a spooky centerpiece but are also completely customizable with toppings that excite your taste buds. The best part? They come together quickly and are sure to impress even the pickiest eaters at your table. Who could resist a meal that’s both delicious and fun? So, are you ready to take your Halloween cooking to the next level? Let’s dive in!
Why Are Cheeseburger Skulls a Must-Try?
Festive and Fun: These cheeseburger skulls are the perfect way to liven up your Halloween festivities! Customize Your Flavor: Tailor them with your favorite toppings for a personal touch that excites every palate. Simple Steps: With straightforward instructions, even novice cooks can impress their guests in no time. Visual Appeal: The skull-shaped buns add a spooky twist that is sure to turn heads at your gathering. Crowd Favorite: Perfect for both kids and adults, these burgers bring everyone together for a memorable meal. Ready to create some Halloween magic in your kitchen? Don’t forget to check out our tips for spooky-themed sides to complete your feast!
Cheeseburger Skulls Ingredients
For the Skull-Shaped Buns
– All-Purpose Flour – Provides structure to the buns; consider using bread flour for a chewier texture.
– Instant Yeast – Causes the dough to rise quickly; active dry yeast can also work, just increase water temperature slightly.
– Granulated Sugar – Enhances browning and sweetness; honey or agave syrup can substitute, adjusting liquid ingredients accordingly.
– Salt – Elevates flavor; sea salt or kosher salt offers a different taste profile.
– Butter (salted) – Adds richness and flavor; you can replace it with vegetable oil, but texture may differ.
– Egg – Provides moisture and helps bind the dough; for an egg-free option, use a flax egg or 1 tablespoon unsweetened applesauce.
For the Cheeseburgers
– Ground Beef (80/20) – The main protein providing juiciness; opt for turkey or plant-based substitutes for a lighter option.
– Cheese (slices, e.g., American) – Melts beautifully on the burger for extra creaminess; vegan cheese is a great dairy-free alternative.
For the Toppings
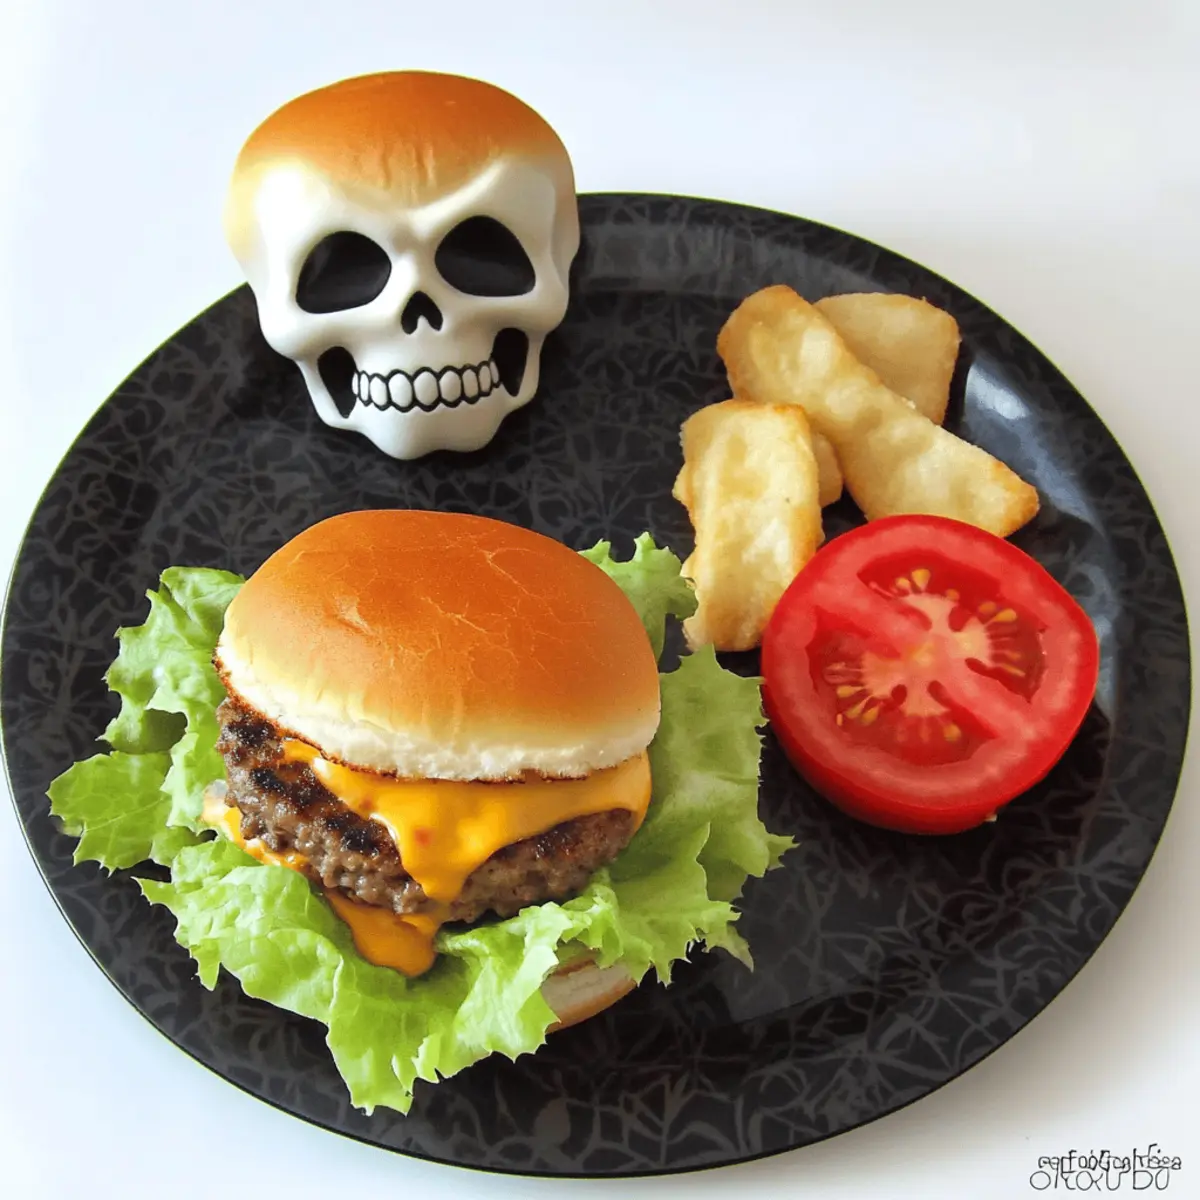
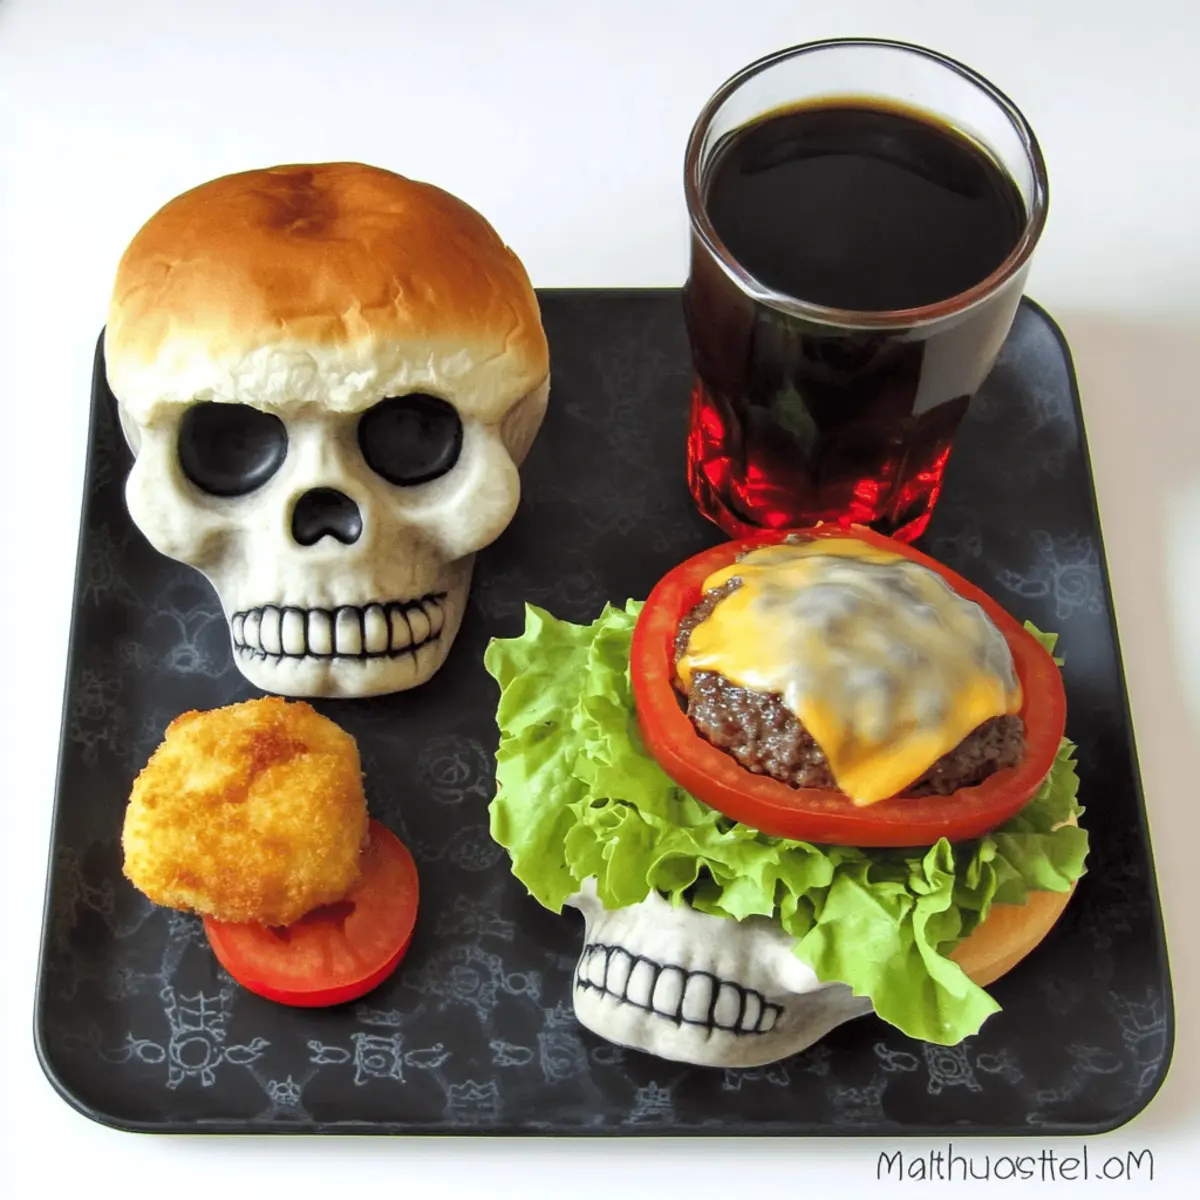
– Burger Toppings (e.g., lettuce, tomato) – Adds freshness and crunch; personalize with your favorite toppings or keep it simple for classic enjoyment.
Get ready to impress with these delightful cheeseburger skulls at your Halloween gathering!
Step‑by‑Step Instructions for Cheeseburger Skulls
Step 1: Dough Preparation
In a large mixing bowl, combine the all-purpose flour, instant yeast, granulated sugar, and salt. Next, mix in the softened butter, the egg, and about one cup of lukewarm water (100-110°F). Stir until the ingredients are well combined and form a shaggy dough, ensuring everything is incorporated before moving on.
Step 2: Mix and Knead
Transfer the shaggy dough to a lightly floured surface. Knead the dough for about 5-7 minutes until it becomes smooth and elastic. You should see a soft, cohesive ball that springs back when gently pressed. This step is crucial for developing gluten, giving your cheeseburger skulls a delightful texture.
Step 3: First Rise
Place the kneaded dough back into a greased bowl and cover it with a clean kitchen towel or plastic wrap. Let the dough rise in a warm area for 1 to 2 hours or until it has doubled in size. After this time, the dough should feel puffy and look airy, boasting visible bubbles on the surface.
Step 4: Shape Buns
Once the dough has risen, punch it down gently to release any air. Divide the dough into eight pieces, each weighing about 95 grams. Working with one piece at a time, shape it into a smooth ball and place it into a greased skull mold, pressing it gently to fill the shape completely.
Step 5: Second Rise
Cover the filled skull molds with a kitchen towel and allow the shaped buns to rise for another hour. This step enables the dough to puff up again, ensuring your cheeseburger skulls will have that perfect fluffy bite after baking.
Step 6: Preheat and Bake
Preheat your oven to 375°F (190°C). Once heated, bake the skull-shaped buns for about 14-18 minutes. Rotate the molds halfway through to achieve even baking. Look for a golden-brown finish; the buns should be lightly browned on top and sound hollow when tapped.
Step 7: Prepare Burgers
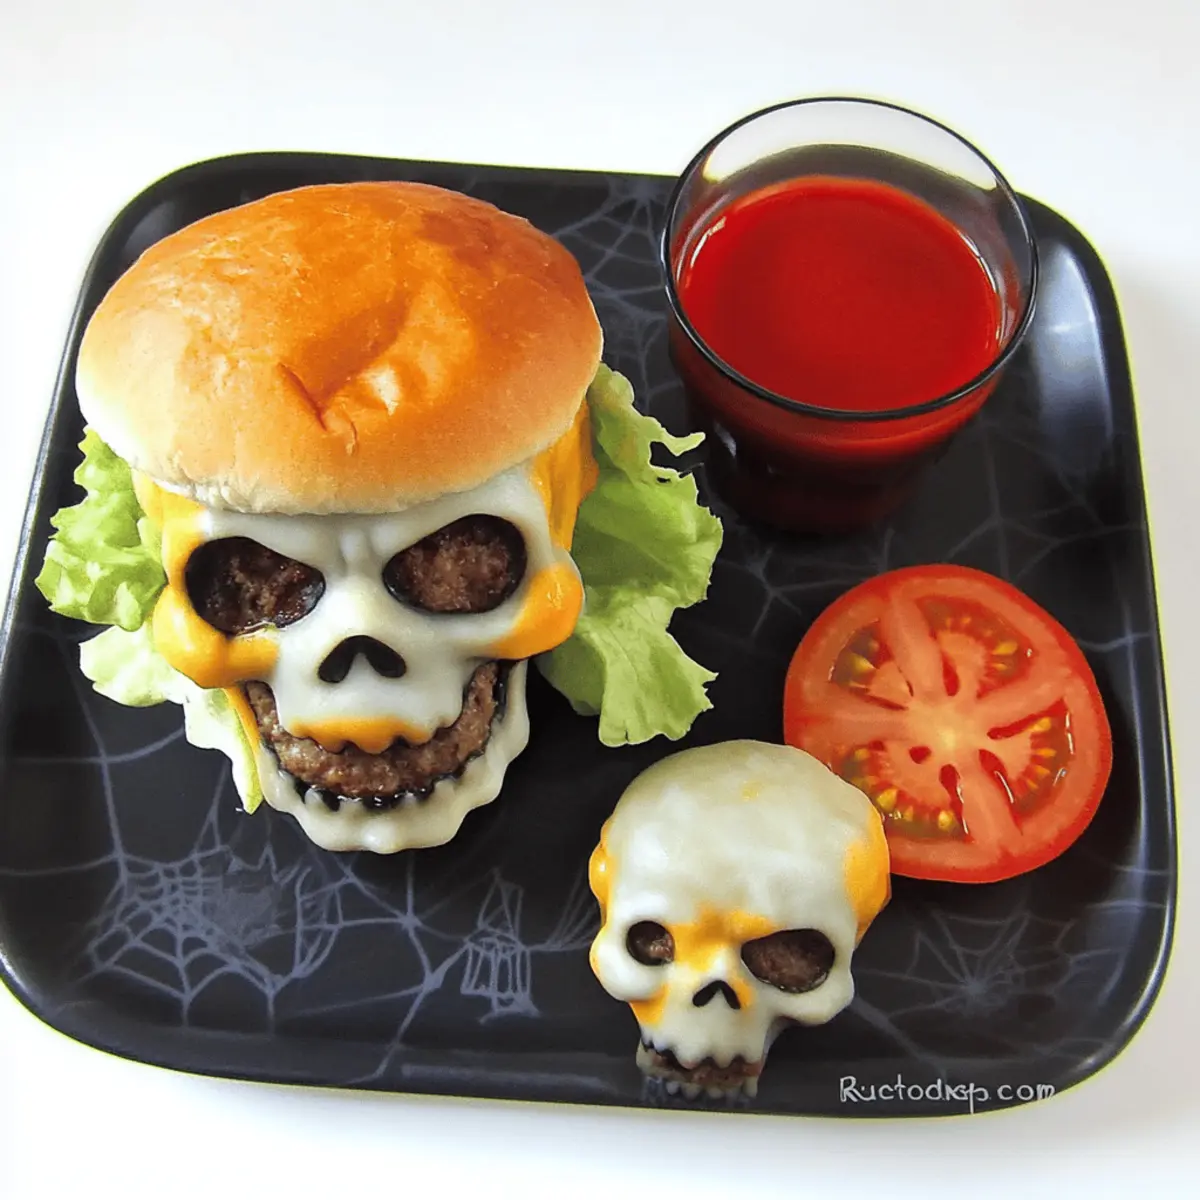
While the buns are baking, shape the ground beef into skull patties that are slightly larger than the buns, as they will shrink during cooking. Heat a skillet over medium-high heat and cook the patties for about 3 minutes on each side, or until they reach your desired doneness and are nicely browned.
Step 8: Melt Cheese
After flipping the patties, add a slice of cheese on top of each. Cover the skillet briefly with a lid to melt the cheese, which should take about a minute. You’ll know it’s ready when the cheese is bubbly and gooey, creating a deliciously creamy layer over your burgers.
Step 9: Assemble and Serve
Now it’s time to bring everything together! Remove the cheeseburger skulls from the molds and place each one on a plate. Gently sandwich the cooked skull patties within the skull-shaped buns and pile on your favorite toppings, like fresh lettuce and tomatoes, for an extra pop of flavor.
What to Serve with Cheeseburger Skulls
Elevate your Halloween gathering with delightful sides and drinks that harmonize perfectly with your playful cheeseburger skulls.
-
Crispy Sweet Potato Fries: The natural sweetness and crispy texture provide a delightful contrast to the savory burgers, making every bite a treat. Marinate them with a hint of cinnamon for an enticing twist!
-
Spooky Witches’ Fingers: Create an eye-catching platter of carrot sticks with almond slices for “fingernails”—a fun and healthy accompaniment that adds crunch and festivity to your meal.
-
Ghostly Macaroni Salad: This creamy side, dotted with black olives for “eyes,” brings a fun, spooky vibe while balancing the richness of the cheeseburger skulls.
-
Pumpkin Soup Shooters: Serve up small cups of warm, spiced pumpkin soup to stir warmth during your Halloween feast. The flavors complement the meaty richness while adding an elegant touch.
-
Cauldron of Blood Red Salsa: A vibrant salsa made with ripe tomatoes, red bell peppers, and a hint of heat offers a zesty, flavorful dip for your witches’ fingers and is perfect for a festive touch.
-
Crisp Green Salad: A refreshing mix of greens topped with crunchy cucumbers and vibrant cherry tomatoes to cut through the richness of the cheeseburgers—perfect for a balanced bite!
-
Hauntingly Good Apple Cider: Warmed with spices and served in whimsical cups, this seasonal drink adds a cozy element to your meal and pairs beautifully with the savory flavors of your cheeseburger skulls.
-
Chocolate Lava Cakes: End the scary feast on a sweet note with these rich, gooey chocolate cakes that melt in your mouth—just the right amount of indulgence to delight your guests.
These pairings ensure that your Halloween feast is not only delicious but also an unforgettable experience for everyone around the table!
Cheeseburger Skulls Variations & Substitutions
Feel free to get creative with these cheeseburger skulls, adding your personal touch to elevate your Halloween feast!
-
Dairy-Free: Substitute the cheese slices with a delicious vegan cheese that melts well for a creamy, dairy-free option.
You won’t miss the cheese, as the plant-based varieties can be just as flavorful! Try adding a sprinkle of nutritional yeast for an extra cheesy taste. -
Gluten-Free: Use a gluten-free flour blend in place of all-purpose flour for the buns.
Just make sure to add a bit of xanthan gum to help bind the dough together. Your gluten-free guests will appreciate the festive inclusion! -
Spicy Kick: Add diced jalapeños or a drizzle of hot sauce to the ground beef mixture for a fiery twist.
This variation will bring a surprising heat to your cheeseburger skulls, perfect for those who enjoy a good kick! -
Herbed Buns: Mix fresh herbs like rosemary or thyme into the dough for an aromatic twist.
These fragrant herbs will not only enhance the flavor but also brighten the overall taste of the buns. -
Plant-Based: Swap the ground beef for a plant-based burger (like Beyond Meat or black bean patties).
This option is perfect for vegetarians and is deliciously satisfying, ensuring no one misses out on this festive dish. -
Loaded Style: Top your burger with layers of caramelized onions and sautéed mushrooms before closing the bun.
This add-on creates a rich depth of flavor that will impress everyone at your gathering. Try pairing it with a sprinkle of blue cheese or feta for a gourmet touch! -
Topping Upgrade: Instead of traditional lettuce and tomato, add pickled jalapeños and avocado slices for a unique flavor combo.
These toppings bring freshness and richness, making each bite exciting and delicious.
Enhance the joy of your Halloween cooking by trying these variations, and be sure to complement your cheeseburger skulls with some spooky-themed sides for the ultimate festive experience!
Expert Tips for Cheeseburger Skulls
- Perfect Dough Temperature: Ensure your water is lukewarm (100-110°F) for the best yeast activation, which is vital for fluffy buns.
- Kneading Matters: Knead the dough until smooth and elastic, about 5-7 minutes, to develop gluten and ensure your cheeseburger skulls have a great texture.
- Proper Patty Size: Shape patties slightly larger than the buns since they’ll shrink during cooking—this ensures a good burger-to-bun ratio for every bite.
- Even Baking: Rotate the skull molds halfway through baking to achieve even browning and a consistent texture on all sides of your cheeseburger skulls.
- Keep it Fresh: For the juiciest burgers, cook them to rare (120°F) first and store properly if reheating later; this maintains moisture and flavor.
Storage Tips for Cheeseburger Skulls
Room Temperature: Keep the cheeseburger skulls at room temperature for up to 2 hours after serving. Cover the assembled burgers with a clean kitchen towel to maintain moisture.
Fridge: Store leftover cheeseburger skulls in an airtight container in the fridge for up to 3 days. This will help preserve the flavors and textures of the buns and fillings.
Freezer: For longer storage, freeze the assembled cheeseburger skulls wrapped tightly in plastic wrap or placed in a freezer-safe bag for up to 2 months. This is perfect for advance meal prep.
Reheating: To enjoy your frozen cheeseburger skulls, thaw in the fridge overnight and reheat in the oven at 350°F (175°C) for about 10-15 minutes, or until warmed through. This method helps keep the buns fluffy and the burgers juicy!
Make Ahead Options
These Halloween Cheeseburger Skulls are perfect for busy cooks looking to save time! You can prepare the skull-shaped buns up to 3 days in advance, storing them in an airtight container or freeze them for up to 2 months to maintain their freshness. The patties can be shaped and stored in the refrigerator for 24 hours before cooking, helping streamline your prep. When it’s time to enjoy, simply cook the patties in a hot skillet until they’re brown and add the cheese to melt, then assemble everything in the pre-baked buns. This way, you can create a festive meal with minimal effort on the day of your Halloween celebration!
Cheeseburger Skulls Recipe FAQs
How do I choose ripe ingredients for my cheeseburger skulls?
Absolutely! When selecting your ingredients, look for all-purpose flour that’s fresh and free of lumps. For ground beef, go for meat with a bright red color and minimal dark spots, which indicates freshness. If you’re adding veggies like lettuce and tomatoes, pick ones with vibrant colors and firm textures for that crunchy bite!
How should I store leftover cheeseburger skulls?
Very easily! After serving, leftover cheeseburger skulls can be stored at room temperature for up to 2 hours. For longer storage, place them in an airtight container in the fridge, where they will last for about 3 days while maintaining their flavors. If you’d like to save them for a later date, wrap them tightly and freeze for up to 2 months.
What are the freezing instructions for cheeseburger skulls?
For excellent results, wrap the assembled cheeseburger skulls tightly in plastic wrap or place them in a freezer-safe bag. When you’re ready to enjoy them again, thaw the burgers in the fridge overnight. Then, reheat them in the oven at 350°F (175°C) for about 10-15 minutes. This method helps keep the buns fluffy and the burgers juicy, just like the first time!
What if my dough doesn’t rise properly?
No worries! If your dough doesn’t rise, it could be due to inactive yeast. Ensure your water temperature is between 100-110°F for the yeast activation, and let the dough rise in a warm spot, away from drafts. If it still doesn’t rise, you might need to start over with fresh yeast. Kneading the dough for the right amount of time, about 5-7 minutes, will also help develop gluten for better results.
Can I make these cheeseburger skulls vegetarian or vegan?
The more the merrier! Absolutely, you can use plant-based grounds or grilled vegetables as a substitute for the ground beef. For a vegan option, replace the egg with a flax egg (1 tablespoon ground flaxseed mixed with 2.5 tablespoons water) and choose vegan cheese for a guilt-free treat that everyone can enjoy.
Are there any dietary considerations for pets or allergies?
Always consider your guests’ needs! If you have pets, ensure that no ingredients harmful to them (like onions and certain spices) are used in your preparation. For guests with allergies, clearly label and communicate the ingredients you’re using, especially concerning gluten and dairy. Making adaptations can create a delightful experience for everyone!
Cheeseburger Skulls: Spooky Goodness for Halloween Feasts
Ingredients
Equipment
Method
- In a large mixing bowl, combine the all-purpose flour, instant yeast, granulated sugar, and salt. Mix in the softened butter, egg, and about one cup of lukewarm water. Stir until well combined to form a shaggy dough.
- Transfer the shaggy dough to a lightly floured surface. Knead for about 5-7 minutes until smooth and elastic.
- Place the kneaded dough in a greased bowl, cover, and let rise in a warm area for 1 to 2 hours or until doubled.
- Punch down the risen dough, divide into eight pieces, shape into balls, and place them in a greased skull mold.
- Cover the filled molds and let the shaped buns rise for another hour.
- Preheat oven to 375°F (190°C). Bake the buns for about 14-18 minutes, rotating halfway through.
- While baking, shape the ground beef into skull patties and cook in a skillet until browned.
- Add cheese to patties and cover until melted.
- Remove buns from molds, assemble with patties and toppings, then serve.
Leave a Reply