
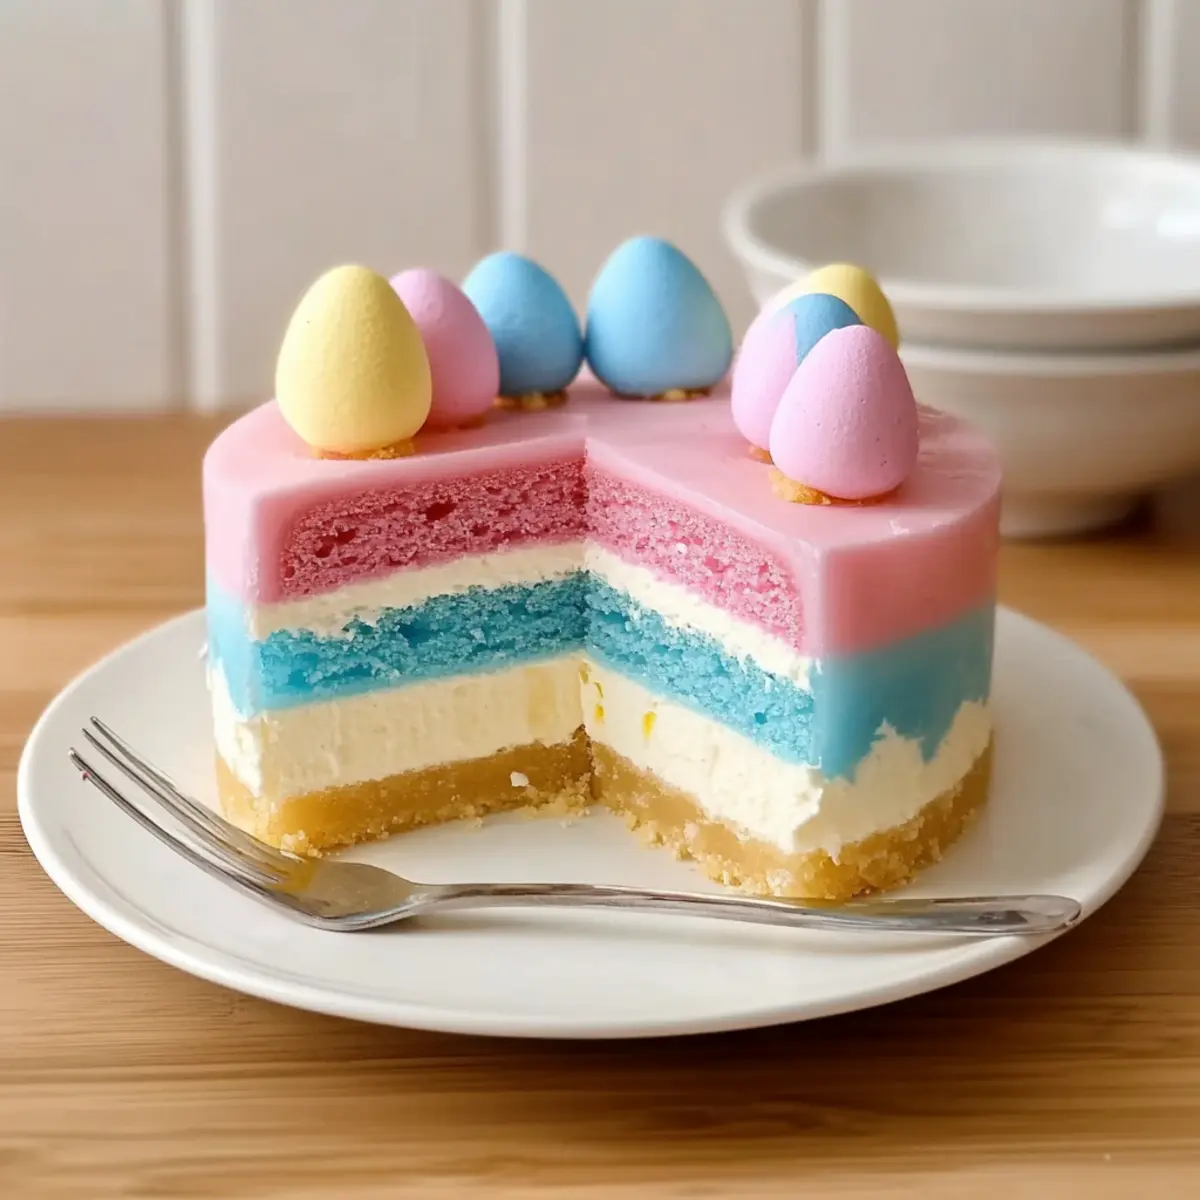
As the first blooms of spring emerge, so does the perfect time to brighten up our dessert table. This Easy No-Bake Easter JELLO Cheesecake transforms classic ingredients into a colorful masterpiece that’s as fun to make as it is to eat. With its fluffy layers and creamy cheesecake center balanced atop a crunchy graham crust, it’s the ultimate spring dessert. The best part? Its vibrant hues are not only a feast for the eyes but also a delightful treat that everyone, from kids to adults, will adore. Plus, this no-bake wonder can be prepared the night before, making it a stress-free way to celebrate Easter with family and friends. Are you ready to bring a splash of color to your holiday gathering?
Why is this cheesecake a must-try?
Bright, Colorful Layers: This Easter JELLO Cheesecake is a feast for the eyes, showcasing beautiful pastel colors that will instantly lift your spirits.
No-Bake Convenience: Perfect for busy hosts, it requires minimal effort and can be made ahead of time, letting you enjoy the festivities without stress.
Crowd-Pleasing Delight: With its creamy filling and crunchy crust, this cheesecake is a hit for all ages—make it for family gatherings or holiday parties!
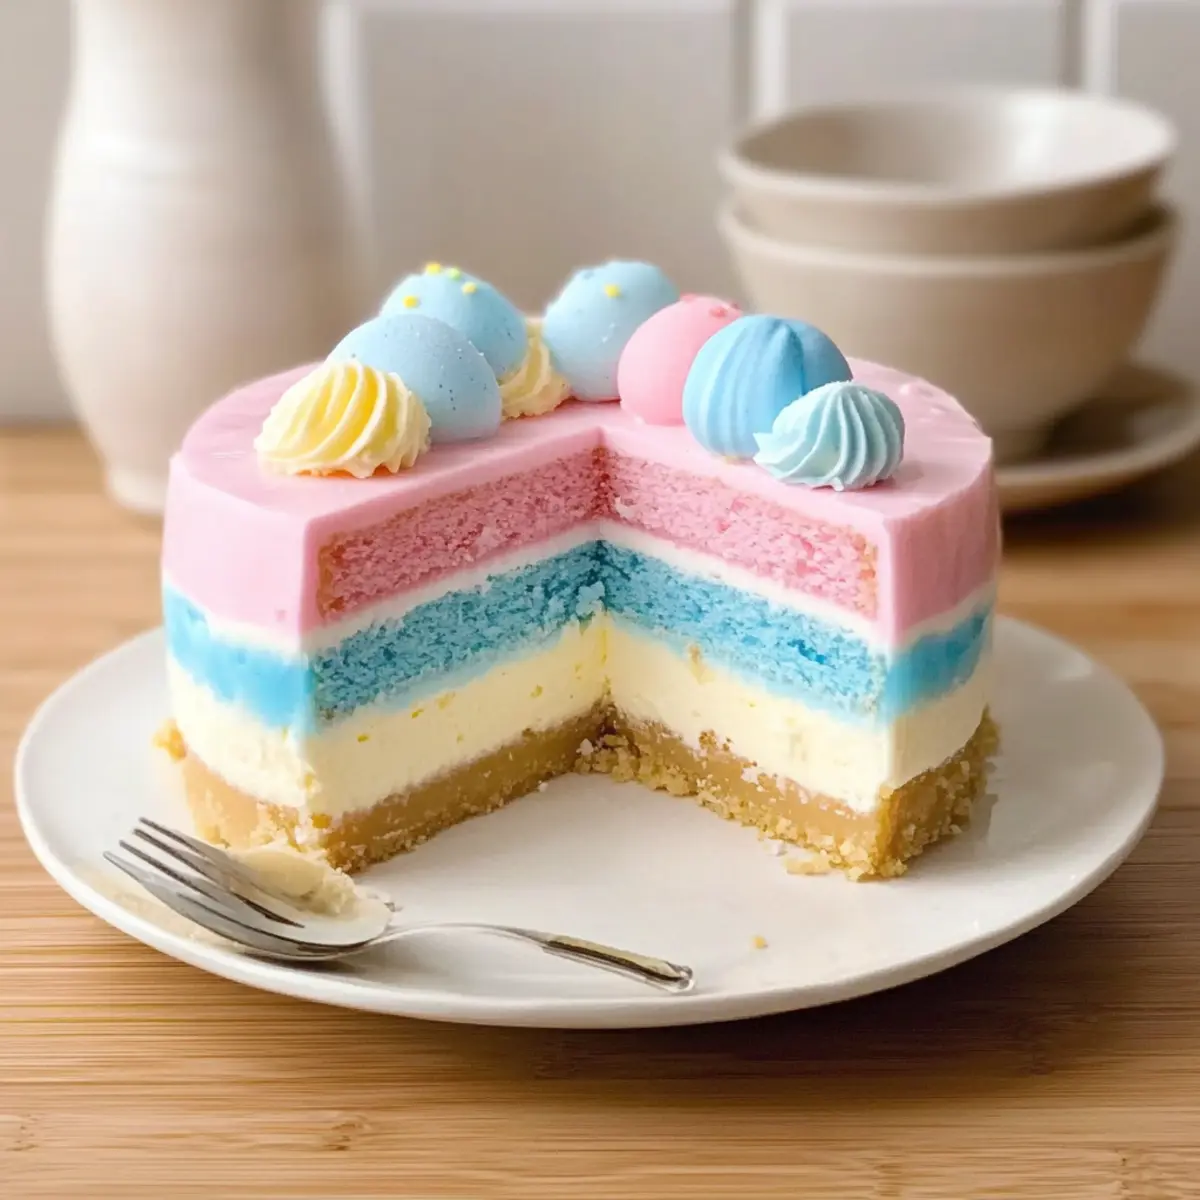
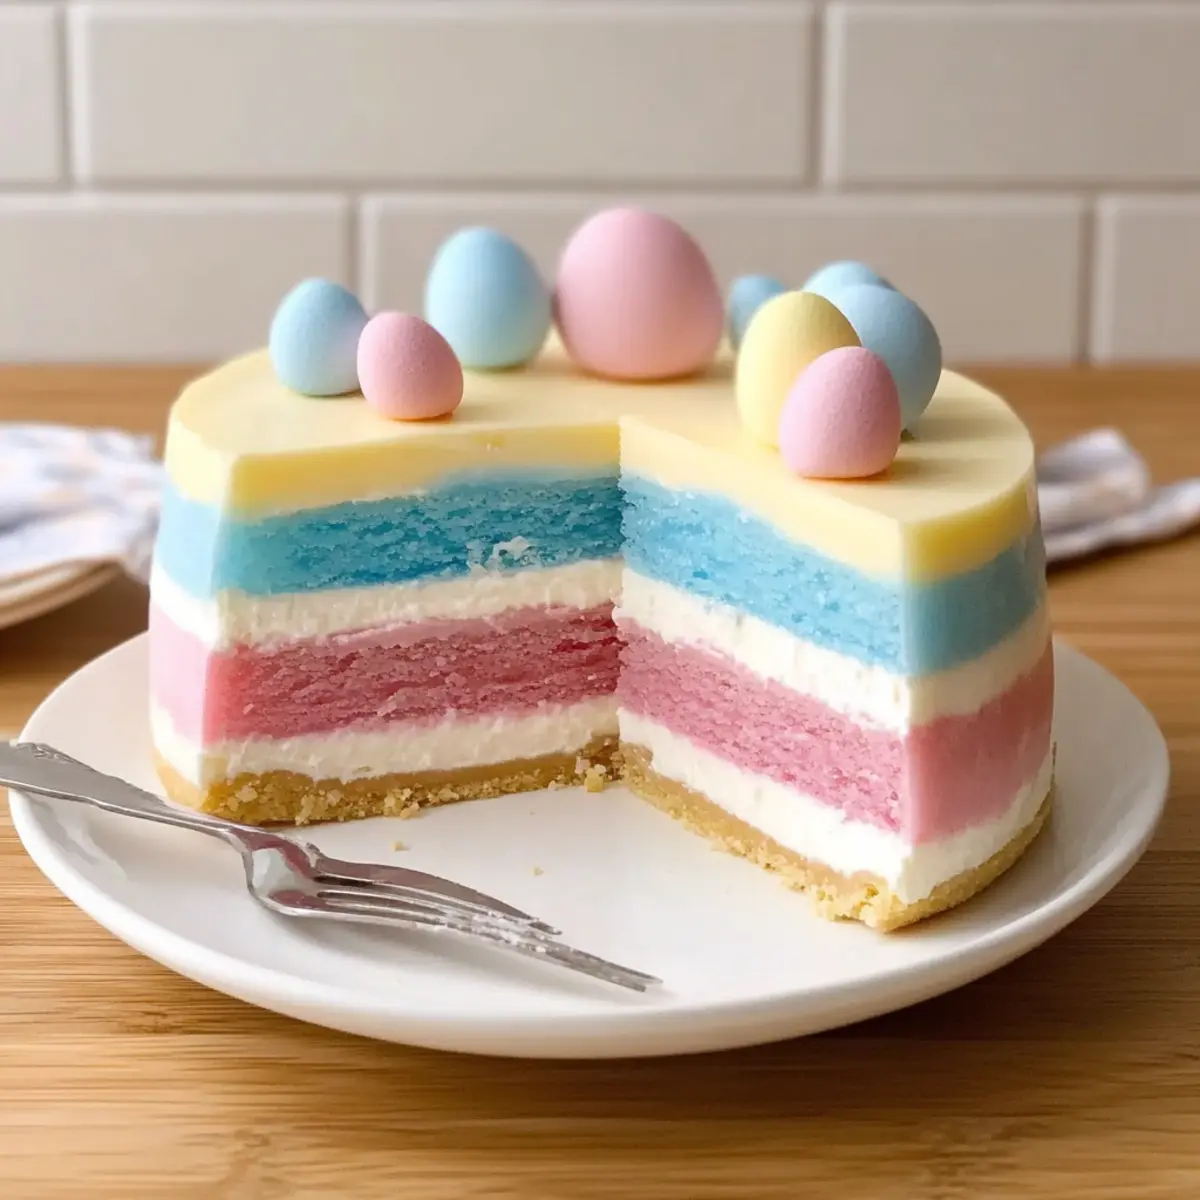
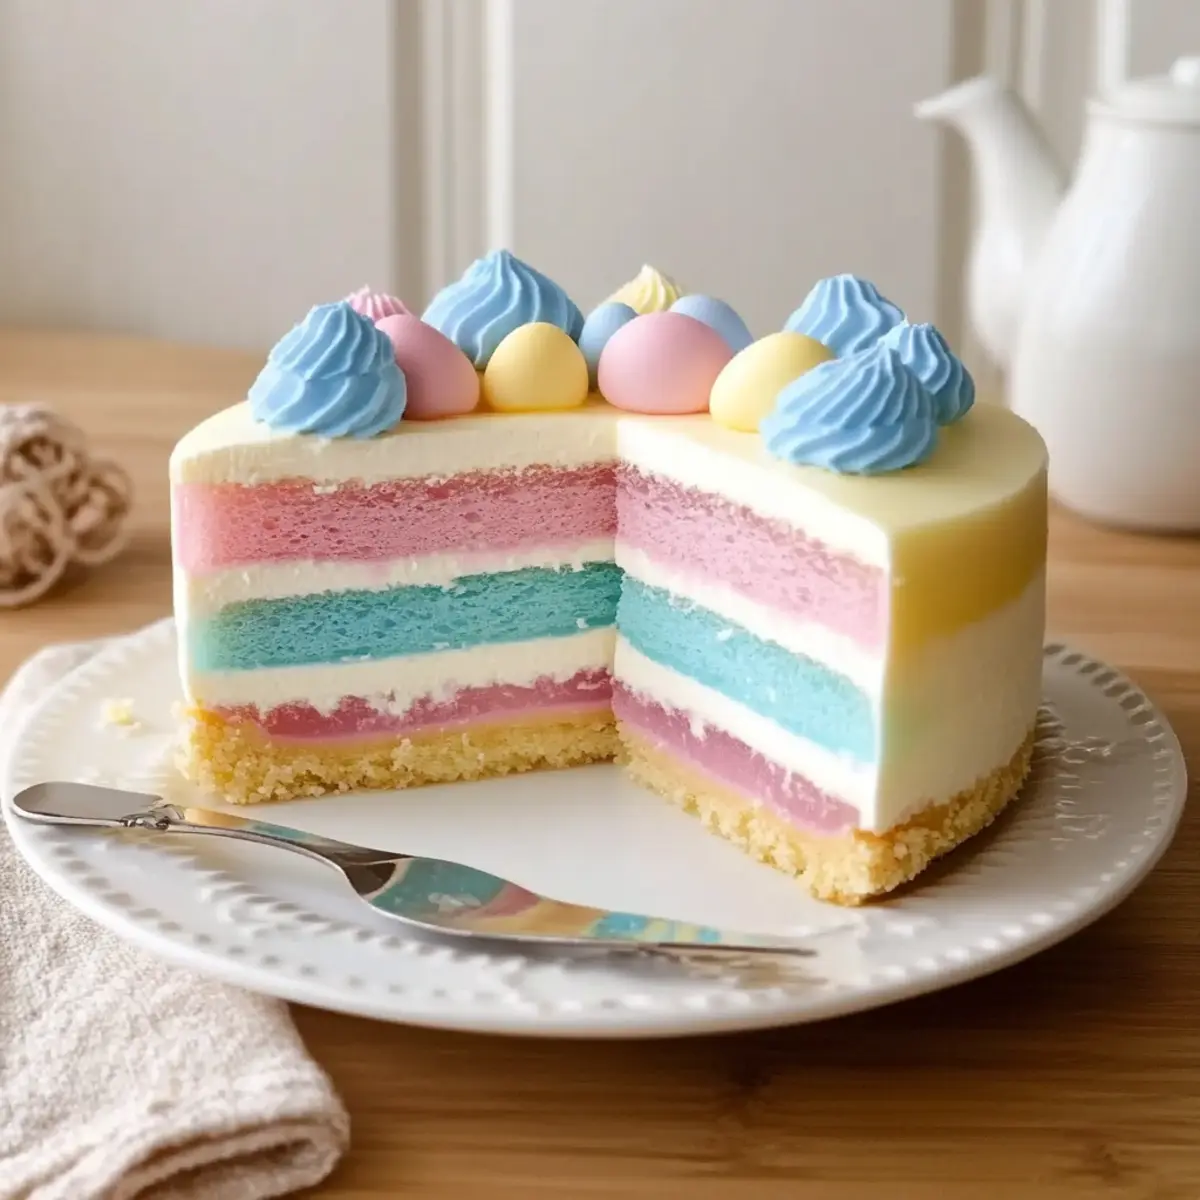
Variations for Fun: Get creative by mixing and matching Jell-O flavors. Consider adding a stunning lemon layer or festive decorations like Cadbury Pastel Mini Eggs to wow your guests.
Simple Yet Impressive: Despite looking like a showstopper, this recipe only takes a few easy steps, making it approachable for both novice and experienced bakers alike. Enjoy a taste of spring in every slice!
Easter JELLO Cheesecake Ingredients
• Dive into this no-bake treat!
For the Cheesecake Base
- Jell-O Classic No-Bake Cheesecake Mix – This creamy base layer sets the stage for your vibrant masterpiece.
- Ingredients per box (milk, butter, etc.) – Follow the package instructions for a rich and flavorful cheesecake.
- Cooking Spray – Prevents sticking and ensures easy release from the pan for that perfect slice.
For the Colorful Layers
- Blue Jell-O Powder – Creates the first colorful layer; substitute with light green or lemon for a different look.
- Strawberry or Cherry Jell-O Powder – Deliciously forms the second layer; feel free to mix with other fruit-flavored options for variety.
- Cool Whip (3 tubs) – This light, fluffy ingredient helps achieve that airy texture; whipped cream is a lovely alternative too.
- Boiling Water (⅓ cup for blue Jell-O, ½ cup for red Jell-O) – Dissolves the Jell-O powder for those vibrant colors.
- Ice Cold Water (½ cup for each Jell-O layer) – Essential for setting those colorful layers; room temperature water won’t work here!
For the Finishing Touch
- Cadbury Pastel Mini Eggs (optional) – Adds a delightful decorative touch perfect for Easter; other seasonal candies can work just as well!
Bring joy to your table with this striking Easter JELLO Cheesecake—your family and friends will love every colorful layer!
Step‑by‑Step Instructions for Easter JELLO Cheesecake
Step 1: Prepare the Pan and Crust
Start by greasing a 9-inch springform pan with cooking spray to ensure the cheesecake releases easily. Follow the package instructions for the graham cracker crust, mixing the ingredients until crumbly. Press the mixture evenly into the bottom of the prepared pan, creating a solid base for your Easter JELLO Cheesecake. Place it in the refrigerator to set while you prepare the filling.
Step 2: Mix the Cheesecake Filling
In a medium-sized mixing bowl, prepare the no-bake cheesecake filling according to the package instructions, which usually requires beating the mixture with milk and melted butter. Whip until it is creamy and smooth, ensuring no lumps remain. Once blended, pour the cheesecake filling over the chilled crust and smooth the top with a spatula. Refrigerate for about 30 minutes, allowing it to firm up.
Step 3: Create the Blue Layer
For the first colorful layer, boil ⅓ cup of water and dissolve the blue Jell-O powder in it, stirring until fully melted. Next, add ½ cup of ice cold water to the mixture to help it set quickly. Allow it to cool briefly before folding in one tub of Cool Whip until no streaks remain. Chill this mixture in the fridge for around 30 minutes until slightly thickened.
Step 4: Assemble the Blue Layer
Once the blue Jell-O mixture has cooled and thickened, gently spread it over the set cheesecake base, using a spatula for an even layer. Be careful to not disturb the cheesecake underneath. Return the springform pan to the refrigerator and let it chill for a minimum of 2 hours. This will ensure the blue layer is fully set and ready for the next layer.
Step 5: Prepare the Pink Layer
Repeat the process for the pink Jell-O layer. Boil ½ cup of water, then mix in the strawberry or cherry Jell-O powder, stirring until dissolved. Afterward, add ½ cup of ice cold water and let the mixture cool. Fold in another tub of Cool Whip until combined, making sure it remains light and fluffy. Chill briefly if necessary to allow it to thicken slightly.
Step 6: Layer the Pink Mixture
Spread the pink Jell-O mixture carefully over the set blue layer, smoothing it out gently without breaking through. This contrast will enhance the beautiful look of your Easter JELLO Cheesecake. After layering, return the cheesecake to the fridge, allowing it to set for at least 4 hours, or ideally, overnight to achieve the best texture and flavor.
Step 7: Final Touches Before Serving
Once the cheesecake has thoroughly chilled and set, remove it from the springform pan. Top the entire cheesecake with the last tub of Cool Whip, spreading it evenly over the top and sides. For an extra festive touch, consider decorating with Cadbury Pastel Mini Eggs or any seasonal candies. Finally, slice and serve this delightful Easter JELLO Cheesecake to your eager guests!
What to Serve with Easy No-Bake Easter JELLO Cheesecake
As you prepare to dazzle your guests with this colorful treat, it’s time to consider delightful accompaniments that will enhance your festive spread.
-
Fresh Fruit Salad: Bright, juicy fruits like strawberries, blueberries, and kiwi provide a refreshing contrast to the creamy cheesecake, adding vibrancy to your table.
-
Mint-Lemonade: This zesty drink complements the sweetness of the cheesecake with its refreshing minty notes, perfect for spring celebrations.
-
Vanilla Ice Cream: A scoop of smooth vanilla ice cream adds a rich creaminess that pairs beautifully with the cheesecake’s airy texture, making every bite a symphony of flavors.
-
Honey-Glazed Carrots: These sweet-savory vegetables add a delightful crunch and earthy flavor, balancing the sweetness of the dessert while keeping the meal light.
-
Chocolate-Covered Strawberries: A fun and indulgent treat that echoes the playful spirit of your cheesecake while providing a fresh, fruity bite.
-
Lemon Sorbet: For a palate cleanser, serve tangy lemon sorbet that refreshes the senses and adds a vibrant pop of color, mirroring the slices of cheesecake.
Enjoy creating a complete Easter spread that beautifully complements your Easy No-Bake Easter JELLO Cheesecake, making for an unforgettable celebration!
Make Ahead Options
These vibrant Easter JELLO Cheesecake layers are perfect for meal prep, allowing you to alleviate holiday stress! You can prepare the entire cheesecake up to 24 hours in advance. Start by making the cheesecake and crust, then refrigerate them to set. Each colorful Jell-O layer can be mixed and added just before serving to maintain texture and appearance. For optimal flavor, chill the cheesecake overnight, ensuring it’s covered to prevent any absorption of other odors in the fridge. When ready to serve, simply top it with Cool Whip and your favorite decorative candies, and you’ll have a stunning dessert ready to impress, with minimal last-minute effort!
Expert Tips for Easter JELLO Cheesecake
-
Cool Layers First: Ensure each Jell-O layer has cooled before mixing with Cool Whip; this helps the colors stay vibrant and distinct.
-
Chill Between Layers: Refrigerate each layer after pouring to maintain separation and prevent colors from bleeding into one another.
-
Cut with Care: For clean slices, dip your knife in hot water before cutting, then wipe it dry between slices for a neat presentation.
-
Store Properly: Keep leftovers covered in the refrigerator for up to three days. Freezing may help firm up the layers but should be done carefully for best texture.
-
Ingredient Alternatives: If you can’t find Cool Whip, freshly whipped cream can be used for a deliciously light, homemade twist in your Easter JELLO Cheesecake.
Easter JELLO Cheesecake Variations
Feel free to let your creativity shine as you put your own twist on this delightful cheesecake!
-
Flavorful Jell-O Swaps: Experiment with various Jell-O flavors like orange or raspberry for a unique taste and vibrant color palette.
-
Dairy-Free Delight: Use coconut cream instead of Cool Whip for a luscious dairy-free cheesecake that retains its creamy texture.
-
Graham Cracker Alternative: Swap the graham crackers for crushed vanilla wafers or even gluten-free cookies for a different crunch.
-
Fresh Fruit Toppings: Elevate your cheesecake by adding fresh fruits like berries or kiwi on top for a refreshing and natural sweetness.
-
Colorful Layer Twist: Use more layers! Alternate the Jell-O flavors to create a rainbow effect that will wow your guests at any spring gathering.
-
Nutty Crunch: Add finely chopped nuts to the crust for an extra crunchy texture that complements the softness of the cheesecake layers.
-
Decadent Chocolaty Layer: For a chocolatey twist, mix in cocoa powder or use a chocolate cheesecake pudding mix as one of your layers.
-
Mini Cheesecake Bites: Turn this recipe into mini cheesecakes by using a muffin tin; perfect for individual servings at parties or holidays!
As you explore these variations, why not get inspired by our delectable Mini Oreo Cheesecakes or consider making a rich Chocolate Cheesecake Decadent for a contrasting dessert option? Let your imagination guide you, and enjoy the delicious results!
How to Store and Freeze Easter JELLO Cheesecake
Fridge: Store your Easter JELLO Cheesecake covered with plastic wrap or in an airtight container for up to 3 days to maintain its freshness.
Freezer: If you want to save it for later, you can freeze the cheesecake for up to 2 months. Slice it first for easy serving later, then wrap each piece tightly in plastic wrap before placing it in a freezer-safe container.
Thawing: To enjoy frozen slices, transfer them to the fridge for several hours or overnight to gently thaw. Avoid microwaving to prevent altering the texture of the delicate layers.
Reheating: This cheesecake is best served chilled, so there’s no need to reheat. Just slice and enjoy the creamy, colorful layers!
Easter JELLO Cheesecake Recipe FAQs
How do I select the right Jell-O flavors for this cheesecake?
Absolutely! Choose flavors that complement each other; for example, pairing blue raspberry with strawberry creates a charming look and delicious taste. You can also experiment with lemon Jell-O for a sunny layer or go bold with grape for a playful twist. Look for vibrant colors that will brighten your plate!
How should I store my Easter JELLO Cheesecake after it’s made?
Very importantly, store your cheesecake covered with plastic wrap or in an airtight container in the refrigerator for up to 3 days. If you want to save it longer, you can freeze it for up to 2 months. Just make sure to slice it first for easy serving later!
Can I freeze the Easter JELLO Cheesecake?
Yes, you can! To freeze, wrap each slice tightly in plastic wrap and place them in a freezer-safe container. To thaw, transfer the slices to the refrigerator for several hours or overnight, allowing them to come back to their creamy form. Avoid using the microwave, as it can change the delicate texture of these layers.
What should I do if the Jell-O layers are not setting properly?
If you’re experiencing issues with the layers not setting, it might be due to warm ingredients being mixed in. Always ensure that the Jell-O mixture cools before combining it with Cool Whip. If it’s already too warm, you can try chilling it in the fridge for 20-30 minutes before folding in the Cool Whip to help thicken it up.
Are there any dietary restrictions to consider with this recipe?
When preparing your Easter JELLO Cheesecake, always check for allergies. The main ingredients are dairy-based and may not be suitable for those with lactose intolerance. For a dairy-free version, look for a non-dairy whipped topping and a compatible gelatin substitute. It’s also great to check the Jell-O packaging for any allergens, especially if serving to kids or guests with food sensitivities.
What’s the best way to serve leftovers?
To enjoy your leftover cheesecake at its best, store it in the fridge as mentioned earlier. When ready to serve, simply slice the pieces and garnish with fresh fruits or more whipped topping for an added touch. Layering the presentation can make it feel special even on day two or three!
Easter JELLO Cheesecake: No-Bake Bliss with Colorful Layers
Ingredients
Equipment
Method
- Grease a 9-inch springform pan with cooking spray. Prepare the graham cracker crust as per package instructions, mixing until crumbly. Press evenly into the pan and refrigerate while preparing the filling.
- Prepare the no-bake cheesecake filling according to package instructions, beating with milk and melted butter until creamy. Pour over the chilled crust and smooth the top. Refrigerate for about 30 minutes.
- For the blue layer, boil ⅓ cup of water, dissolve the blue Jell-O powder, then stir in ½ cup of ice cold water. Let cool briefly, then fold in one tub of Cool Whip, and chill for about 30 minutes.
- Spread the blue Jell-O layer over the cheesecake base carefully. Chill for at least 2 hours.
- For the pink layer, boil ½ cup of water, dissolve the strawberry or cherry Jell-O powder, stir in ½ cup of ice cold water, and fold in another tub of Cool Whip. Chill briefly until slightly thickened.
- Spread the pink Jell-O mixture over the blue layer carefully. Chill for at least 4 hours, or overnight.
- Remove the cheesecake from the springform pan. Top with the last tub of Cool Whip and decorate with Cadbury Pastel Mini Eggs before serving.
Leave a Reply