
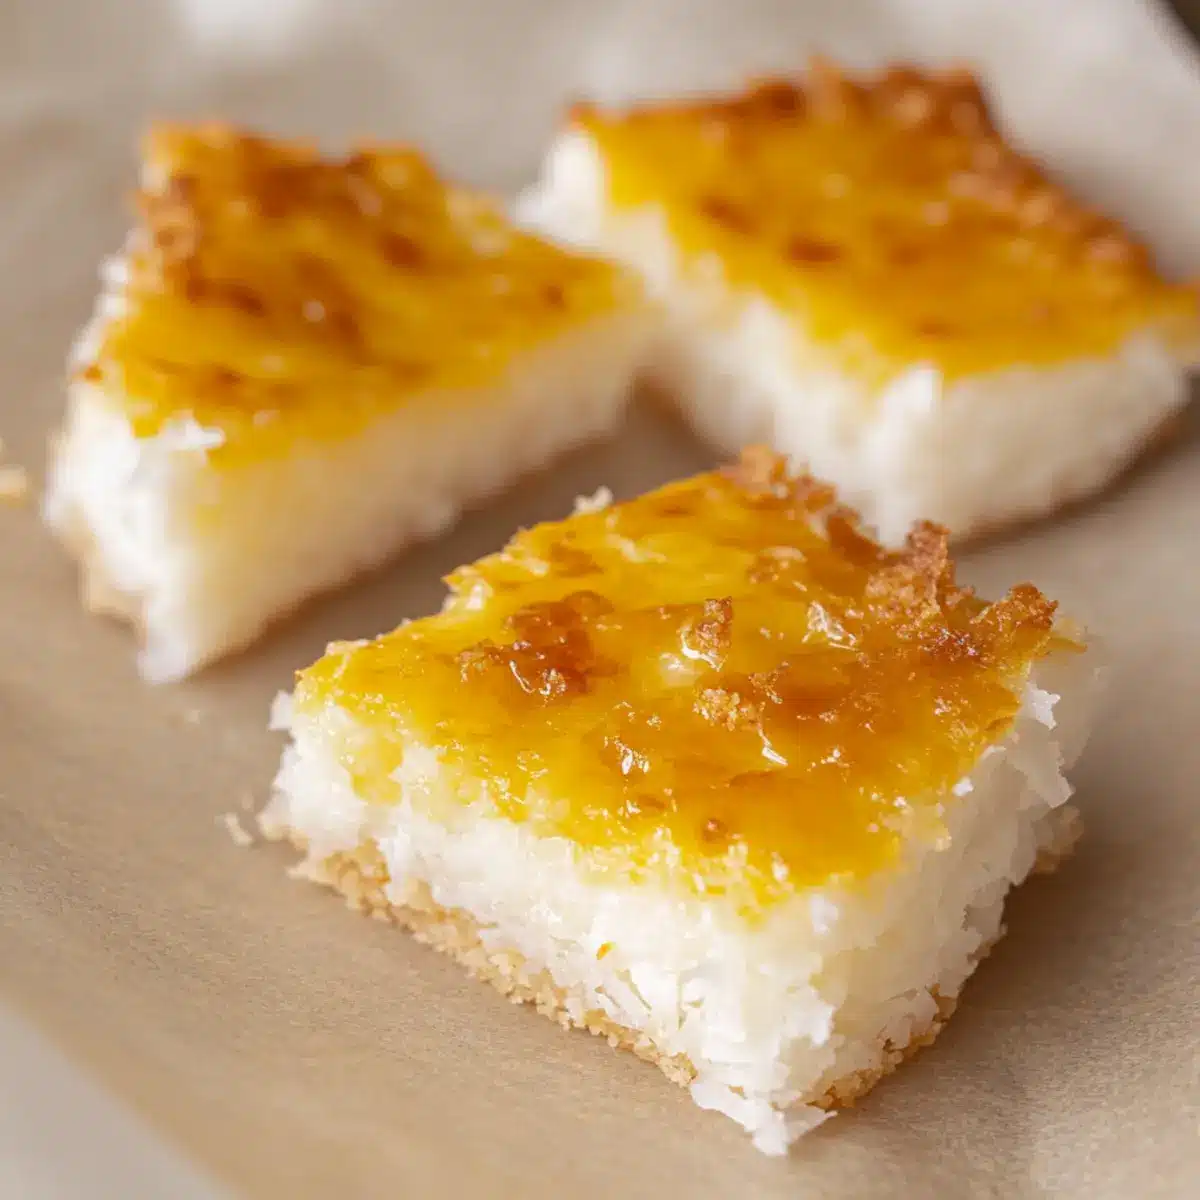
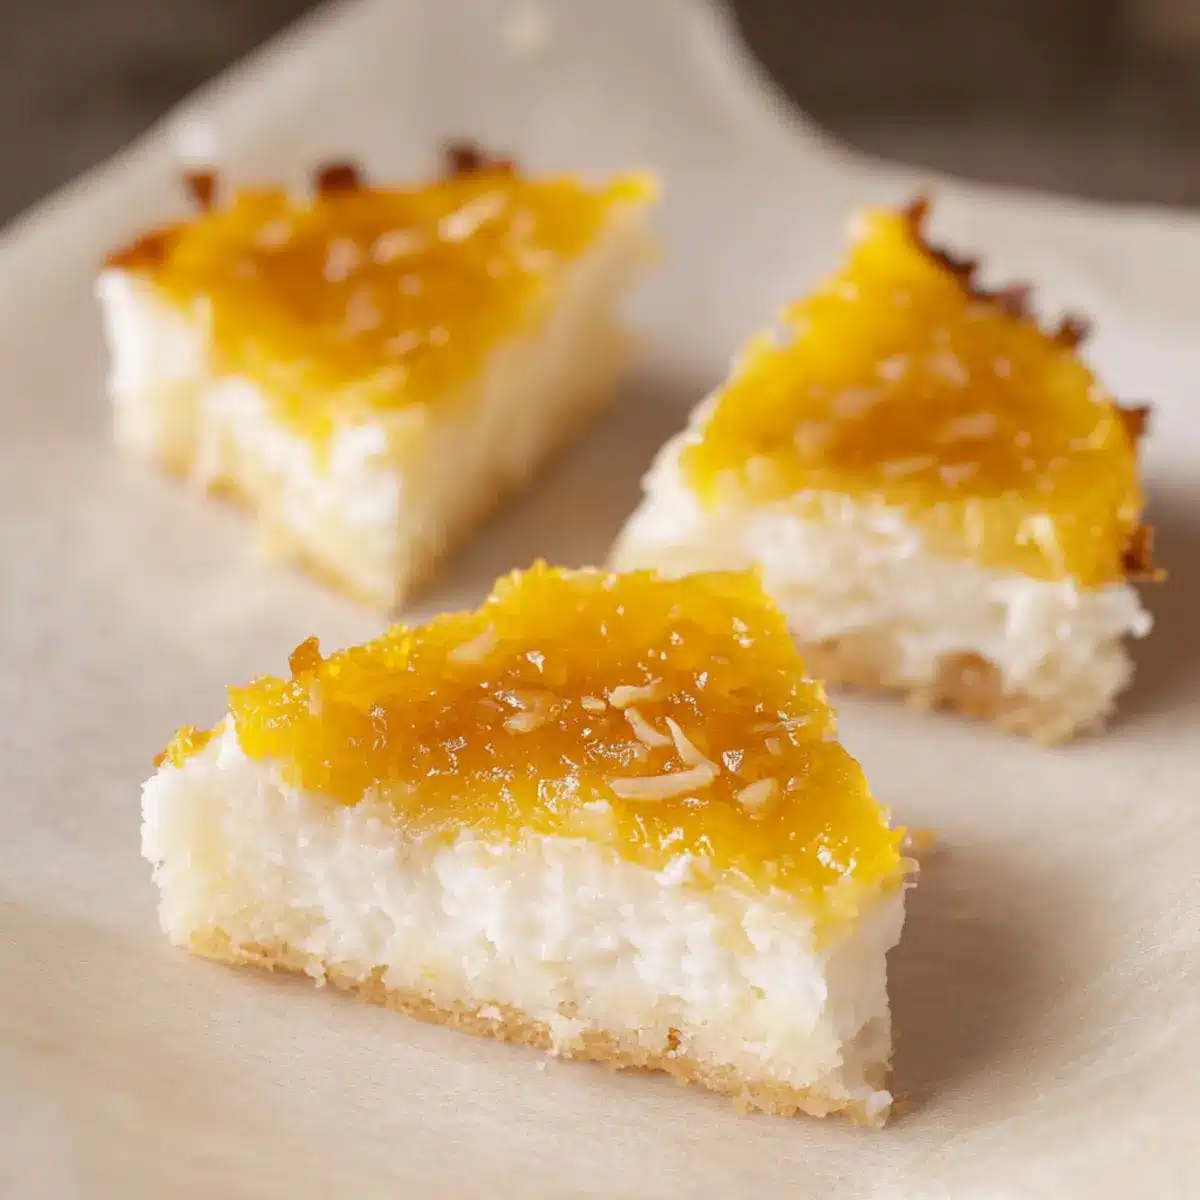
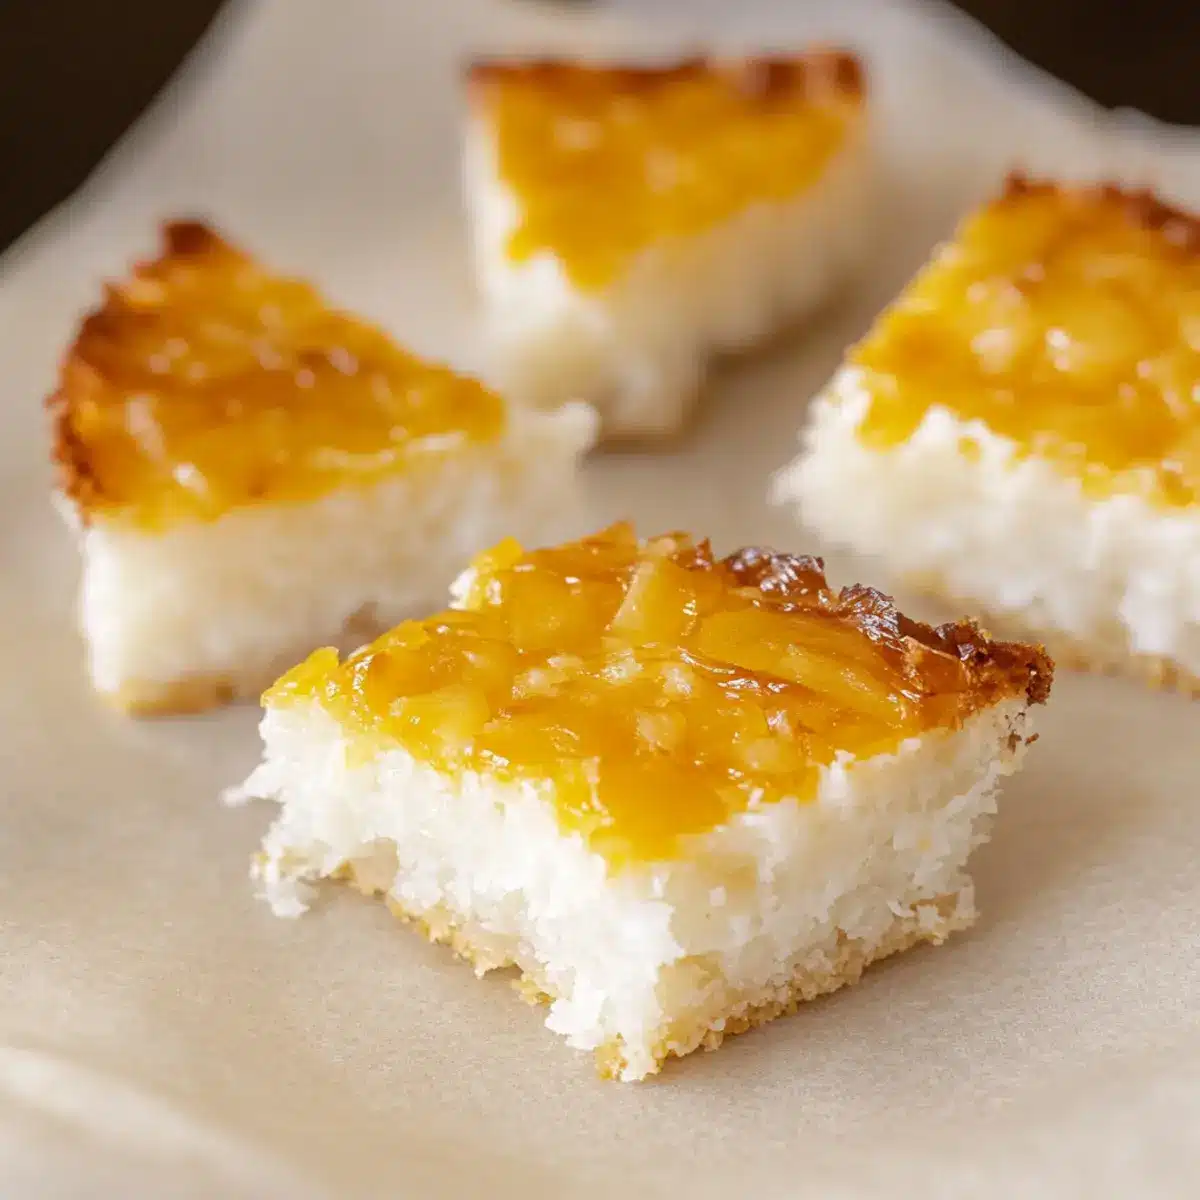
As I sat surrounded by the hypnotic aroma of coconut, it suddenly hit me how this glorious ingredient transforms ordinary dishes into something special. Enter the Easy Gluten-Free Indonesian Sticky Coconut Cake, or Wingko Babat, a delightful treat that combines simplicity with a taste of tropical bliss. This recipe not only ensures an easy bake with commonly found ingredients, but it also serves as a fun way to connect with family and friends during gatherings. With its fudgy, chewy texture and rich coconut flavor, this cake will quickly become a crowd favorite. Ready to dig into a slice of culinary paradise? Let’s discover how to make this enchanting dessert!
Why is this Sticky Coconut Cake irresistible?
Indulgent Flavor: The rich, creamy coconut flavor shines through in every bite, transporting you straight to a tropical paradise.
Chewy Texture: With its uniquely sticky and fudgy texture, this cake offers a delightful contrast that will keep you reaching for another piece.
Easy to Make: Using simple, gluten-free ingredients, this recipe is perfect for bakers of all levels, from beginners to seasoned chefs.
Versatile Treat: Ideal for any occasion, whether it’s a family potluck or a cozy afternoon snack with coffee or tea, it’s sure to impress your guests.
Cultural Connection: Dive into the history of Wingko Babat, a beloved street food from Indonesia, and share its rich tradition with your loved ones. Once you try this cake, you’ll understand why it should take center stage at your next gathering!
Sticky Coconut Cake Ingredients
For the Batter
- Eggs (2, separated) – Adds richness and structural support; for a vegan option, you can use aquafaba instead.
- Granulated Sugar (1 ¼ cup) – Provides sweetness and promotes a lovely golden crust.
- Full-Fat Canned Coconut Milk (2 ¼ cup) – Infuses creamy coconut flavor; always shake well before using to mix the contents.
- Shredded Sweetened Coconut (3 cups) – Boosts coconut essence and enhances the texture; feel free to use unsweetened if you prefer a less sweet cake.
- Glutinous Rice Flour (1 ½ cup) – Essential for the cake’s chewy and sticky texture; this flour is non-negotiable, so avoid replacing it with all-purpose flour.
- Vanilla Extract (1 teaspoon) – Adds an extra layer of flavor that complements the coconut beautifully.
For Topping
- Egg Yolks (from separated eggs) – This will create a rich, golden crust when brushed on before broiling.
Enjoy the delightful layers of flavors and textures in this Sticky Coconut Cake, and watch it become a cherished favorite in your home!
Step‑by‑Step Instructions for Easy Gluten-Free Indonesian Sticky Coconut Cake
Step 1: Preheat the Oven
Begin by preheating your oven to 350°F (175°C). This temperature will ensure that your Easy Gluten-Free Indonesian Sticky Coconut Cake bakes evenly. While the oven warms up, prepare your baking pan by lightly greasing an 8×8-inch square pan to prevent sticking.
Step 2: Whisk the Egg Whites and Sugar
In a medium mixing bowl, whisk together the separated egg whites and granulated sugar until the mixture is well combined and slightly frothy. This should take about 3–5 minutes. Ensure you achieve a silky consistency, as this will help your cake rise beautifully and contribute to its delightful chewy texture.
Step 3: Combine the Ingredients
Next, gently stir in the full-fat coconut milk, shredded sweetened coconut, glutinous rice flour, and vanilla extract into the egg white mixture. Use a spatula to mix until there are no lumps and the batter is smooth. This cohesive batter will form the foundation for your Sticky Coconut Cake, so make sure it’s well blended.
Step 4: Pour Into Pan
Carefully pour the batter into the prepared baking pan. Use a spatula to spread it evenly, filling the corners and smoothing the top. You want a level surface for baking, which will help achieve that perfect texture you desire from your Easy Gluten-Free Indonesian Sticky Coconut Cake.
Step 5: Bake the Cake
Place the pan in the preheated oven and bake for 45 minutes. You’ll know it’s done when the top is set and has a slight golden hue. Pay attention to the edges; they should start to pull away from the sides of the pan. This visual cue indicates that the cake is ready for the next step.
Step 6: Broil for the Golden Topping
Remove the cake from the oven, and brush the top with the reserved egg yolks for a rich finish. Set your oven to broil and return the cake to the oven for an additional 5-10 minutes. Keep a close eye on it to prevent burning; the goal is a beautifully golden, crisp crust that enhances the overall look and taste.
Step 7: Cool on a Rack
Once broiling is complete, take the cake out and allow it to cool in the pan for about 15 minutes. Then, transfer it to a wire rack to cool completely. This cooling step is crucial, as it allows the flavors to meld and helps the cake set properly before you slice into it.
Step 8: Refrigerate Before Serving
Once cooled, wrap the cake and refrigerate it for at least 8 hours, or overnight if possible. Chilling enhances the chewy texture that makes this Easy Gluten-Free Indonesian Sticky Coconut Cake so irresistible. When ready to serve, simply cut the cake into squares or triangles for delightful portions.
Sticky Coconut Cake Variations & Substitutions
Feel free to explore these delicious twists and variations to tailor your Sticky Coconut Cake to your taste buds!
-
Vegan Option: Substitute the eggs with aquafaba (3 tablespoons for each egg) for a delightful vegan version that maintains the cake’s chewy goodness.
-
Different Milk: Use almond or oat milk instead of coconut milk for a lighter flavor, but be aware this will slightly alter the rich coconut taste.
-
Flavor Boost: Add a teaspoon of almond extract along with the vanilla for a nutty, aromatic twist that complements the coconut beautifully.
-
Herbal Spice: Incorporate a dash of ground cardamom or cinnamon to the batter for an exotic touch that adds warmth and depth to your dessert.
-
Mix It Up: Fold in some chopped nuts or dried fruits like mango or pineapple into the batter for added texture and a tropical flair that makes every bite exciting.
-
Lemon Zest: Grate in some lemon or lime zest to the batter for a refreshing citrus note that brightens the rich coconut flavors, making it truly unforgettable.
-
Tempting Toppings: Top the cake with a drizzle of melted dark chocolate or a sprinkle of toasted coconut to enhance the presentation and flavor profiles dramatically.
-
Mini Bites: Bake the batter in a mini muffin tin for bite-sized treats. They’ll bake quicker and are perfect for parties or snacks on the go!
For more delightful ideas, you might also enjoy making Coconut Crusted Fish or trying the Crockpot Thai Coconut Chicken Soup. Let’s create a family feast that will elevate your home-cooked meals to new heights!
What to Serve with Easy Gluten-Free Indonesian Sticky Coconut Cake
Imagine a sunny afternoon, surrounded by loved ones, enjoying the sweet, chewy bliss of this delightful dessert.
- Refreshing Coconut Drink: A chilled coconut water or coconut smoothie will enhance the tropical flavors, making each bite feel like a mini-vacation.
- Coffee or Tea: The rich, earthy notes of coffee or a fragrant herbal tea create a comforting balance with the cake’s sweetness.
- Tropical Fruit Salad: A mix of fresh mango, pineapple, and kiwi adds a vibrant, juicy contrast that beautifully complements the texture of the cake.
- Vanilla Ice Cream: Creamy vanilla ice cream creates a delightful melt-in-your-mouth experience paired with the chewy cake. It’s simple yet divine.
- Whipped Coconut Cream: Light and airy coconut cream drizzled on top brings an indulgent touch, perfect for coconut enthusiasts!
- Spiced Chai: The warm spices in chai tea harmonize wonderfully, elevating the cake’s flavors while providing a cozy drink option.
- Chocolate Sauce: A drizzle of rich chocolate sauce elevates the dessert experience, adding decadence that rich coconut flavor beautifully supports.
- Pineapple Curry: For a savory twist, a light, sweet-and-sour pineapple curry can offer a unique flavor contrast, enhancing the overall experience.
Expert Tips for the Best Sticky Coconut Cake
-
Perfectly Mixed Coconut Milk: Ensure the full-fat canned coconut milk is well-shaken before adding to the batter. This prevents lumps, ensuring a smooth texture in your Sticky Coconut Cake.
-
Careful Broiling: Watch the cake closely when broiling the top with egg yolks. It can easily burn; a few minutes can make a big difference in achieving that golden finish.
-
Chill for Best Flavor: Refrigerate your cake for at least 8 hours before serving. This resting time enhances the flavors and gives the cake its signature chewy texture, making it simply delightful!
-
Accurate Baking Time: Use a toothpick to check doneness; it should come out clean but moist. Adjust baking time slightly based on your oven’s calibration to achieve that chewy consistency.
-
Creative Variations: Experiment with different types of shredded coconut—sweetened or unsweetened. This can subtly alter the sweetness and overall taste of your Sticky Coconut Cake.
How to Store and Freeze Sticky Coconut Cake
Fridge: Store the Sticky Coconut Cake in an airtight container to keep it fresh for up to 2 weeks. It’s best enjoyed chilled or at room temperature.
Freezer: Cut the cake into individual portions and wrap them tightly in plastic wrap before placing them in a freezer-safe bag. It can be frozen for up to 3 months.
Thawing: To enjoy your frosty treat, simply remove a portion from the freezer and thaw in the fridge overnight. Serve chilled for the best texture and flavor.
Reheating: Although best served cold, you can warm slices in the microwave for about 10-15 seconds if desired, but avoid overheating to maintain its chewy texture.
Make Ahead Options
Busy home cooks will find this Easy Gluten-Free Indonesian Sticky Coconut Cake a delight for meal prep! You can prepare the batter up to 24 hours in advance and refrigerate it, ensuring flavors develop beautifully. To maintain the cake’s luscious texture, simply whisk the egg whites and sugar, mix with the rest of the ingredients, and pour it into your pan. Cover the batter tightly with plastic wrap before refrigerating. When ready to bake, pour it into the prepared pan and bake according to the recipe. This way, you’ll achieve stunning, restaurant-quality results with minimal effort and time on the day you wish to serve!
Sticky Coconut Cake Recipe FAQs
What type of coconut milk should I use for the Sticky Coconut Cake?
I recommend using full-fat canned coconut milk for a rich and creamy flavor. Make sure to shake it well before opening, as the cream can separate. If you prefer a lighter version, you can try lite coconut milk, but the texture may be less rich.
How long does the Sticky Coconut Cake stay fresh?
The cake can be stored in an airtight container in the fridge for up to 2 weeks. To enjoy it at its best, chill it before serving. This cake is particularly delightful when served cold, capturing that perfect chewy texture.
Can I freeze Sticky Coconut Cake?
Absolutely! For freezing, cut the cake into individual portions and wrap each piece tightly in plastic wrap. Place the wrapped portions in a freezer-safe bag and store them for up to 3 months. This way, you can easily grab a piece whenever the craving strikes!
Why did my Sticky Coconut Cake come out too hard or too soft?
If your cake is too hard, it might have been overbaked. Keep a close eye on it during the last few minutes to ensure it’s just set. Conversely, if it’s too soft, it may not have baked long enough. Always check for doneness with a toothpick — it should come out clean but slightly moist.
Are there any dietary considerations to note for the Sticky Coconut Cake?
This cake is gluten-free, making it suitable for those with gluten sensitivities. However, always ensure that your ingredients, especially pre-packaged items like shredded coconut, are labeled gluten-free. If serving to guests with allergies, check the ingredient labels carefully, and feel free to substitute with alternatives, such as aquafaba for eggs, to make it vegan-friendly!
How can I achieve the perfect chewy texture in my Sticky Coconut Cake?
For that ideal chewiness, make sure to use glutinous rice flour, as all-purpose flour will not provide the same texture. After mixing your batter, allow it to rest for 10-15 minutes before baking — this helps enhance moisture and the chewy texture. Don’t forget the chilling step after baking; refrigerating the cake for at least 8 hours allows the flavors to meld and the texture to develop beautifully!

Irresistible Sticky Coconut Cake: A Chewy Delight to Share
Ingredients
Equipment
Method
- Preheat your oven to 350°F (175°C) and lightly grease an 8x8-inch square pan.
- Whisk together the egg whites and granulated sugar until frothy, for about 3–5 minutes.
- Gently stir in the coconut milk, shredded coconut, rice flour, and vanilla until the batter is smooth.
- Pour the batter into the prepared baking pan and spread it evenly.
- Bake for 45 minutes, until the top is set and golden.
- Remove from oven and brush with reserved egg yolks, then broil for 5-10 minutes until golden.
- Allow to cool in the pan for 15 minutes, then transfer to a wire rack to cool completely.
- Wrap and refrigerate for at least 8 hours before serving.
Leave a Reply