
As the crisp autumn air settles in and leaves drift to the ground, there’s nothing like bringing a little magic into the kitchen with my Witch’s Fingers Sugar Cookies. These quirky Halloween delights not only look impressively ghoulish but also deliver a perfect balance of buttery tenderness and chewy goodness that your family will adore. Best of all, they’re incredibly simple to make, giving you quality time to create spooky memories with your kids. Plus, with gluten-free and vegan adaptations available, everyone can enjoy this creepy treat. So, are you ready to whip up some frighteningly fun cookies that will haunt your taste buds in the best way possible?
Why Are These Cookies So Unique?
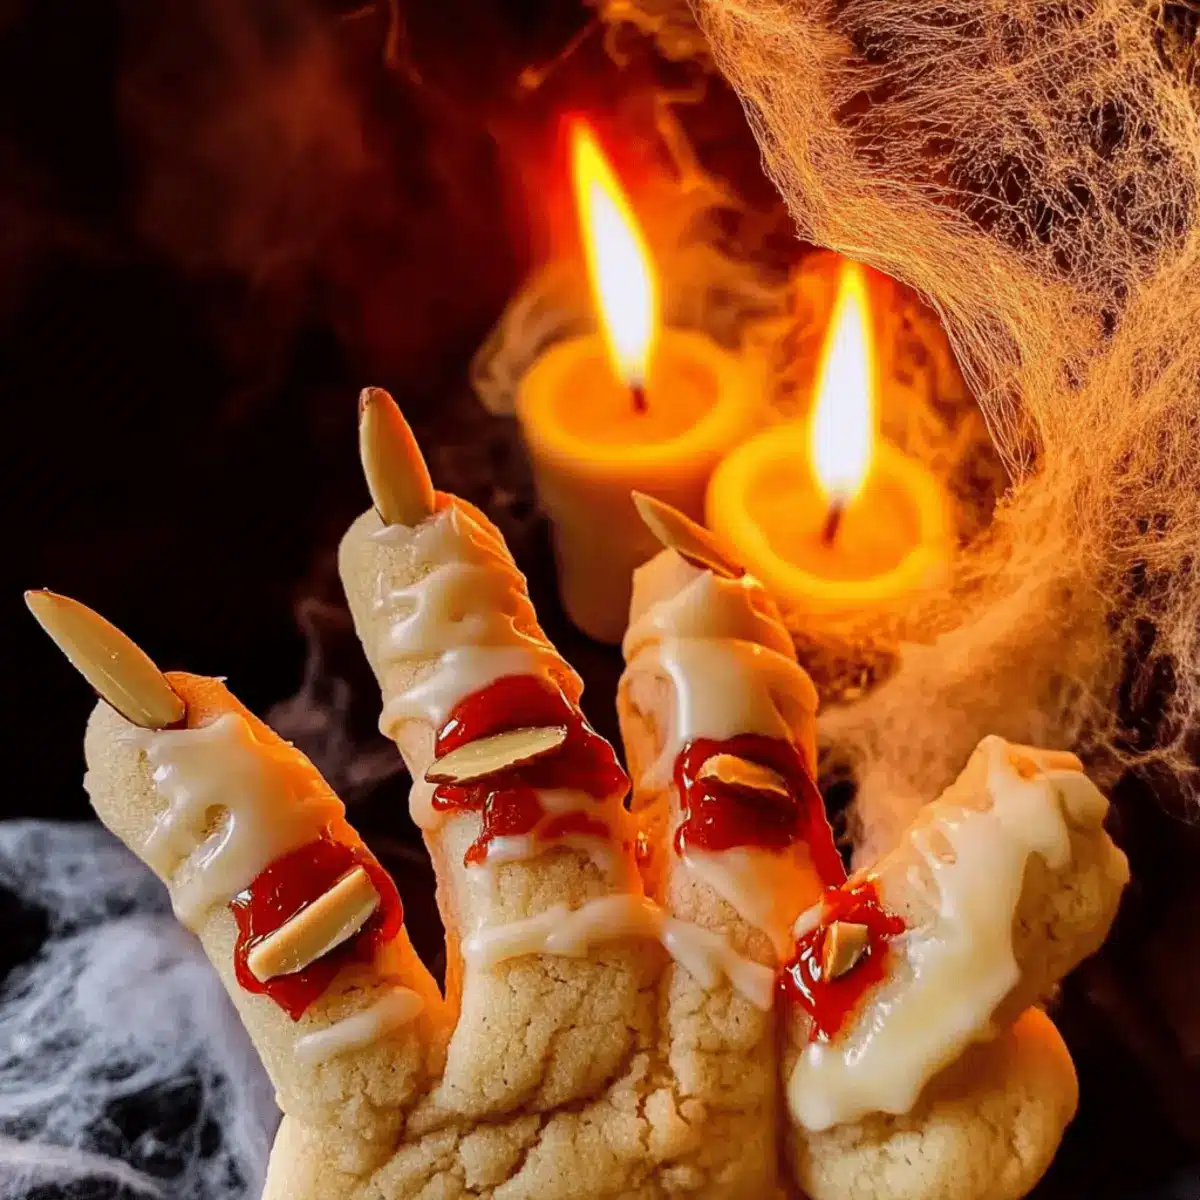
Spooktacular Appeal: These Witch’s Fingers Sugar Cookies are not just treats; they’re conversation starters! Their creepy design makes them the perfect addition to any Halloween gathering, leaving your guests delightfully surprised.
Versatile Options: With both gluten-free and vegan adaptations available, everyone can join in on the fun! You can even play around with toppings, like swapping red candy melts for chocolate for a delicious twist.
Easy Preparation: This recipe is as simple as it gets—ideal for baking with little helpers. They’ll love shaping the ‘fingers’ and decorating with almonds, making it a bonding activity perfect for the season.
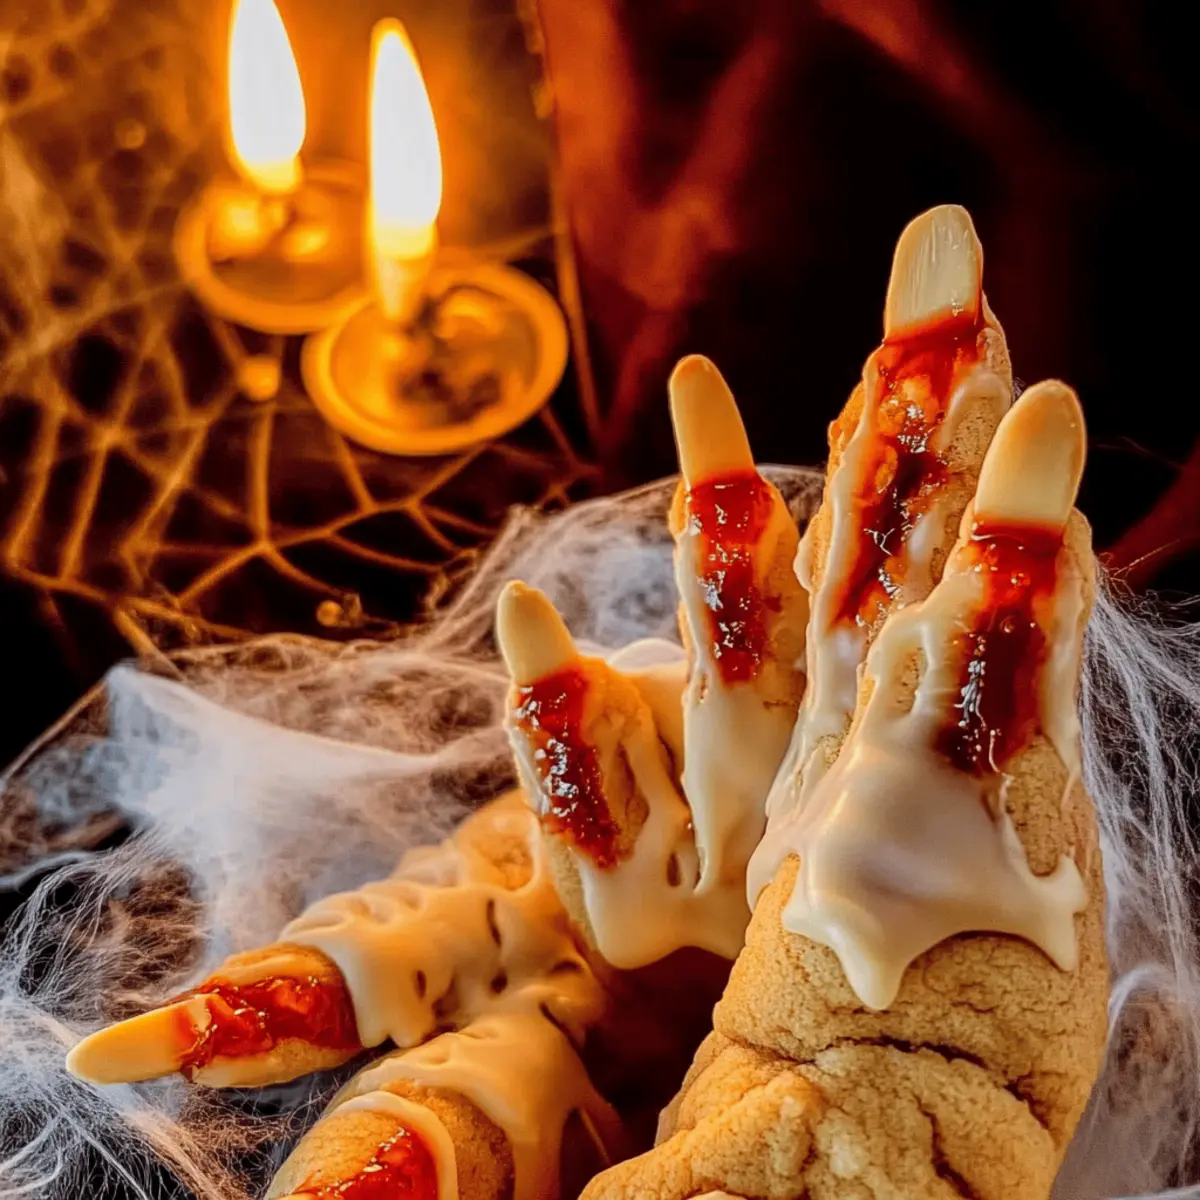
Delectable Texture: Expect a delightful contrast between the chewy center and the crisp outer layer. Each bite is a perfect balance of buttery sweetness, sure to put a smile on any face.
Crowd-Pleasing Fun: Not just for kids, these cookies are a hit with adults too! Surprise your friends with a platter of these eerie delights at your next Halloween party, and watch them vanish in no time.
And while you’re getting into the Halloween spirit, don’t forget to check out my Brown Sugar Peach recipe for a delicious dessert option, or try out some spooky Kitchen Sink Cookies for a sweet twist!
Witch’s Fingers Sugar Cookies Ingredients
For the Cookie Dough
- Unsalted Butter – Provides richness and a tender crumb; substitute with dairy-free vegan sticks for a dairy-free version.
- Vanilla Extract – Adds depth of flavor; can replace with almond extract for a unique twist.
- Confectioner’s Sugar – Sweetens and helps achieve a soft texture.
- All-Purpose Flour – Forms the structure of the cookies; can be replaced with gluten-free baking flour (e.g., Bob’s Red Mill) and includes 1/2 teaspoon of xanthan gum for stability.
- Baking Soda – Helps cookies rise for a lighter texture.
- Salt – Enhances the overall flavor balance.
For the Spooky Decoration
- Red Candy Melts – Used for a spooky effect to mimic the look of “blood”; can substitute with raspberry jam for a different aesthetic.
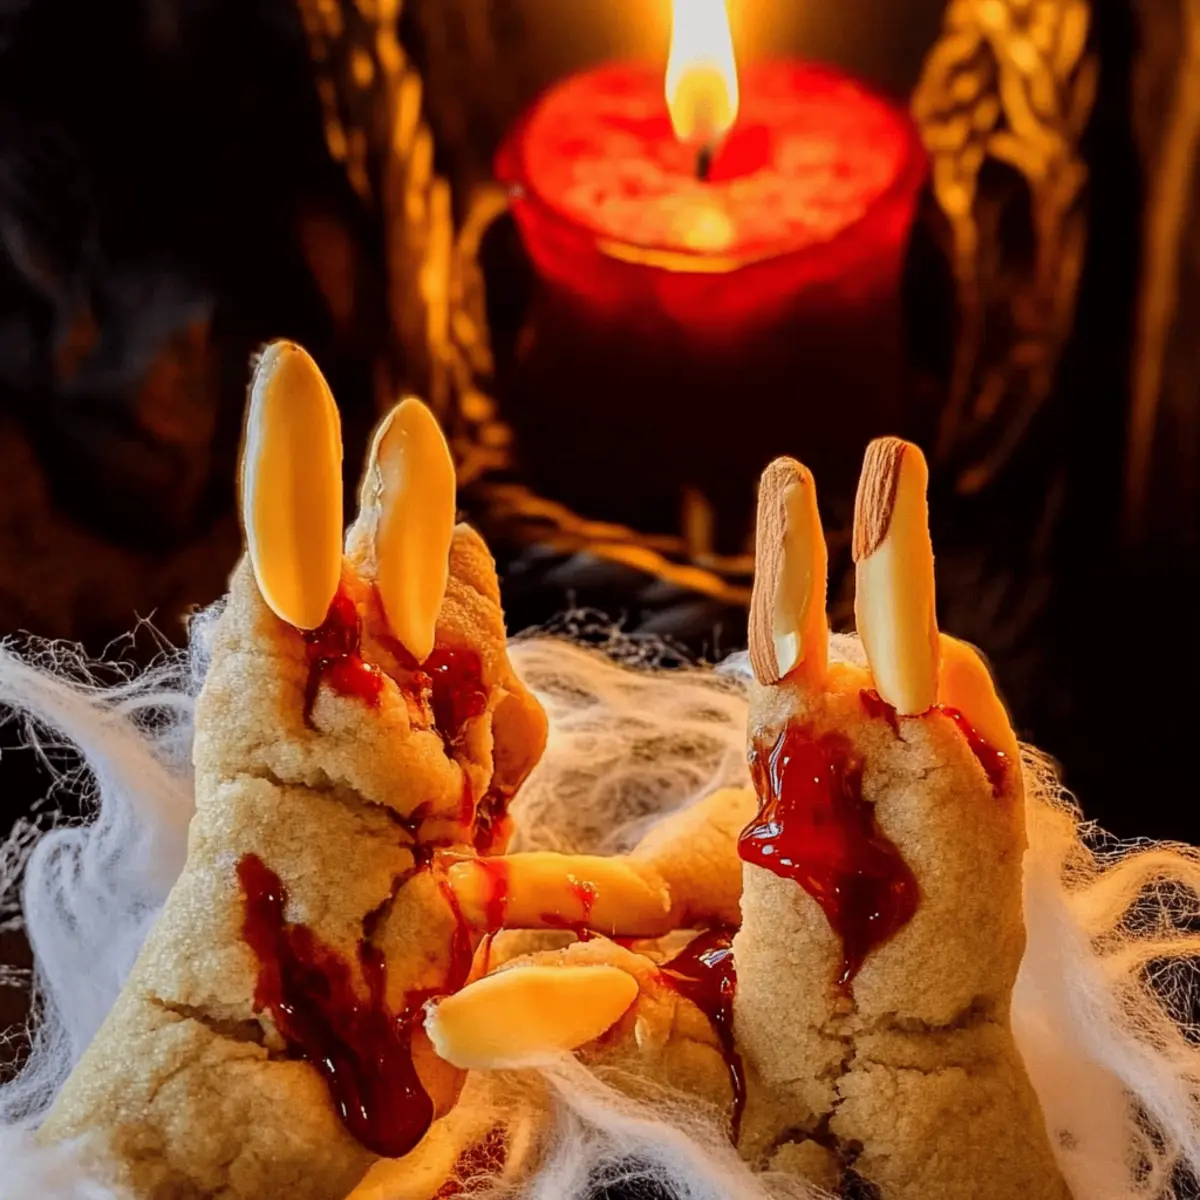
- Sliced Almonds – Act as the ‘finger’ nail, adding a crunchy texture to your Witch’s Fingers Sugar Cookies.
Step‑by‑Step Instructions for Witch’s Fingers Sugar Cookies
Step 1: Preheat the Oven
Begin by preheating your oven to 320°F (160°C). This temperature will ensure that your Witch’s Fingers Sugar Cookies bake evenly, creating that perfect golden exterior. While the oven heats, prepare your baking sheets by lining them with parchment paper to prevent sticking.
Step 2: Mix the Wet Ingredients
In a large mixing bowl, gently combine melted unsalted butter, vanilla extract, and confectioner’s sugar. Use a whisk or hand mixer to blend until the mixture is smooth and creamy, reflecting a lightened color. This should take about 2-3 minutes, ensuring all ingredients are perfectly integrated for a rich flavor.
Step 3: Incorporate Dry Ingredients
Next, sift in the all-purpose flour, baking soda, and salt into the wet mixture. Mix with a spatula or wooden spoon until a soft dough forms, taking care not to overwork it. The dough should be slightly tacky but not sticky, allowing it to hold its shape when rolling out the Witch’s Fingers.
Step 4: Shape the Cookies
To create your eerie cookies, roll small chunks of the dough into finger-like shapes, about 3 inches long. Using your fingers, press down gently to form two indents for knuckles and create a spooky realism. Aim for about 12-15 cookie shapes to fill your baking sheet without crowding.
Step 5: Add the Details
Using a butter knife, create ridges between the indents of each cookie to mimic knuckles. Then, push a sliced almond into the tip of each ‘finger’ to represent the nail, and fill the indents with melted red candy to evoke that creepy ‘blood’ effect. Get creative here—each Witch’s Fingers Sugar Cookie can have its own character!
Step 6: Chill the Cookies
Once shaped and decorated, place your cookies on the prepared baking sheets. Chill them in the freezer for 15 minutes or refrigerate for 30 minutes. This step is crucial as it helps prevent spreading while baking, ensuring your fingers maintain their characteristic shape and spooky details.
Step 7: Bake the Cookies
Remove the cookies from the freezer or refrigerator and carefully place them into the preheated oven. Bake for 15-16 minutes, or until the edges are slightly golden and the cookies hold their shape. Keep an eye on them to avoid overbaking; they should look firm yet soft in the center.
Step 8: Cool Before Serving
Once baked, take the cookies out of the oven and let them cool on the baking sheet for about 5 minutes. Then transfer them to a wire rack to cool completely at room temperature. This step allows the final texture of your Witch’s Fingers Sugar Cookies to develop to perfection before serving or enjoying.
Make Ahead Options
These Witch’s Fingers Sugar Cookies are perfect for busy home cooks who want to save time during the Halloween festivities! You can prepare the cookie dough up to 3 days in advance; simply wrap it tightly in plastic wrap and refrigerate. Additionally, the formed and decorated cookies can be frozen for up to 1 month—just freeze them in a single layer on a baking sheet, then transfer to an airtight container. When you’re ready to enjoy, bake them straight from the freezer for about 1-2 extra minutes. This way, you’ll have delicious cookies that are just as spooky and delightful, ensuring effortless baking without compromising quality!
Witch’s Fingers Sugar Cookies Variations
Feel free to explore deliciously spooky alternatives that will suit your taste buds and dietary needs!
-
Gluten-Free: Use gluten-free flour and add 1/2 teaspoon of xanthan gum to maintain the right texture.
-
Vegan Delight: Swap out the butter for vegan baking sticks for a dairy-free treat that everyone can enjoy.
-
Chocolate Twist: Replace red candy melts with chocolate for a rich and spooky alternative. It’ll change the look but keep the flavors delicious!
-
Fruit Flavored: Try raspberry or strawberry jam in place of the red melts for a fruity flavor twist that still looks appropriately gory.
-
Nut-Free Option: Omit the sliced almonds and use pumpkin seeds instead, creating a crunchy finish while keeping it nut-free.
-
Extra Spice: Add a pinch of cinnamon or nutmeg to the cookie dough for a warm, inviting flavor perfect for fall.
-
Mini Cookies: Roll smaller dough balls for bite-sized treats that are just as spooky but easier to eat in one go.
-
Freaky Fillings: Inject each cookie with a little gooey caramel or chocolate center before baking for an unexpected surprise—perfect for a haunted treat!
And while you’re exploring other haunted recipes, don’t miss my Red Velvet Crinkle cookies that bring a festive flair to your dessert tray, or check out these cheeky Kitchen Sink Cookies for a delightful mix of flavors!
Expert Tips for Witch’s Fingers Sugar Cookies
Chill the Dough: Ensure you refrigerate the dough for at least 1 hour to prevent stickiness when shaping the Witch’s Fingers.
Avoid Overmixing: Be gentle when combining ingredients to keep your cookies tender. Overworking the dough can lead to dry and crumbly cookies.
Shape Fixes: If your cookies lose shape during baking, gently reshape them while warm or use melted candy melts as adhesive for broken parts.
Even Baking: Rotate your baking sheet halfway through to achieve even baking. This helps all cookies get that delightful golden hue!
Decorate Creatively: Experiment with decorative toppings beyond the classic almonds and red candy melts for a personal touch and fun variations.
How to Store and Freeze Witch’s Fingers Sugar Cookies
Airtight Container: Store your Witch’s Fingers Sugar Cookies in an airtight container at room temperature for up to 10 days to maintain their freshness and chewy texture.
Refrigeration: If you prefer, you can keep these cookies in the fridge for up to 2 weeks; just ensure they’re covered to prevent them from drying out.
Freezer: For longer storage, freeze Witch’s Fingers Sugar Cookies in a single layer in a freezer-safe container for up to 3 months. When ready to enjoy, thaw them overnight in the refrigerator.
Prepared Dough: If you’d like to prep ahead, shape the dough into fingers and freeze for up to 1 month; thaw in the fridge before baking for a spooky last-minute treat!
What to Serve with Witch’s Fingers Sugar Cookies
As Halloween creeps closer, let your imagination run wild with delightful pairings that perfectly complement these spooky treats!
-
Pumpkin Spice Latte: This warm, aromatic drink adds a cozy touch, balancing the sweetness of the cookies while enhancing their Halloween charm. The flavors dance together, making every sip feel like a seasonal hug.
-
Apple Cider: Serve warm or chilled, this classic fall beverage offers a refreshing contrast to the buttery cookies. Its crisp, tart notes beautifully highlight the sweetness of the sugar cookies.
-
Chocolate Mousse: Indulge in a rich chocolate mousse for a creamy and luxurious dessert pairing. The rich chocolate flavor elevates the sweet and chewy cookies for an unforgettable treat table.
-
Decorated Cupcakes: Create a festive spread with Halloween-themed cupcakes. Their colorful frosting and playful designs harmonize well, making both treats look enticingly delicious.
-
Cheese Platter: Add a savory element with a selection of cheeses. The creaminess of brie or tang of a blue cheese pairs wonderfully, creating a sweet and salty combination that surprises and delights.
-
Ginger Snap Cookies: Offer a contrasting texture with these spicy, crunchy cookies. The warmth of ginger complements the buttery notes of the Witch’s Fingers while enhancing the Halloween spirit.
-
Vanilla Ice Cream: A scoop of creamy vanilla ice cream is a luxurious treat that balances the cookies’ sweetness perfectly. Melted atop a warm finger cookie, it creates a hauntingly delicious dessert that’s too tempting to resist.
-
Hot Cocoa: Cozy up with a warm cup of cocoa as a sweet accompaniment. The depth of chocolate flavor enhances the Halloween experience and comforts on a chilly autumn evening.
-
Spiced Nut Mix: A zesty nut mix provides a crunchy, savory option that complements the soft sweetness of the cookies. It adds texture and is perfect for snacking between treats.
Witch’s Fingers Sugar Cookies Recipe FAQs
What kind of butter can I use for the Witch’s Fingers Sugar Cookies?
Absolutely! I recommend using unsalted butter for a rich flavor and the perfect tender crumb. If you’re looking for a dairy-free alternative, simply substitute with dairy-free vegan baking sticks for delicious results.
How do I store Witch’s Fingers Sugar Cookies and how long do they last?
Store your Witch’s Fingers Sugar Cookies in an airtight container at room temperature for up to 10 days. If you wish to keep them even longer, they can be refrigerated for up to 2 weeks or kept in the freezer for up to 3 months.
Can I freeze prepared dough for the Witch’s Fingers Sugar Cookies?
Yes! To freeze the prepared dough, shape it into fingers and place them in a single layer on a baking sheet. Freeze for up to 1 month. When you’re ready to bake, simply thaw in the refrigerator overnight, then bake as usual!
What if my cookies spread too much while baking?
If your cookies lose their spooky shape, don’t worry! You can gently reshape them while they are still warm using your hands. If they break, reattach pieces with melted red candy melts for a quick fix that keeps your Witch’s Fingers looking frightfully good.
Are there any dietary considerations with this cookie recipe?
Very! This recipe can be made gluten-free by substituting all-purpose flour with gluten-free baking flour and adding xanthan gum for stability. For a vegan option, replace the butter with vegan baking sticks. They offer a spooky treat for everyone to enjoy during Halloween!

Witch's Fingers Sugar Cookies That Will Haunt Your Tastebuds
Ingredients
Equipment
Method
- Preheat the oven to 320°F (160°C) and prepare baking sheets with parchment paper.
- In a large mixing bowl, combine melted unsalted butter, vanilla extract, and confectioner's sugar until smooth and creamy.
- Sift in the all-purpose flour, baking soda, and salt into the wet mixture. Mix until a soft dough forms.
- Roll small chunks of the dough into finger-like shapes, about 3 inches long. Press down gently to form indents for knuckles.
- Create ridges between the indents of each cookie, push a sliced almond into the tip of each 'finger', and fill with melted red candy.
- Chill cookies in the freezer for 15 minutes or refrigerate for 30 minutes to maintain shape while baking.
- Bake for 15-16 minutes, or until edges are slightly golden. Let cool for 5 minutes on the baking sheet before transferring to a wire rack.
Leave a Reply