
As I stirred the bubbling mix of coffee and agar-agar, a nostalgic aroma whisked me back to afternoons spent in cozy cafés, savoring delicate desserts that danced between texture and taste. This Easy Homemade Coffee Jelly is my tribute to those moments, featuring a delightful blend of rich black coffee and creamy milk jelly layers. Not only is this dessert a crowd-pleaser, but it’s also vegan-friendly, allowing everyone to indulge without any guilt. With its quick prep time, you can whip up this refreshing treat even on the busiest days. So, are you ready to delight in a dessert that’s as fun to make as it is to eat?
Why is Coffee Jelly So Amazing?
Vibrant Flavors: The contrast between rich black coffee and creamy milk layers creates a delightful flavor profile that coffee aficionados will adore.
Quick and Easy: With just a few ingredients and straightforward steps, you can whip up this delicious dessert in no time, making it perfect for weekends or spontaneous gatherings.
Vegan-Friendly: Made with agar-agar instead of gelatin, this recipe ensures everyone can enjoy guilt-free guiltiness without compromising on texture or taste.
Versatile and Fun: Feel free to experiment with flavors — add flavored syrups or even switch to brewed coffee for a personal touch! You can also serve this treat with toppings like whipped cream for an extra indulgence, much like my Coffee Cheesecake.
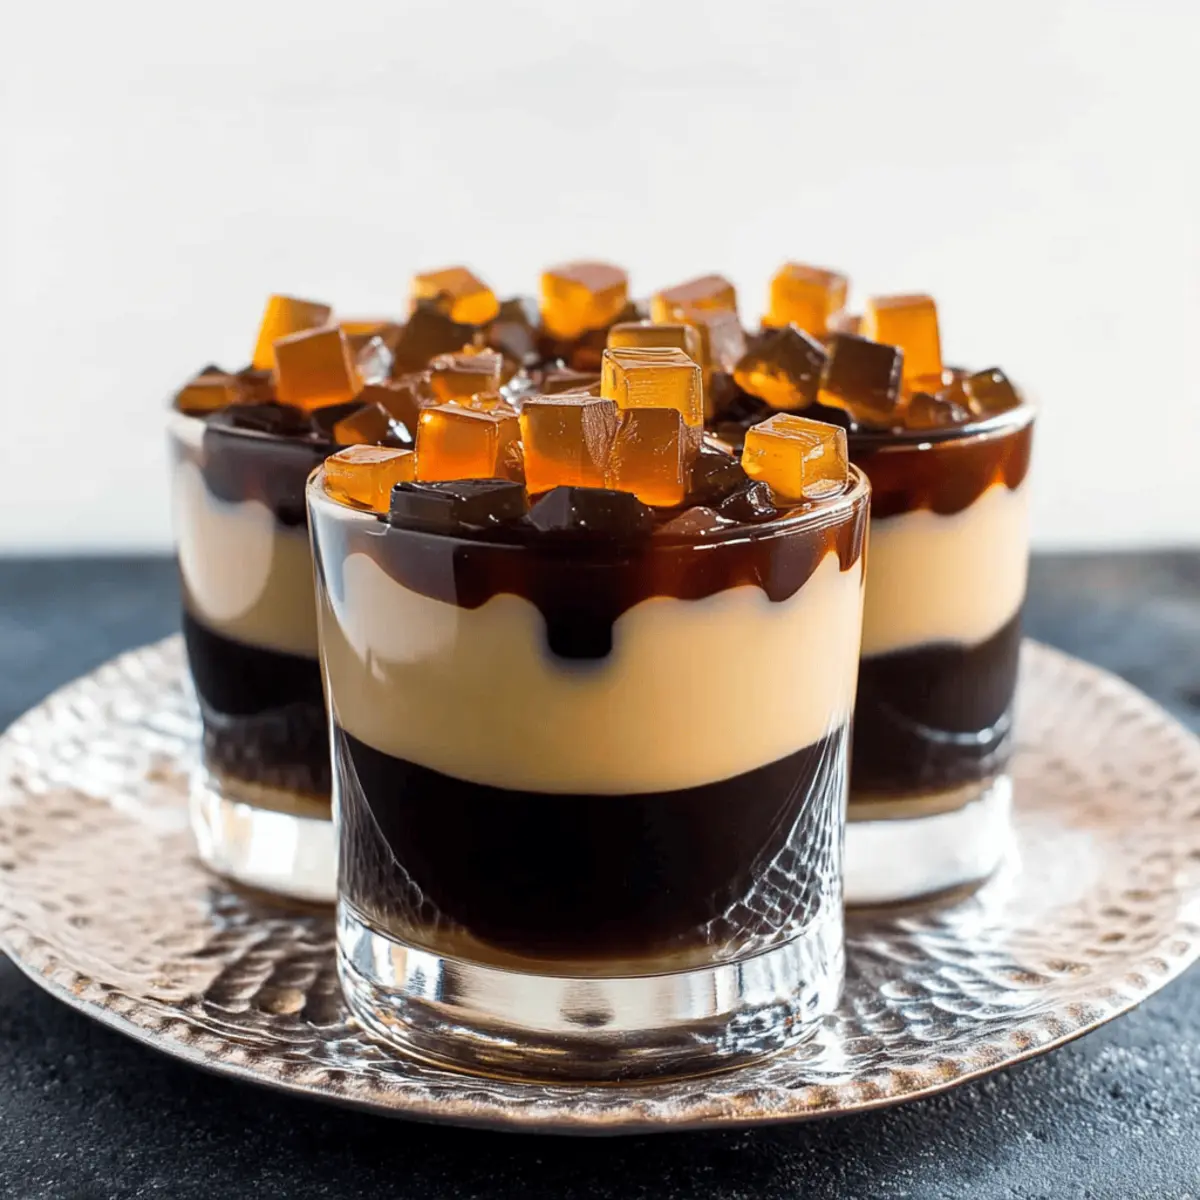
Eye-Catching Presentation: Those neat layers topped with jelly cubes not only taste great but look stunning when plated! Your guests will be impressed with this unique twist on a classic dessert.
Coffee Jelly Ingredients
For the Black Coffee Jelly
- Agar-Agar Powder – A vegan gelling agent derived from seaweed, a great substitute for gelatin.
- Sugar – Adjust according to your taste to find the perfect balance for this coffee jelly.
- Instant Coffee Granules – Provides that strong coffee flavor; brewed coffee can be substituted if preferred.
- Water – Use fresh water to help dissolve agar-agar efficiently for a smooth jelly texture.
For the Milk Coffee Jelly
- Sweetened Condensed Milk – Essential for creaminess; don’t substitute, as it’s vital for proper texture.
- Water – The same as above; ensures that your jelly layers meld perfectly without clumping.
For Serving
- Coffee Jelly Cubes – Cut from set black coffee jelly, these cubes add a fun element to your presentation.
- Whipped Cream (optional) – A delicious topping that enhances the creamy aspect, making this coffee jelly extra special.
Indulge in the refreshing taste of Coffee Jelly, a dessert that combines rich flavors and delightful textures!
Step‑by‑Step Instructions for Coffee Jelly
Step 1: Prepare Molds
Begin by washing and drying your chosen molds thoroughly to ensure that the Coffee Jelly sets correctly. You can use small cups or a shallow dish depending on your preference. Make sure they are clean and dry to prevent any unwanted flavors from affecting your dessert.
Step 2: Cook the Jelly Base
In a medium saucepan, combine sugar and agar-agar powder, stirring well to prevent clumping. Slowly add fresh water and instant coffee granules while continuously mixing. Heat the mixture over low to medium heat, bringing it to a gentle boil for about 8–10 minutes, until fully dissolved and glossy.
Step 3: Set Black Coffee Jelly
Once the jelly mixture reaches a boil, pour a portion into your prepared molds or shallow dish. Allow it to cool at room temperature for a few minutes, then transfer it to the fridge to set for at least 1 hour. The surface should feel firm to the touch before moving on to the next layer.
Step 4: Layer Assembly – Black Jelly Base
After the black coffee layer has set, take the remaining jelly mixture and pour half of it into the molds, gently spooning it over the firm black layer. Chill in the fridge again until the surface is slightly firm, about 30 minutes, to create a stable base for the milk layer.
Step 5: Prepare Milk Coffee Jelly
Meanwhile, return the remaining jelly mixture to the saucepan. Mix in sweetened condensed milk while keeping the mixture warm over low heat, stirring continuously. It’s important to avoid boiling this layer to prevent skin formation, ensuring smoothness for your two-layer Coffee Jelly.
Step 6: Add Milk Layer
Once the milk coffee jelly is warm and well mixed, carefully and gently pour it over the slightly set black jelly in the molds. The creamy layer should cover the black layer completely, creating a beautiful contrast that showcases the two layers of your Coffee Jelly dessert.
Step 7: Incorporate Coffee Jelly Cubes
Before the milk layer fully sets, take the remaining black coffee jelly from the fridge and cut it into small cubes. Gently drop the cubes into the milk layer, ensuring they are evenly distributed. This not only adds texture but also a fun visual element to your finished dessert.
Step 8: Final Assembly
Refrigerate the assembled layers for at least 2 hours or until completely set. The Coffee Jelly should be firm yet wobbly, resembling a light panna cotta. Once set, cut the remaining black jelly into smaller cubes to serve on top when plating, enhancing the presentation of this delightful dessert.
Coffee Jelly Variations & Substitutions
Feel free to explore different flavors and textures to make this delightful dessert your own!
- Brewed Coffee: Swap instant coffee for brewed coffee to introduce a more nuanced flavor profile. Freshly brewed coffee can elevate your jelly.
- Nut Milk: Use almond or oat milk instead of sweetened condensed milk for a lighter, dairy-free version. This substitution will maintain creaminess while adding nutty undertones.
- Flavored Syrups: Incorporate vanilla or hazelnut syrups into the milk jelly for a delightful twist. Your taste buds will dance with joy as the new flavors mingle with the coffee essence.
- Chocolate Drizzle: Add a sprinkle of cocoa or a drizzle of melted dark chocolate to the top before serving. Chocolate compliments the coffee beautifully, creating a decadent treat.
- Coconut Cream: For a tropical twist, replace sweetened condensed milk with coconut cream. This not only adds a delightful flavor but also a rich texture that’s irresistibly creamy.
- Spicy Kick: Experiment with a pinch of cayenne or cinnamon sprinkled on top for a hint of warmth and spice. It might surprise you how well these spices enhance the coffee flavor.
- Fruit Surprise: Serve with fresh berries or a mango topping to introduce a fruity contrast. The sweetness of the fruit will beautifully balance the coffee richness.
- Agar-Agar Substitutes: If you don’t have agar-agar, use carrageenan as an alternative for a similar texture that sets well. Just remember to adjust the quantity based on the package instructions.
Every variation opens a new door to flavors, just like my delightful Coffee Cheesecake, ensuring that each bite is as exciting as the last! Happy experimenting!
Expert Tips for Making Coffee Jelly
-
Mix Well: Ensure agar-agar is thoroughly combined with sugar before adding water to avoid clumps, ensuring a smooth texture for your coffee jelly.
-
Temperature Control: Keep the jelly solution warm while layering. This prevents the layers from separating and helps maintain an even texture in your coffee jelly.
-
Skip the Substitutes: Use sweetened condensed milk in the milk layer for the best structural support. Other milks can lead to a less cohesive jelly.
-
Let It Set: Be patient with cooling times! Allow each layer to set adequately in the fridge before adding the next for a beautifully distinct two-layer coffee jelly.
-
Decorative Cubes: Cut the black jelly into small cubes just before serving. This adds a fun, visual aspect and enhances the overall enjoyment of your coffee jelly dessert.
How to Store and Freeze Coffee Jelly
Fridge: Store your coffee jelly in a covered container for up to 4–5 days. It’s normal for the jelly to release some liquid over time, but it’s perfectly safe to consume.
Freezer: If you need to store coffee jelly for longer, freeze it in an airtight container for up to 2 months. Thaw in the fridge overnight before serving for the best texture.
Reheating: Avoid reheating coffee jelly, as this can disrupt the delicate layers. Instead, enjoy it chilled straight from the fridge for maximum freshness.
Serving Suggestions: Enhance your coffee jelly experience by adding whipped cream or additional coffee jelly cubes just before serving.
Make Ahead Options
These delightful Coffee Jelly treats are perfect for meal prep enthusiasts! You can prepare the black coffee jelly layer up to 24 hours in advance; simply follow the cooking instructions, allow it to cool, and refrigerate until set. The milk coffee jelly layer can also be made up to 3 days ahead. Just keep it in an airtight container in the fridge to maintain its creamy texture. When you’re ready to serve, layer the milk jelly over the black jelly and incorporate the coffee jelly cubes right before it’s fully set. This way, you’ll enjoy a refreshing dessert without the stress of last-minute preparations, giving you more time to relax and unwind!
What to Serve with Refreshing Coffee Jelly: Easy 2-Layer Agar-Agar Dessert
Looking to complete your delightful dessert experience? These pairing ideas will make your coffee jelly shine even brighter.
-
Creamy Whipped Cream: A dollop of freshly whipped cream adds rich texture, contrasting beautifully with the light and refreshing coffee jelly.
-
Fruity Berries: Fresh strawberries or blueberries bring a burst of freshness, balancing the dessert’s richness while enhancing its visual appeal.
-
Chocolate Shavings: Dark chocolate curls or shavings sprinkle sophistication atop your jelly, adding a touch of indulgence that every coffee lover craves.
-
Coconut Sorbet: This light and tropical sorbet offers a delightful contrast in temperature and flavor, making it a refreshing palate cleanser alongside the creamy layers.
-
Mint Leaves: A touch of freshly chopped mint adds a bright aroma and lightness, elevating your coffee jelly to a new level of sophistication.
-
Iced Coffee: For those who can’t get enough coffee, serve this dessert with a chilled glass of iced coffee. The flavors harmonize beautifully while keeping your treat refreshing.
These delightful additions will elevate your coffee jelly dessert into an unforgettable experience!
Coffee Jelly Recipe FAQs
What type of coffee is best for making coffee jelly?
Using instant coffee granules is ideal for this recipe as it dissolves easily and provides a strong flavor. However, you can also substitute brewed coffee — just ensure it’s strong enough to maintain the intense coffee essence.
How should I store my coffee jelly after making it?
Store your coffee jelly in a covered container in the fridge for up to 4–5 days. If you notice some liquid pooling at the bottom, don’t worry; that’s normal! It’s still safe and delicious to enjoy.
Can I freeze coffee jelly for future enjoyment?
Absolutely! You can freeze coffee jelly in an airtight container for up to 2 months. For best results, thaw it in the fridge overnight before serving it again. This helps maintain the lovely wobbly texture.
What should I do if my jelly isn’t setting properly?
If your jelly isn’t setting, it may be due to not dissolving the agar-agar fully. For best results, make sure to bring the mixture to a gentle boil for 8–10 minutes, stirring continuously. If it still fails to set after chilling, you may need to try the recipe again, ensuring the right proportions of ingredients.
Is coffee jelly suitable for those with dietary restrictions?
Yes, this coffee jelly is vegan-friendly! It uses agar-agar instead of gelatin, making it a great choice for those avoiding animal products. Ensure that your sweetened condensed milk is dairy-free for a fully vegan dessert that everyone can enjoy.
Can I substitute ingredients if I’m allergic to certain components?
If you’re allergic to specific ingredients, I recommend using alternative sweeteners or dairy-free options. For example, consider almond or soy milk instead of sweetened condensed milk, but keep in mind this might alter the final texture of the jelly. Always check labels for any allergens when choosing products!
Delicious Coffee Jelly: Refreshing 2-Layer Dessert to Savor
Ingredients
Equipment
Method
- Prepare molds by washing and drying them thoroughly.
- Cook the jelly base by combining sugar and agar-agar powder in a saucepan.
- Set black coffee jelly by pouring it into prepared molds and chill until set.
- Layer assembly - black jelly base: Pour half of the remaining jelly mixture over the set layer.
- Prepare milk coffee jelly by mixing in sweetened condensed milk without boiling.
- Add milk layer by carefully pouring it over the slightly set black jelly.
- Incorporate coffee jelly cubes by dropping them into the milk layer before it fully sets.
- Final assembly: Refrigerate the layers until completely set.
Leave a Reply