
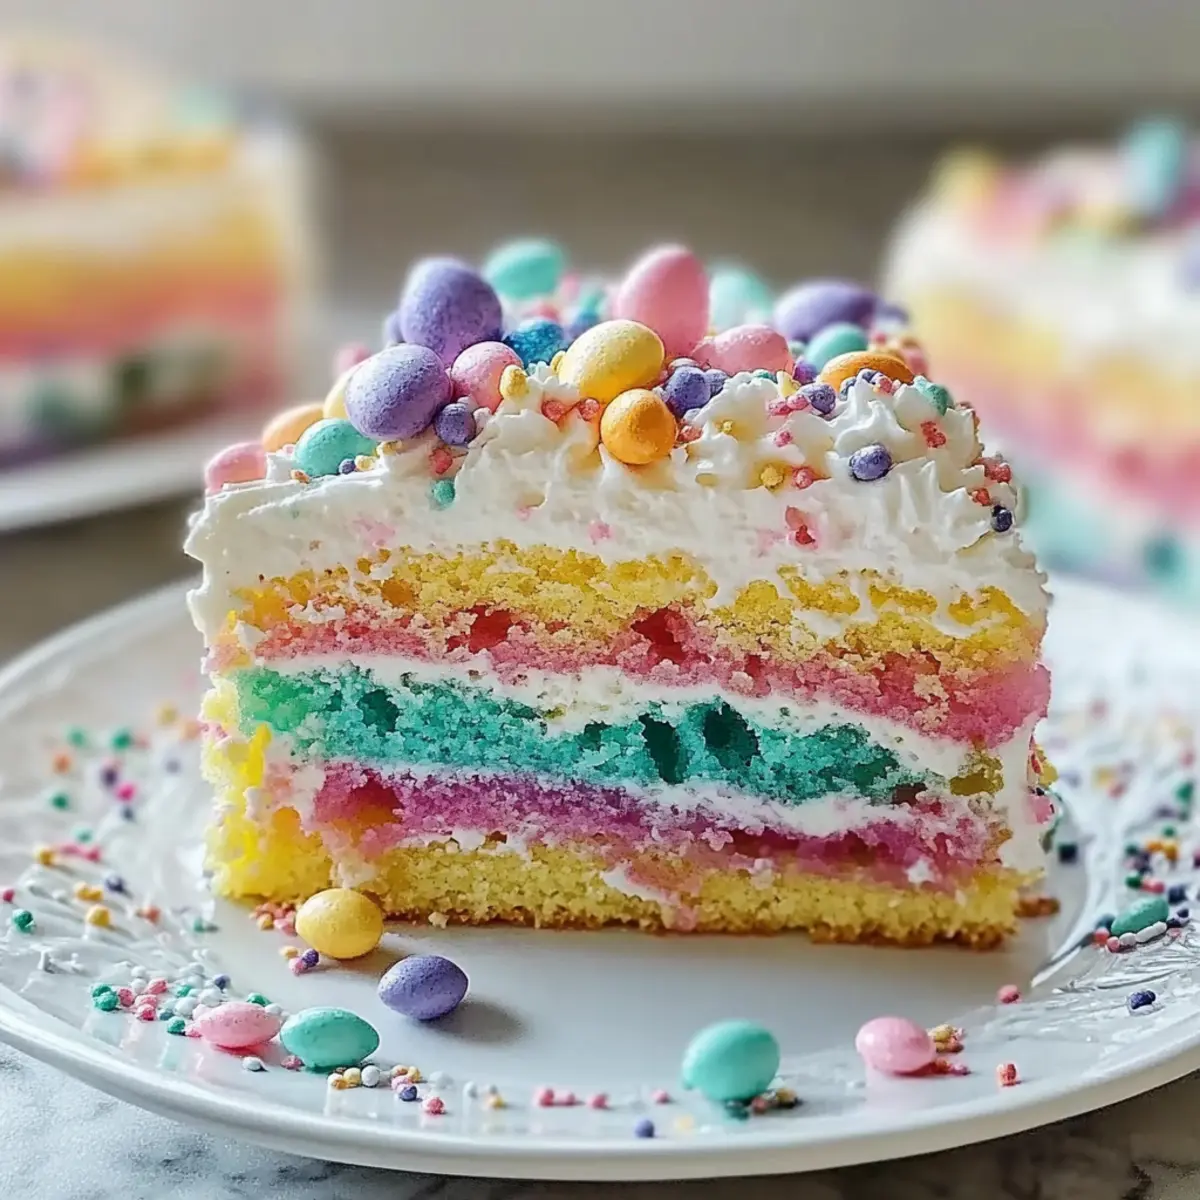
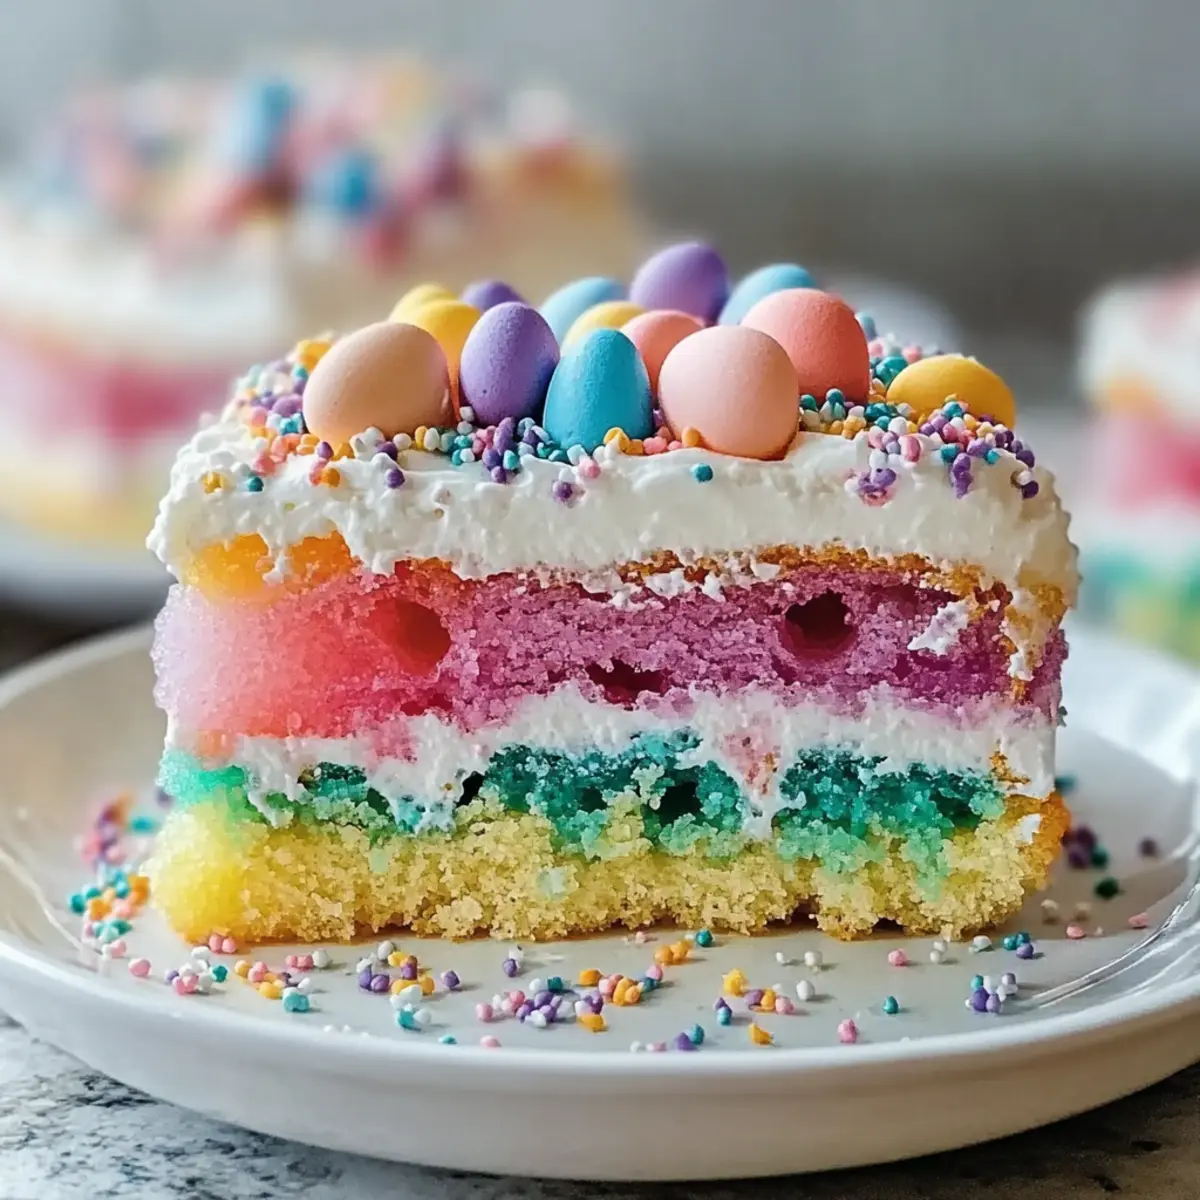
As I stepped into my kitchen, the unmistakable scent of spring hung in the air, inviting creativity and joy. With Easter just around the corner, I couldn’t resist whipping up a vibrant Easter Poke Cake that’s sure to brighten any celebration. This easy dessert effortlessly combines fluffy cake with delightful gelatin, creating a festive centerpiece that dazzles the senses. It’s a crowd-pleaser that not only looks stunning but is also simple to prepare—perfect for those moments when you want to impress with minimal effort. Whether you’re hosting a family gathering or seeking a sweet treat to share, this colorful cake brings smiles and warmth to your table. Who wouldn’t want a slice of this cheerful delight? Let’s dive into how to make this Easter Poke Cake that will leave everyone coming back for seconds!
Why is Easter Poke Cake a Must-Try?
Vibrant Colors: The cheerful colors of the gelatin make this cake a standout at any gathering.
Effortless Preparation: With a simple base of cake mix and a few easy steps, this festive dessert is perfect for both novice and seasoned bakers.
Crowd-Pleasing Flavor: Its moist texture and sweet fruity taste appeal to both kids and adults, ensuring no leftovers!
Versatile Variations: You can easily switch up the flavors by experimenting with different gelatin options or toppings—your creativity is the only limit!
Ideal for Celebrations: This Easter Poke Cake is the perfect centerpiece for your holiday brunch or potluck, bringing joy and color to your table.
So why not create this delightful dessert to brighten your spring celebrations? If you’re looking for more easy dessert ideas, check out our Strawberry Cheesecake Cinnabon or indulge in a rich Chocolate Cheesecake Decadent for variety!
Easter Poke Cake Ingredients
For the Cake
• White Cake Mix – The base structure for your Easter Poke Cake; you can swap this for a homemade version or a gluten-free mix.
• Eggs – These provide moisture and help the cake rise; consider using a flax egg for a vegan-friendly option.
• Water – This activates the cake mix; try using flavored liquids like fruit juice for an exciting twist.
• Oil – Adds moisture and richness; can be substituted with applesauce for a lighter cake version.
For the Gelatin
• Strawberry Gelatin – This gives the cake its vibrant color and flavor infusion; feel free to experiment with other flavors like raspberry or lime for variety.
For the Topping
• Whipped Topping – A creamy layer on top that pairs beautifully with the cake; you can make homemade whipped cream for a light and fresh option.
For Festive Decorations
• Festive Toppings (sprinkles, marshmallows, chocolate eggs) – These decorative elements enhance the visual appeal of your dessert; customize based on your theme or preference!
Celebrate Easter with this delightful Easter Poke Cake that will surely bring joy to your table!
Step‑by‑Step Instructions for Easter Poke Cake
Step 1: Prepare the Cake
Start by preheating your oven to 350°F (175°C). In a mixing bowl, combine the white cake mix, eggs, water, and oil, following the instructions on the cake mix box. Use a hand mixer or whisk to blend until smooth and lump-free—about 2 minutes. Pour the batter evenly into a greased 9×13 inch baking pan and bake for 25-30 minutes, or until the cake is golden brown and a toothpick inserted in the center comes out clean.
Step 2: Poke Holes
Once the cake is finished baking, remove it from the oven and let it cool in the pan for about 10 minutes. Using a fork or skewer, poke holes all over the top of the still-warm cake. Ensure the holes are deep enough to allow the strawberry gelatin to seep through but avoid puncturing the bottom of the cake to keep it intact.
Step 3: Make Gelatin
In a medium mixing bowl, combine 1 cup of boiling water with the strawberry gelatin powder. Stir the mixture until the gelatin is completely dissolved. Then, add ½ cup of cold water and mix again. Allow the gelatin to cool slightly before proceeding; this will keep it from cooking the cake as it’s poured on.
Step 4: Inject Gelatin
Slowly and carefully pour the cooled gelatin mixture over the entire surface of the cake, ensuring that it seeps into all the holes you’ve poked. The vibrant colors from the gelatin will begin to penetrate the cake, creating that beautiful poke effect. Once done, cover the cake with plastic wrap and refrigerate it for at least 2 hours, allowing the gelatin to set completely.
Step 5: Top the Cake
After the gelatin has set, retrieve the cake from the refrigerator. Gently remove the plastic wrap and spread an even layer of whipped topping over the entire cake surface, creating a fluffy and creamy layer. Use a spatula to smooth it out beautifully, ensuring it covers the gelatin colors beneath.
Step 6: Serve
Finally, unleash your creativity by adding festive toppings such as colorful sprinkles, marshmallows, or chocolate eggs on top of the whipped cream. Slice the cake into squares and serve chilled, allowing everyone to admire the stunning marbled colors and dig in. This Easter Poke Cake is sure to be a delightful addition to your celebration!

Storage Tips for Easter Poke Cake
Fridge: Store any leftover Easter Poke Cake in an airtight container in the refrigerator for up to 3-4 days to maintain its freshness and flavor.
Freezer: If you want to keep the cake longer, wrap it tightly in plastic wrap and place it in the freezer for up to 1-2 months. Thaw in the fridge before serving.
Reheating: When ready to enjoy, slice and let the cake sit at room temperature for about 10-15 minutes before serving. This helps restore its original texture and flavor.
Wrapping: Ensure that the cake is well-wrapped to prevent freezer burn when storing in the freezer. The vibrant colors of the Easter Poke Cake may fade if left uncovered!
Make Ahead Options
These Easter Poke Cakes are perfect for busy cooks looking to save time during the spring festivities! You can bake the cake up to 24 hours in advance; simply allow it to cool completely, then cover it tightly with plastic wrap to prevent any drying out. Once it’s cooled, you can also poke the holes and prepare the gelatin, storing the poured cake in the fridge for up to 2 hours before serving, allowing the flavors to meld beautifully. When you’re ready to impress your guests, whip the topping and decorate with your favorite festive toppings right before serving, ensuring the cake looks just as delicious and vibrant as if made fresh that day.
Expert Tips for Easter Poke Cake
-
Poke Depth Matters: Ensure holes are deep enough for gelatin absorption without reaching the bottom. This helps create the perfect texture for your Easter Poke Cake.
-
Cool Completely: Allow the cake to cool to room temperature before refrigerating it. This ensures an even setting for your gelatin and prevents the cake from becoming dense.
-
Gelatin Variations: Mix up colors and flavors! Use different gelatin flavors in sections for a rainbow effect. Your Easter Poke Cake will look even more festive.
-
Wrap Leftovers: To keep the cake fresh, wrap any leftovers tightly in plastic wrap before storing in the refrigerator for up to 3-4 days. You can also freeze it for longer enjoyment.
-
Avoid Overmixing: When preparing the cake mix, blend just until combined to maintain the fluffiness of your Easter Poke Cake. Overmixing can lead to a denser cake.
What to Serve with Easter Poke Cake
As you prepare to wow your guests with this delightful dessert, consider some delicious side dishes and drinks that perfectly complement the cheerful flavors of your Easter Poke Cake.
-
Creamy Mashed Potatoes: Their buttery, smooth texture provides a rich contrast to the sweetness of the cake, making for a well-rounded meal.
-
Honey-Glazed Carrots: The natural sweetness of these vibrant veggies echoes the fruity notes of the cake while adding a pop of color to your table.
-
Zesty Lemonade: A refreshing beverage that cuts through the sweetness of the dessert, offering a bright, tangy contrast that enchants the palate.
-
Spring Salad: A mix of fresh greens, strawberries, and nuts adds a crunch and a touch of brightness, perfectly balancing the richness of the Easter Poke Cake. Toss in a light vinaigrette for an uplifting finish!
-
Chocolate-Covered Strawberries: These delightful treats echo the fruity flavors of your cake and make for an elegant dessert pairing that everyone will love.
-
Vanilla Ice Cream: A scoop of creamy goodness complements the cake beautifully, enhancing its celebratory feel while providing a cool contrast.
-
Fluffy Biscuits: Soft, buttery biscuits are a delightful side that adds a comforting, warm element to your meal, making it truly memorable.
-
Iced Tea: A chilled glass of sweetened or unsweetened iced tea is an ideal refreshment, harmonizing perfectly with both the cake and meal for a satisfying experience.
Easter Poke Cake Variations & Substitutions
Feel free to make this festive dessert your own with these simple and delicious variations!
-
Gluten-Free: Substitute the white cake mix with a gluten-free cake mix for a delightful version everyone can enjoy.
-
Vegan-Friendly: Use a flax egg and plant-based whipped topping to keep the cake deliciously vegan without sacrificing flavor. Embrace the joy of creating!
-
Flavored Gelatin: Experiment with different gelatin flavors like raspberry, peach, or lime to suit your taste preferences and brighten up your cake.
-
Fruit Juice Swap: Replace the water in your cake mix with fruit juice to add a fruity zest and enhance the overall flavor profile.
-
Whipped Cream Twist: Try using cream cheese frosting for a richer, tangier topping that perfectly complements the poke element.
-
Layered Gelatin: Create a mesmerizing effect by pouring different colors of gelatin into sections of the cake, transforming it into a rainbow delight.
-
Fruit Toppings: Fresh fruit like sliced strawberries or blueberries can provide a refreshing contrast to the sweetness of the cake and gelatin.
-
Temperature Play: Serve the cake slightly warm for a comforting twist instead of chilled—perfect for those cozy gatherings with loved ones.
Your creative touch will make this Easter Poke Cake experience even more special! Plus, if you’re interested in more delicious dessert options, check out our delightful Moist Chantilly Cake or explore the fun flavors in our Ube Mochi Cake for additional sweet ideas!

Easter Poke Cake Recipe FAQs
What type of cake mix should I use for the Easter Poke Cake?
You can use any white cake mix for this recipe. If you prefer a homemade cake, that’s a great option too! For gluten-free needs, make sure to choose a certified gluten-free cake mix.
How long can I store leftover Easter Poke Cake in the refrigerator?
Absolutely! You can store the leftovers in an airtight container in the refrigerator for up to 3-4 days. Just make sure it’s well-covered to maintain its moistness and flavor.
Can I freeze Easter Poke Cake? If so, how?
Yes, you can! Simply wrap the cake tightly in plastic wrap and place it in a freezer-safe container. It can be frozen for up to 1-2 months. To enjoy later, just thaw it in the refrigerator for several hours or overnight before serving.
What if the gelatin doesn’t seep into the cake holes properly?
If you notice the gelatin isn’t permeating as expected, it might be due to shallow holes. Ensure your holes are deep but not reaching the bottom of the cake—this allows for proper absorption. You can gently poke additional holes before injecting the gelatin to fix it.
Are there any dietary considerations for the Easter Poke Cake?
Very! To make it gluten-free, ensure your cake mix and toppings are certified gluten-free. For vegan options, you can substitute eggs with a flax egg (1 tablespoon flaxseed meal mixed with 2.5 tablespoons water) and use plant-based whipped topping.
Can I alter the flavors of the gelatin or toppings?
The more the merrier! Feel free to experiment with different gelatin flavors like raspberry or lime for a fun twist. You can also get creative with toppings—consider using fresh berries or coconut in place of sprinkles for a more natural touch!
Easter Poke Cake: A Festive Treat to Brighten Your Table
Ingredients
Equipment
Method
- Preheat your oven to 350°F (175°C). Combine the white cake mix, eggs, water, and oil in a mixing bowl. Blend until smooth and lump-free, about 2 minutes. Pour into a greased baking pan and bake for 25-30 minutes or until a toothpick comes out clean.
- Let the cake cool in the pan for about 10 minutes. Poke holes all over the top using a fork or skewer, ensuring they are deep enough for the gelatin.
- In a medium mixing bowl, combine 1 cup of boiling water with the strawberry gelatin powder, stirring until dissolved. Then add ½ cup of cold water and mix again. Let it cool slightly.
- Pour the cooled gelatin mixture over the cake, ensuring it seeps into the holes. Cover with plastic wrap and refrigerate for at least 2 hours.
- Spread the whipped topping over the set gelatin layer, smoothing it out evenly.
- Add festive toppings like sprinkles, marshmallows, or chocolate eggs. Slice and serve chilled.
Leave a Reply