
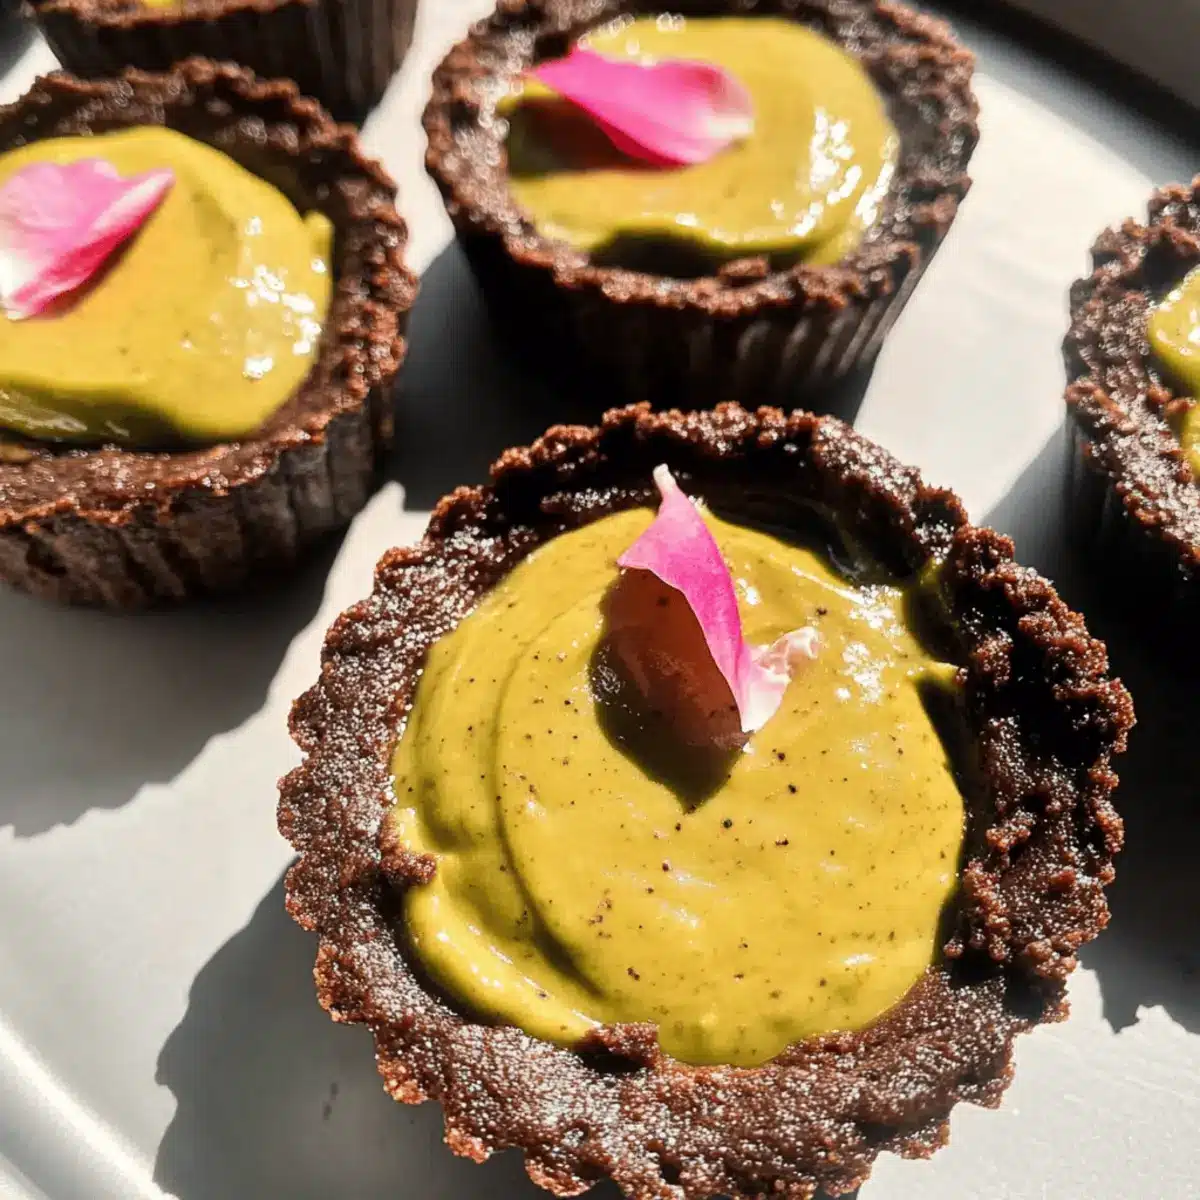
As I stood in my kitchen, a craving for something sweet yet healthy crept in—a little voice urging me to whip up a treat that combines indulgence with nourishment. That’s when I turned to these delightful No Bake Chocolate Avocado Tarts. With a luscious, creamy filling infused with ripe avocado and rich cocoa, this recipe is not only a feast for the senses but also a guilt-free way to satisfy those dessert cravings. The best part? They’re incredibly easy to whip up, making them a perfect choice for busy weeknights or unexpected guests. Plus, they’re gluten-free and vegan, ensuring that everyone can enjoy this wholesome dessert. Ready to dive into a treat that feels indulgent but is packed with goodness? Let’s get started!

Why choose No Bake Chocolate Avocado Tarts?
Indulgent yet Healthy: These tarts are a delightful balance of rich cocoa and creamy avocado, making them a guilt-free indulgence.
Easy Preparation: With no baking needed, you can whip these up in a flash, confidently impressing friends and family.
Crowd-Pleasing Flavor: The combination of velvety filling and a crunchy crust is sure to win over even the pickiest of eaters.
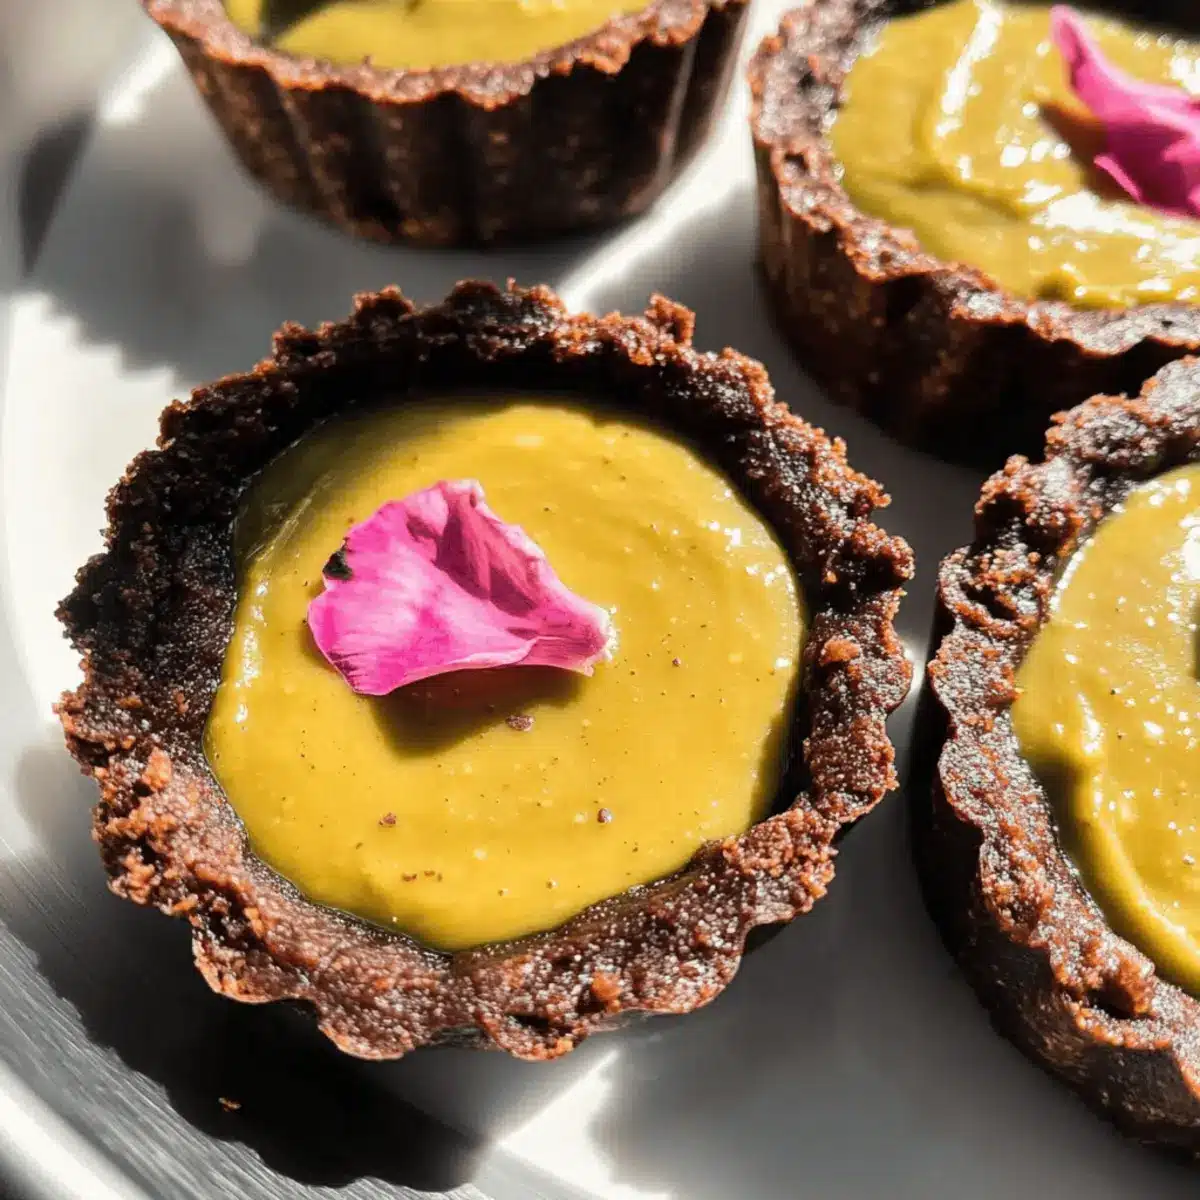
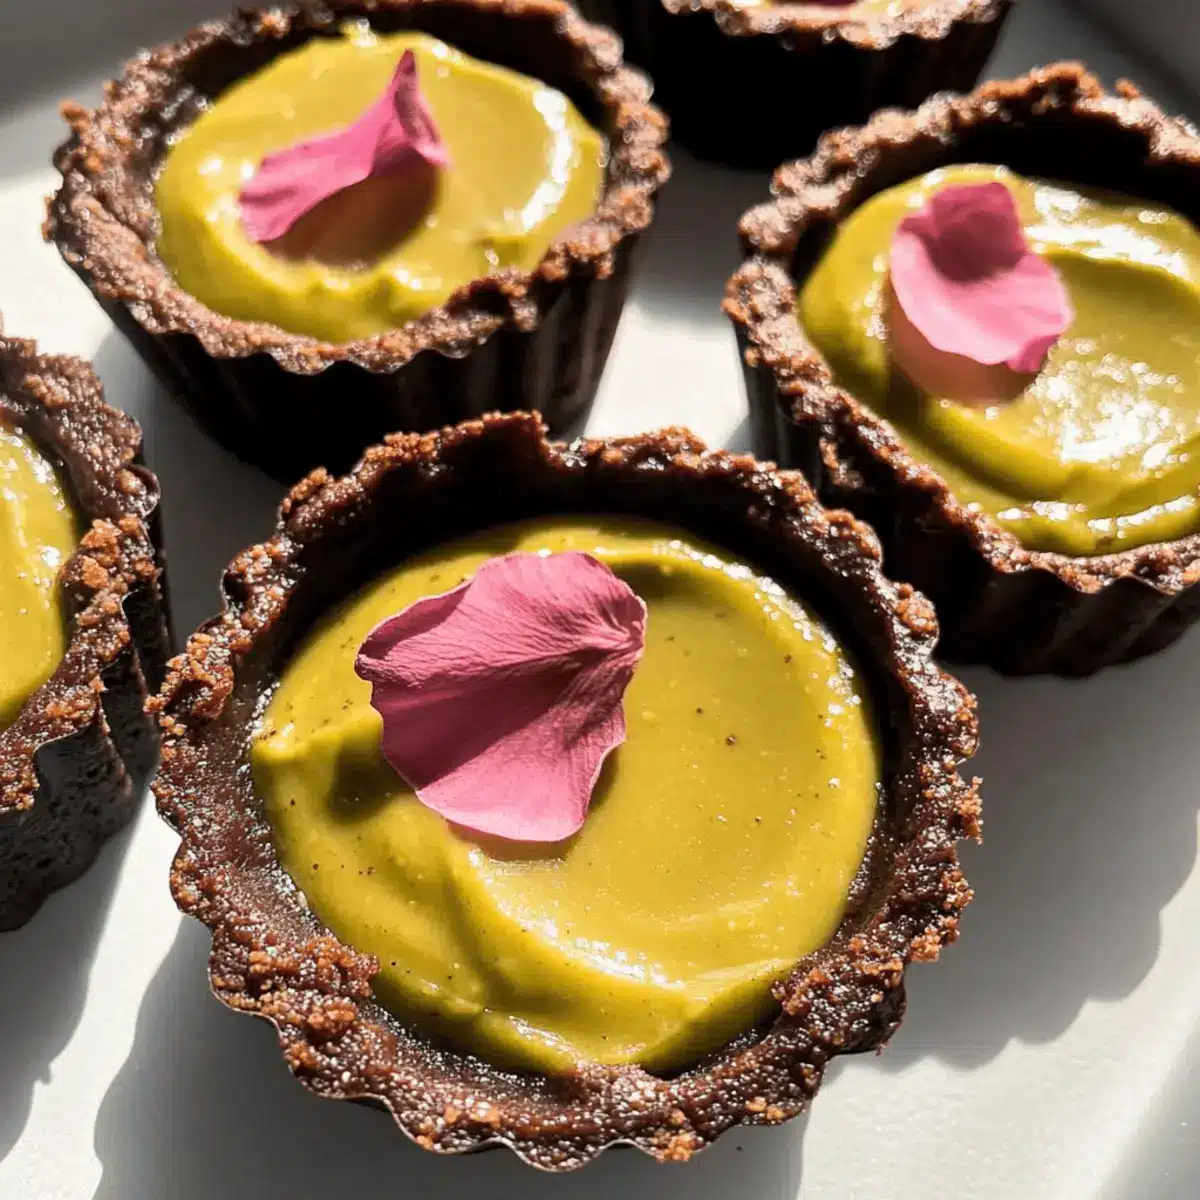
Versatile Toppings: Dress them up with dried rose petals or a drizzle of chocolate sauce for visual flair and added flavor.
Nutrient-Rich: Packed with healthy fats and fiber, they’re a smart choice for dessert lovers looking for something wholesome.
For more sweet inspirations, check out my Chocolate Cheesecake Decadent or Chocolate Chip Zucchini recipes!
No Bake Chocolate Avocado Tarts Ingredients
For the Crust
- Almond Flour – Provides the base, adding a nutty texture; gluten-free and can be swapped with other nut flours if needed.
- Cocoa Powder – Introduces a rich chocolate flavor; opt for Dutch cocoa for a deeper taste.
- Coconut Oil – Binds the crust while adding a hint of coconut; can substitute with vegan butter for a similar effect.
- Maple Syrup – Acts as a natural sweetener for both crust and filling; agave syrup is a good alternative.
- Pinch of Salt – Balances the sweetness and enhances flavor.
For the Filling
- Avocado – The creamy base, rich in healthy fats; use ripe medium-sized avocados for best texture.
- Nut Butter – Provides creaminess and enhances the rich flavor; almond or cashew butter works best.
- Vanilla Extract – Adds depth of flavor; be sure to use pure vanilla for the best results.
- Maple Syrup – Sweetens the filling; adjust quantity to your desired sweetness level.
Optional Toppings
- Dried Rose Petals – Add a floral touch for elegance.
- Extra Nut Butter – Drizzle over the top for added richness.
- Whipped Cream – Use coconut whipped cream for a vegan-friendly garnish.
Dive into these No Bake Chocolate Avocado Tarts that deliver all the decadence without the guilt!
Step‑by‑Step Instructions for No Bake Chocolate Avocado Tarts
Step 1: Prepare Crust
Start by greasing a mini muffin pan with coconut oil to ensure easy removal later. In a mixing bowl, combine almond flour, cocoa powder, melted coconut oil, maple syrup, and a pinch of salt. Mix until a thick, crumbly dough forms that holds together when pressed. This crust will form the delicious base of your No Bake Chocolate Avocado Tarts.
Step 2: Shape Crust
Divide the dough into 12 equal portions and press each one firmly into the muffin pan, covering both the bottoms and sides to create little tart shells. Ensure the crust is evenly distributed and compacted to hold together after chilling. Once shaped, place the muffin pan in the freezer for at least 15 minutes to set, while you prepare the filling.
Step 3: Make Filling
In a food processor, add ripe avocados, maple syrup, nut butter, and vanilla extract. Blend on high until the mixture is completely smooth and creamy, scraping down the sides as needed. Taste the filling and adjust the sweetness with additional maple syrup if desired, ensuring it’s flavorful and perfectly balanced for your No Bake Chocolate Avocado Tarts.
Step 4: Assemble Tarts
Remove the muffin pan from the freezer and spoon the avocado filling into each chilled crust. Smooth the tops with a spatula or the back of a spoon for an elegant finish. Once filled, return the tarts to the freezer to firm up for at least 1 hour, perfecting the texture of the filling while you dream of their rich, chocolatey goodness.
Step 5: Serve
After the tarts have set, gently remove them from the muffin pan by carefully loosening the edges with a knife. Serve chilled for the best flavor and texture, enjoying the delightful contrast between the crunchy crust and the creamy filling. Consider garnishing your No Bake Chocolate Avocado Tarts with dried rose petals or a drizzle of nut butter for an extra touch of elegance.
Expert Tips for No Bake Chocolate Avocado Tarts
- Ripe Avocados: Make sure to use avocados that are perfectly ripe; they provide the best creamy texture and flavor for the filling.
- Sweetness Balance: Start with less maple syrup when blending the filling; it’s easier to add more if needed than to fix an overly sweet mixture.
- Crust Consistency: Ensure the crust dough is mixed thoroughly until it’s thick enough to hold its shape; too crumbly means it won’t cut well.
- Proper Chilling: Allow the tarts to chill adequately in the freezer before serving; this firms up the filling and enhances the overall texture.
- Greasing Essentials: Don’t skip greasing the muffin pan well; this will make removing your tarts much easier and avoid breakage.
How to Store and Freeze No Bake Chocolate Avocado Tarts
- Fridge: Store the tarts in an airtight container in the refrigerator for up to 3 days. This keeps them fresh and ready to enjoy anytime.
- Freezer: For longer storage, place the tarts in a Ziploc bag or an airtight container and freeze for up to 1 month. They maintain their flavor and texture well when frozen.
- Thawing: To enjoy a tart from the freezer, simply remove it and let it sit at room temperature for about 15 minutes before serving. This will restore its creamy consistency.
- Avoid Moisture: Ensure the tarts are fully cooled and wrapped properly before storing to prevent any freezer burn or moisture buildup, which could affect the delicious taste of your no bake chocolate avocado tarts.
Make Ahead Options
These No Bake Chocolate Avocado Tarts are perfect for meal prep, allowing you to whip them up ahead of time for busy days! You can prepare the crust up to 24 hours in advance by storing it in the fridge or freezer, ensuring it stays fresh and firm. The filling can also be made a day ahead—just blend the ingredients and refrigerate the mixture in an airtight container to maintain its creamy texture. When you’re ready to assemble, simply fill the chilled crusts with the avocado filling, smooth the tops, and freeze again for about 1 hour to set. This way, you’ll have a delightful, healthy dessert ready with minimal effort, just as delicious as when freshly made!
What to Serve with No Bake Chocolate Avocado Tarts
Looking to elevate your taste experience with these creamy, dreamy tarts? Here are some delightful pairings to create the perfect meal.
-
Fresh Berries: Their tartness contrasts beautifully with the creamy sweetness of the tarts, adding a refreshing touch to every bite.
-
Coconut Whipped Cream: A light dollop brings extra creaminess and a hint of coconut flavor, enhancing the lush decadence of the dessert.
-
Chopped Nuts: Toasted almonds or pecans provide a satisfying crunch, creating a delightful texture that complements the smooth filling.
-
Dark Chocolate Shavings: For the chocolate lovers, adding shavings on top contributes an elegant visual and deepens the chocolate flavor experience.
These pairings can transform your No Bake Chocolate Avocado Tarts into an unforgettable dessert experience, each enhancing the flavors in a unique way. Consider serving alongside herbal tea or a light dessert wine for an extra touch of sophistication.
No Bake Chocolate Avocado Tarts Variations
Feel free to get creative and customize these delightful tarts to suit your taste and dietary needs!
- Nut-Free: Replace almond flour with sunflower seed flour for a nut-free version that still delivers a great texture.
- Peanut Butter Twist: Swap out nut butter for peanut butter for a rich and comforting twist—it’s like a nostalgic treat!
- Cocoa Boost: Enhance chocolate flavor by adding extra cocoa powder in the filling. This intensifies that decadent chocolate bliss!
- Mixed Berry Layer: Top the tarts with a medley of fresh berries for a refreshing, fruity explosion. The vibrant colors elevate the dish visually!
- Spicy Kick: Add a dash of cayenne pepper to the filling for a surprising heat that beautifully complements the sweetness.
- Date Sweetener: Replace maple syrup with blended Medjool dates for a whole-food sweetener that adds a caramel-like richness.
- Coconut Flakes: Sprinkle unsweetened toasted coconut flakes on top before serving for a delightful crunch and added tropical flair.
- Whipped Cream Delight: Garnish the tarts with coconut whipped cream for a light, fluffy topping that makes every bite feel indulgent.
As you dive into these variations, consider pairing your tarts with some fresh fruits or a dollop of my Avocado Cream Sauce for a creamy companion. Each twist offers a unique experience, ensuring they’ll be a hit at any gathering!
No Bake Chocolate Avocado Tarts Recipe FAQs
What kind of avocados should I use for the filling?
Absolutely use ripe, medium-sized avocados for the best texture and flavor in your filling. They should yield slightly to gentle pressure but not be overly soft or brown. If you find avocados with a few dark spots, don’t worry—they’re safe to eat as long as they’re not rotten!
How should I store the No Bake Chocolate Avocado Tarts?
The tarts can be stored in an airtight container in the refrigerator for up to 3 days. If you’d like to keep them longer, you can freeze them for up to 1 month. Just make sure to wrap them well to prevent freezer burn!
Can I freeze No Bake Chocolate Avocado Tarts?
Yes! To freeze, place the tarts in a Ziploc bag or an airtight container once they’ve fully set. When you’re ready to enjoy one, remove it from the freezer and let it thaw at room temperature for about 15 minutes to regain its creamy texture.
What should I do if my crust is too crumbly?
If your crust mixture is too crumbly and doesn’t hold together when pressed, try adding a bit more melted coconut oil or maple syrup. Mix thoroughly and check for a cohesive dough that can be easily shaped into the muffin pan.
Are these tarts safe for people with nut allergies?
If you’re making these tarts for someone with nut allergies, you’ll want to substitute the almond flour with a nut-free flour, like oat flour. Additionally, opt for sunflower seed butter or a similar nut-free spread in the filling, ensuring everyone can enjoy this delicious dessert without worry.
Can I adjust the sweetness of the filling?
Very much! When blending the filling, start with a smaller amount of maple syrup and taste as you go. If you prefer it sweeter, feel free to add more maple syrup gradually until the desired sweetness is achieved. This way, you can customize it to your taste!
No Bake Chocolate Avocado Tarts for Guilt-Free Indulgence
Ingredients
Equipment
Method
- Grease a mini muffin pan with coconut oil. In a mixing bowl, combine almond flour, cocoa powder, melted coconut oil, maple syrup, and a pinch of salt. Mix until a thick, crumbly dough forms.

- Divide the dough into 12 equal portions and press each firmly into the muffin pan to create tart shells. Place the pan in the freezer for at least 15 minutes to set.
- In a food processor, add ripe avocados, maple syrup, nut butter, and vanilla extract. Blend on high until smooth. Adjust the sweetness as necessary.
- Spoon the avocado filling into each chilled crust and smooth the tops. Return the tarts to the freezer for at least 1 hour to firm up.
- Gently remove the tarts from the muffin pan and serve chilled, garnished with dried rose petals or nut butter if desired.
Leave a Reply