
The aroma of cinnamon and sweet apples fills the air as Halloween creeps closer. Among the flurry of spooky decorations and festive excitement, there’s one dessert that stands out: the Poison Apple Pie. This delectable treat captures the essence of Halloween with its bewitching flavors and stunning presentation. Not only is it easy to make, but it’s also a show-stopper at any gathering. Perfect for kids and adults alike, using simple ingredients, this recipe puts a fun twist on the classic apple pie that everyone knows and loves. Imagine the delight on your loved ones’ faces when they cut into a pie that’s as enchanting as it is delicious! Ready to step into the world of festive baking? Let’s uncover the secrets to making this whimsical masterpiece.
Why Is Poison Apple Pie a Must-Bake?
Irresistible Aroma: The delightful smell of cinnamon and apples wafts through your kitchen, luring everyone in for a slice.
Kid-Friendly Fun: This recipe is a fantastic opportunity for kids to get involved in baking, making memories one pie at a time.
Stunning Presentation: With its vibrant red color and spooky design, this pie is sure to be the centerpiece at your Halloween celebration.
Easily Customizable: Feel free to switch up the spices or even add a splash of caramel for a unique twist! If you enjoy family-bonding recipes like Baked Oatmeal Applesauce, this one’s for you!
Quick Prep Time: With simple ingredients and straightforward steps, you’ll have a stunning pie ready to impress with minimal effort.
Get ready to enchant your guests and elevate your festive gatherings with this Delectably Spooky Poison Apple Pie!
Poison Apple Pie Ingredients
• Prepare to create a spooky masterpiece that will delight adults and kids alike!
For the Pie Crust
- All-Purpose Flour – This forms the base of your crust; use a gluten-free blend for a gluten-free version.
- Unsalted Butter – Provides richness; make sure it’s cold for a flaky texture.
- Granulated Sugar – Adds a touch of sweetness to balance the crust’s flavor.
- Ice Water – Helps to bring the dough together without warming it.
For the Filling
- Fresh Apples – Use a mix of sweet and tart varieties for complex flavors; Granny Smith and Honeycrisp work wonderfully.
- Brown Sugar – Infuses a deeper flavor; you can swap it for coconut sugar for a healthier option.
- Ground Cinnamon – Adds warmth and spice, capturing the essence of fall.
- Nutmeg – A pinch elevates the flavor profile, leaving a cozy aroma.
- Lemon Juice – Prevents browning and adds brightness to the apples; apple cider vinegar can be a fun substitute.
For the Garnish
- Red Food Color – Gives that iconic “poison” look; you can use beet juice for a natural alternative.
- Candy Eyes – These spooky decorations make the pie come alive; swap with chocolate chips for a less creepy effect.
Now you have the ingredients ready for your Delectably Spooky Poison Apple Pie—let’s make some magic happen in the kitchen!
Step‑by‑Step Instructions for Delectably Spooky Poison Apple Pie
Step 1: Prepare the Pie Crust
In a mixing bowl, combine 1 ½ cups all-purpose flour, ½ cup cold unsalted butter, and 2 tablespoons granulated sugar. Use a pastry cutter or your fingers to blend until the mixture resembles coarse crumbs. Gradually add ice water, one tablespoon at a time, until the dough holds together. Shape it into a disc, wrap in plastic wrap, and refrigerate for at least 30 minutes while you prepare the filling.
Step 2: Make the Apple Filling
Peel, core, and slice 4 cups of fresh apples, mixing a combination of Granny Smith and Honeycrisp for the best flavor. In a large bowl, toss the apple slices with ¾ cup brown sugar, 1 teaspoon ground cinnamon, ¼ teaspoon nutmeg, and 1 tablespoon lemon juice. Let this mixture sit for about 15 minutes to allow the flavors to meld and the apples to soften slightly.
Step 3: Preheat the Oven
Preheat your oven to 425°F (220°C). This high temperature will ensure your Delectably Spooky Poison Apple Pie crust bakes to a gorgeous golden brown. As the oven warms up, roll out your chilled dough on a floured surface to about 1/8-inch thick. Carefully place the crust into a 9-inch pie dish, making sure to gently press it into the pan’s shape and trim any excess.
Step 4: Fill the Pie Shell
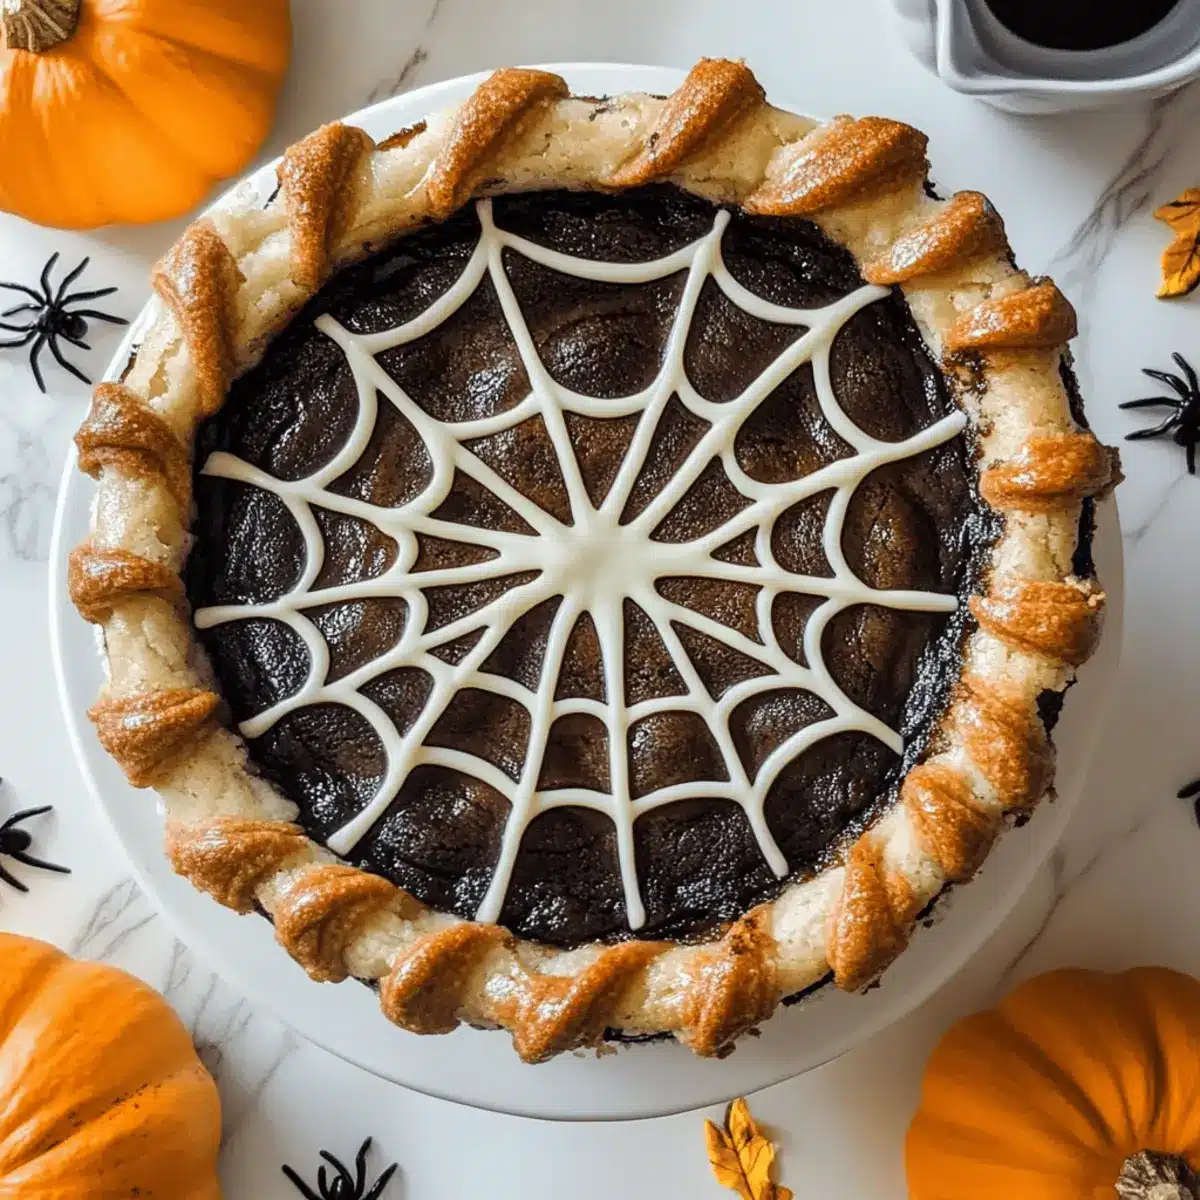
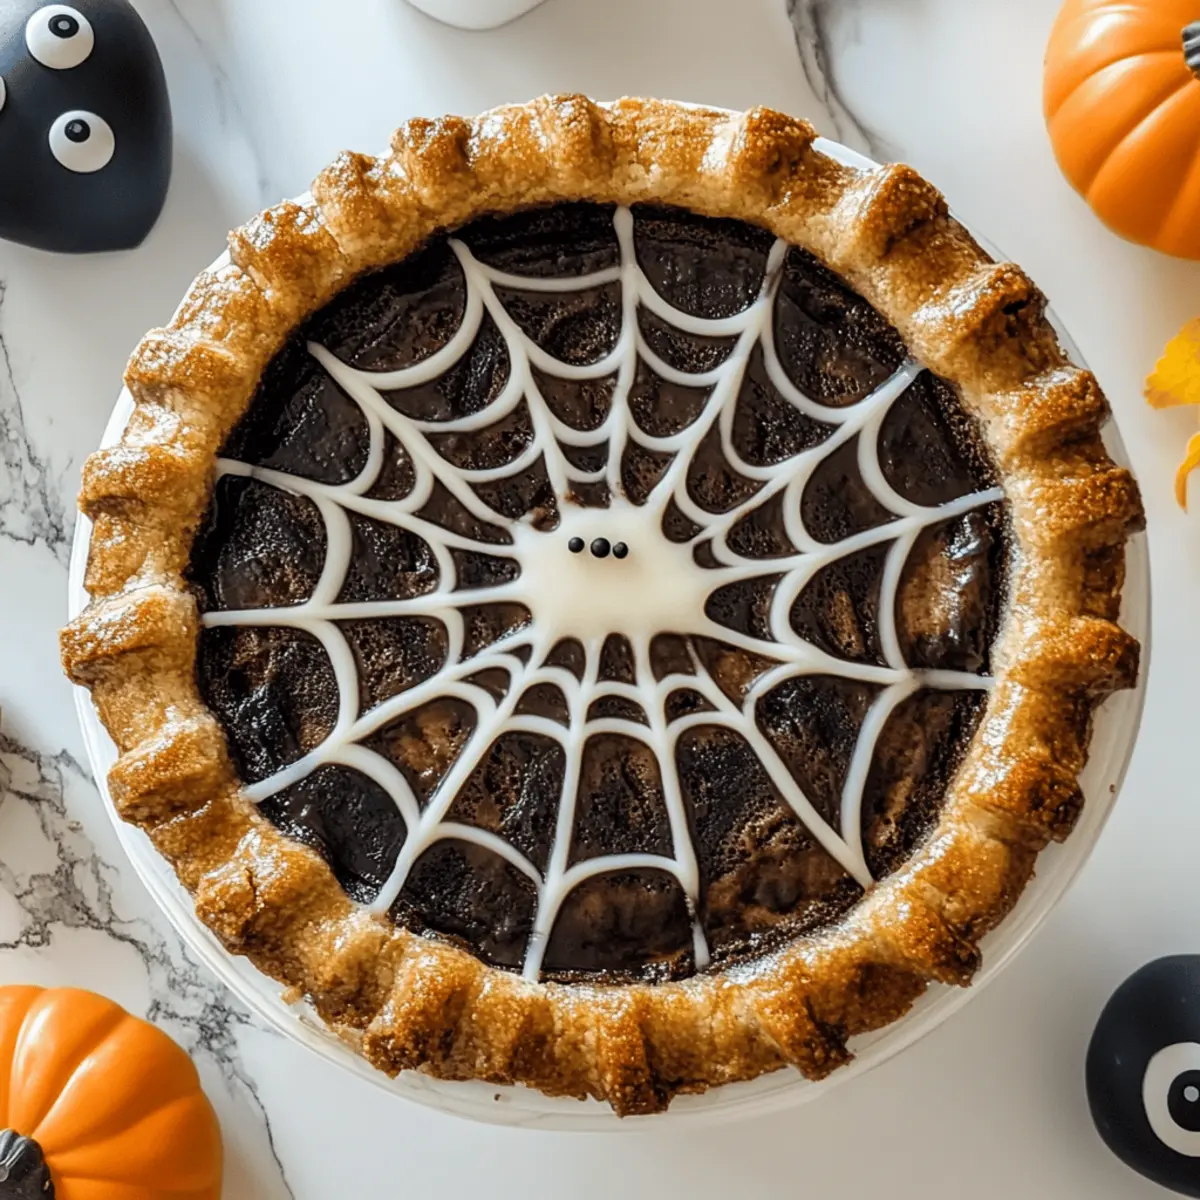
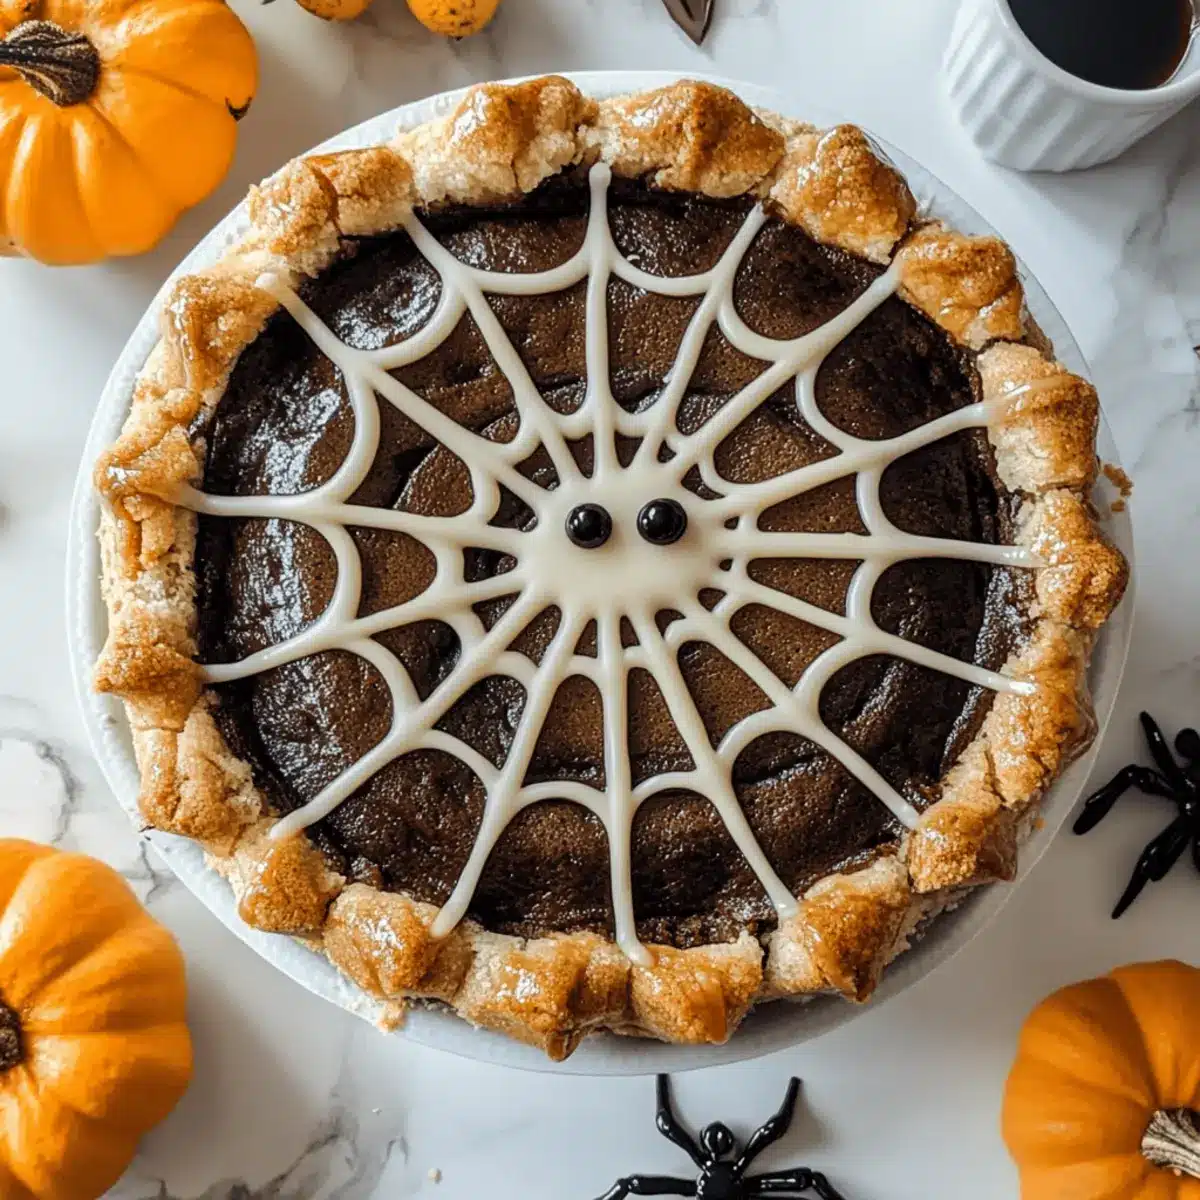
Once your apples have marinated, spoon the apple mixture into the prepared pie crust, ensuring even distribution. To create that spooky look, drizzle the apples with a few drops of red food coloring, avoiding heavy application to keep the natural beauty visible. This will give your Poison Apple Pie its enchanting hue, making it a show-stopping centerpiece for Halloween festivities.
Step 5: Assemble and Bake
Roll out a second portion of pie crust to create a lattice top or simply cover your pie with the remaining dough. Cut small slits for steam vents if using a full crust. Brush the crust with a beaten egg or milk for a shiny, golden finish. Bake in the preheated oven for 15 minutes, then reduce the heat to 350°F (175°C) and continue baking for 30 to 35 minutes, or until the apples are bubbly and the crust is golden brown.
Step 6: Add the Final Touches
Once your Delectably Spooky Poison Apple Pie is done, remove it from the oven and let it cool on a wire rack for about 20 minutes. Before serving, decorate the top of the pie with candy eyes to give it a fun, spooky appearance that kids will love. This charming twist adds the perfect finishing touch to your festive dessert!
Step 7: Serve and Enjoy
Slice into the pie and watch as the vibrant filling beckons. Serve warm or at room temperature, and consider pairing it with vanilla ice cream or whipped cream for an extra treat. With every bite, your guests will delight in the whimsical flavors of your Poison Apple Pie, making it a memorable part of your Halloween gatherings!

Expert Tips for Poison Apple Pie
• Perfecting Your Crust: Use cold butter and ice water for a tender, flaky pie crust. Don’t overwork the dough to avoid toughness.
• Apple Selection: Opt for a mix of sweet and tart apples, like Granny Smith and Honeycrisp, to achieve a balanced flavor in your Poison Apple Pie.
• Food Coloring Tip: For a spookier appearance, use just a few drops of red food color to keep the pie vibrant without overpowering the natural apple hue.
• Pre-Bake for Texture: If you want an extra-crisp bottom, pre-bake the crust for 10 minutes before adding the filling. This prevents sogginess.
• Watch the Bake Time: Keep an eye on your pie towards the end of baking; every oven behaves differently, and you want that golden crust without burning.
• Cooling Is Key: Let the pie cool before serving to ensure the filling sets properly. This helps slice neatly and enhances the presentation!
Make Ahead Options
These Delectably Spooky Poison Apple Pies are perfect for meal prep enthusiasts! You can prepare the pie crust and filling up to 24 hours in advance to save time on Halloween day. Simply make the dough, wrap it tightly in plastic wrap, and refrigerate. For the filling, slice the apples and mix them with sugar and spices as instructed, then store in an airtight container in the refrigerator to prevent browning. When you’re ready to bake, simply assemble the pie, add your red food coloring, and pop it in the oven. This way, your pie will hit the table with all the delightful flavors and spooky charm, making it just as delicious and beautiful as if you had baked it fresh that day!
Poison Apple Pie Variations & Substitutions
Feel free to explore these variations and tailor your pie to your taste—your creativity is the only limit!
-
Gluten-Free Crust: Substitute all-purpose flour with a gluten-free blend for a pie that everyone can enjoy without compromising on flavor.
-
Vegan Option: Replace unsalted butter with coconut oil or vegan butter, and use a flax egg instead of a regular egg to brush the crust.
-
Spiced Up Flavor: Add a dash of cloves or allspice to your apple filling for an extra layer of warmth and complexity. These spices dance well with the natural sweetness of the apples.
-
Caramel Drizzle: Enhance the sweetness with a swirl of caramel sauce in the filling. The gooey texture pairs beautifully with the crisp apples, creating an indulgent experience!
-
Candy Coated Eyes: Instead of candy eyes, use chocolate chips or even gummy candies for a twist that adds a sweet surprise to each slice. Kids will love this fun twist!
-
Bubbly Filling: For a juicy, bubbly filling, mix in some chopped cranberries or raisins. These add a vibrant contrast in texture and a delightful tartness.
-
Themed Colors: Make it even spookier by adding a touch of green food coloring for a more eerie look. It’s a fun way to enchant and amuse young guests!
If you’re in the mood for more delightful treats, check out my Baked Oatmeal Applesauce or the classic Pineapple Zucchini Bread—both offer unique flavors that keep the festive spirit alive.
What to Serve with Delectably Spooky Poison Apple Pie
The sight of your Poison Apple Pie will leave everyone enchanted, but what delightful accompaniments will make this Halloween dessert even more memorable?
-
Vanilla Ice Cream: A classic pairing that adds creaminess, balancing the pie’s rich flavors with a refreshing touch. The cold ice cream contrasts perfectly with the warm pie, creating a cozy mouthfeel.
-
Spiced Hot Apple Cider: Infuse your gathering with fall aroma by serving this warm drink alongside. The flavors of cinnamon and apple echo those in the pie, enhancing the overall experience.
-
Whipped Cream: A dollop of sweet whipped cream on each slice lightens the dessert, making every bite feel a bit more indulgent. Consider adding a sprinkle of cinnamon for an extra flair!
-
Pumpkin Spice Latte: This seasonal favorite complements the flavors of your pie while bringing a festive vibe to the table. Its warm, spicy notes provide a rich backdrop to your sweet treat.
-
Candy Corn: Give your guests a nostalgic Halloween experience with this fun and colorful candy. It adds a playful, crunchy texture that kids will love to nibble alongside a slice of pie.
-
Chocolate Drizzle: Drizzling melted chocolate over the pie or individual slices adds a decadent touch. This rich flavor contrast elevates the dish, making it a true show-stopper at your Halloween gathering.
-
Caramel Sauce: Serve warm caramel for drizzling over each piece of pie, enhancing the sweetness while giving it a cozy, gooey texture that pairs beautifully with apples.
-
Marshmallow Treats: Soft and chewy marshmallow treats can add a playful element to your dessert spread. Their lightness provides a sweet balance alongside the heartiness of the Poison Apple Pie.
Embrace the spirit of Halloween by crafting an unforgettable dessert table that elevates your festive gatherings!
How to Store and Freeze Poison Apple Pie
Room Temperature: Store your Poison Apple Pie covered at room temperature for up to 3 days to maintain its freshness and flavor.
Fridge: For longer storage, keep the pie in an airtight container in the fridge, where it will last for up to a week without losing its delightful taste.
Freezer: Freeze leftovers by wrapping them tightly in plastic wrap and aluminum foil. This pie will safely freeze for up to 3 months, ensuring your Halloween treat can be enjoyed later.
Reheating: To reheat, thaw in the fridge overnight and warm slices in a preheated oven at 350°F (175°C) for about 10-15 minutes to restore its deliciousness.
Poison Apple Pie Recipe FAQs
How do I choose the right apples for Poison Apple Pie?
Absolutely! For the best flavor, use a mix of sweet and tart apples. Granny Smith adds the right amount of tartness, while Honeycrisp offers natural sweetness and a delightful crunch, making every bite a treat.
What is the best way to store leftover Poison Apple Pie?
To keep your delicious pie fresh, store it covered at room temperature for up to 3 days. If you want to enjoy it longer, refrigerate it in an airtight container for up to a week. This keeps the flavors intact and ensures every slice is just as delightful.
Can I freeze Poison Apple Pie and how?
Yes, indeed! To freeze, wrap your cooled pie tightly in plastic wrap and then in aluminum foil. This method protects it from freezer burn, allowing you to store it for up to 3 months. When you’re ready to indulge, simply thaw it in the fridge overnight before reheating slices in a 350°F (175°C) oven for about 10-15 minutes.
What should I do if my pie crust turns out soggy?
Very important! If you find that your pie crust is soggy, there are a couple of tricks you can try. One is to pre-bake the crust for about 10 minutes before adding the filling. This helps set the crust and reduces moisture. Additionally, make sure to drain excess liquid from the apple filling before placing it in the crust.
Can I make Poison Apple Pie gluten-free?
The more the merrier! Absolutely, you can make this pie gluten-free by using a gluten-free all-purpose flour blend in the crust. Just make sure the blend contains xanthan gum for the best texture, and keep an eye on the baking time, as gluten-free crusts may cook differently.
Is Poison Apple Pie safe for pets?
While the pie is perfectly safe for humans, caution is needed with pets. Apples are generally fine for pets in small amounts, but avoid giving them pie crust and keep any sweet ingredients like sugar and food coloring away from them, as they can be harmful. Always consult your vet for dietary concerns regarding your furry friends.
These FAQs should help answer any lingering questions you might have as you whip up your enchanting Poison Apple Pie. Enjoy your baking adventure!
Delectably Spooky Poison Apple Pie for Halloween Fun
Ingredients
Equipment
Method
- Combine flour, cold butter, and sugar in a mixing bowl until resembling coarse crumbs. Gradually add ice water until dough holds together. Shape into disc, wrap, and refrigerate for 30 minutes.
- Peel, core, and slice apples. Toss with brown sugar, cinnamon, nutmeg, and lemon juice. Let sit for 15 minutes.
- Preheat oven to 425°F (220°C). Roll out chilled dough and place into a 9-inch pie dish.
- Spoon apple mixture into the prepared crust. Drizzle with food coloring.
- Cover with another crust or lattice top, cut steam vents, and brush with egg or milk. Bake for 15 minutes, then reduce heat to 350°F (175°C) and bake for another 30-35 minutes.
- Cool for 20 minutes, then decorate with candy eyes before serving.
- Slice and serve warm or at room temperature, optionally with ice cream or whipped cream.
Leave a Reply