
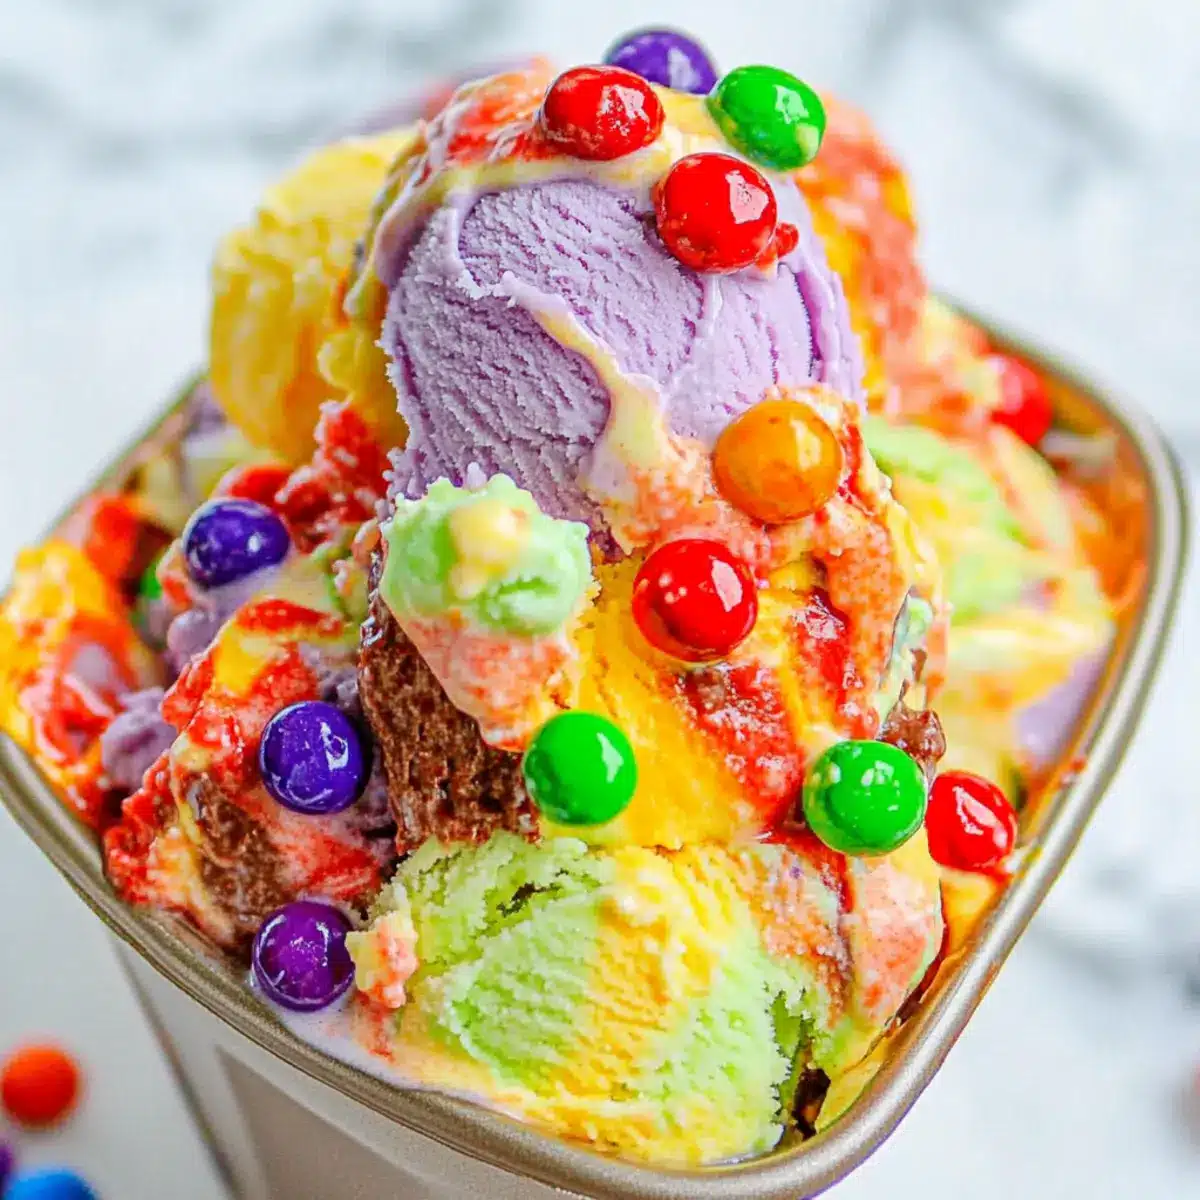
As I watched a rainbow of colors cascade into a mixing bowl, I couldn’t help but smile at the childlike joy of creating this no churn Skittles ice cream. This vibrant dessert transforms the beloved candies into a creamy, dreamy treat that both kids and adults adore. Not only is it incredibly easy to whip up without an ice cream maker, but it also allows you to bring a taste of nostalgia to any party or gathering. Imagine the delighted faces as they dive into this colorful, candy-themed indulgence! Want to discover how to make this sweet masterpiece that you can enjoy all summer long? Let’s dive into the recipe!

Why is Skittles Ice Cream a Must-Try?
Vibrant, Colorful Delight: This no churn Skittles ice cream bursts with color, making it a stunning centerpiece for any gathering.
Nostalgic Flavors: Each scoop takes you back to childhood with the familiar fruity flavors of Skittles that everyone loves.
Simplicity: With just a few ingredients and no ice cream maker needed, this recipe is perfect for both novice and experienced chefs.
Crowd-Pleasing Appeal: Whether you’re hosting a party or enjoying a family night, this treat is sure to impress guests of all ages.
Versatile Variations: Feel free to mix it up! Substitute other candies like M&M’s or gummy bears to create your own signature flavor.
Create your own sweet escape today and pair this ice cream with a slice of chocolate cake or a scoop of Avocado Cream Sauce for a uniquely fun dessert experience!
Skittles Ice Cream Ingredients
Unleash the rainbow in your kitchen with this delightful recipe!
For the Ice Cream Base
- Heavy Cream – This adds the richness and creamy texture that makes your ice cream divine; remember to keep it cold before whipping!
- Sweetened Condensed Milk – Provides the necessary sweetness and a silky mouthfeel; for a dairy-free version, consider exploring non-dairy alternatives.
For the Flavor and Color
- Skittles Candy – The star ingredient that brings a burst of fruity flavors and vibrant colors; feel free to mix your favorite Skittles flavors for a unique twist.
- Gel Food Coloring – Enhances the color of your ice cream layers, making it visually stunning; regular food coloring can be used, but you may need more to achieve the same brightness.
Get ready to indulge in this colorful treat that will take your summer desserts to the next level with this Skittles ice cream!
Step‑by‑Step Instructions for Skittles Ice Cream
Step 1: Prepare the Pan
Start by placing a loaf pan in the freezer for about 10 minutes. This will help ensure that your no churn Skittles ice cream holds its shape when you layer in the colorful mixtures. While that’s chilling, gather your other equipment, including bowls for the crushed Skittles and a mixer for whipping the cream.
Step 2: Crush the Skittles
Next, separate your Skittles by color into five different bags. Using a rolling pin or a heavy object, crush each bag individually until the candies become fine bits, taking care to maintain the integrity of each color. Transfer the crushed Skittles into separate bowls so they are ready for mixing into the ice cream.
Step 3: Whip the Cream
In a large mixing bowl, pour in the cold heavy cream and use an electric mixer on high speed to whip the cream until stiff peaks form, around 3-5 minutes. You should see peaks that hold their shape when you lift the beaters. This whipped cream is key to achieving the light and airy texture of your Skittles ice cream, so take your time!
Step 4: Combine with Condensed Milk
Gently fold in the sweetened condensed milk into the whipped cream using a spatula. Be careful not to deflate the cream; you want the mixture to remain fluffy and airy. Mix until fully combined, which should take just a minute, resulting in a creamy, smooth base for your no churn Skittles ice cream.
Step 5: Color the Mixture
Divide this creamy mixture evenly into the five bowls containing the crushed Skittles. Add a few drops of gel food coloring to each bowl to match the Skittles colors, mixing gently until fully incorporated. Each bowl should glow with vibrant color, reflecting the candy’s signature hues, making the process as visually appealing as it is fun.
Step 6: Layer the Colors
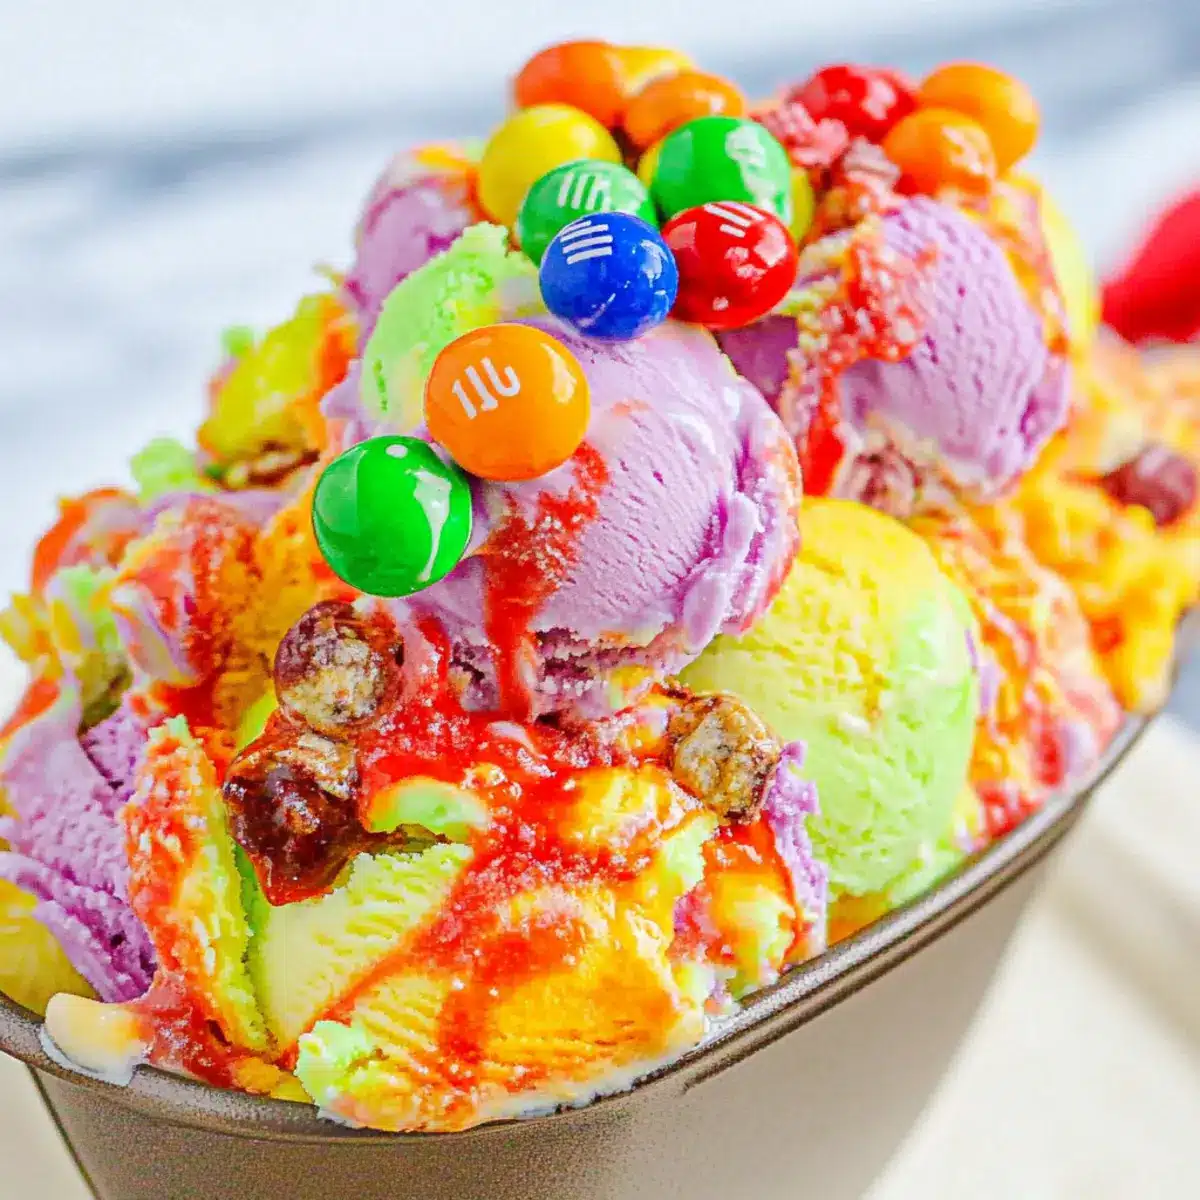
Begin layering your colorful ice cream mixtures into the chilled loaf pan. Spoon in one color at a time, and feel free to swirl them together for a tie-dyed effect or layer them neatly for a striped appearance. Repeat the process until you’ve used all the colored mixtures, creating a beautiful rainbow effect in your no churn Skittles ice cream.
Step 7: Freeze Until Set
Once your layers are beautifully arranged, garnish the top with the leftover Skittles for added crunch and color. Cover the loaf pan tightly with plastic wrap and freeze for at least 6 hours, or until the ice cream is firm and set. This ensures that your ice cream has the perfect texture for scooping when you’re ready to serve.
Make Ahead Options
These no churn Skittles ice cream layers are perfect for busy home cooks looking to save time! You can prepare the creamy base by whipping the heavy cream and folding in the sweetened condensed milk up to 24 hours in advance. Store the mixture in an airtight container in the refrigerator to maintain its fluffy texture. Additionally, crush and separate the Skittles by color ahead of time; simply keep them in sealed bags to prevent moisture from affecting the candy. When you’re ready to serve, just add the gel food coloring and layer the mixtures into your chilled loaf pan, then freeze until firm. Enjoy delightful, vibrant scoops of Skittles ice cream at your next gathering with minimal effort on the day of!
Skittles Ice Cream Variations & Substitutions
Get ready to let your creativity shine while making this delightful no churn Skittles ice cream!
-
Candy Swap: Substitute with other types of candy, like M&M’s or gummy bears, for new flavors and textures. Each candy brings its own fun twist—let your imagination run wild!
-
Dairy-Free Delight: Consider using coconut cream or cashew cream instead of heavy cream for a luscious, dairy-free version. The tropical flavor of coconut cream complements the fruity Skittles beautifully.
-
Flavor Boost: Add a splash of flavored extract, like vanilla or almond, to enhance the overall taste. These little touches can turn your classic ice cream into a gourmet masterpiece.
-
Color Variations: Use different food colorings for a unique visual twist or even try natural colorings using pureed fruits. Beet juice or berry puree can create vibrant shades without artificial ingredients.
-
Layers of Fun: Instead of layering by color, create swirls by mixing the colored ice cream mixtures lightly before freezing. You’ll achieve a beautiful marbled effect that’s as fun to look at as it is to eat.
-
Extra Crunch: Add crushed cookies or sprinkles to your ice cream layers for an added textural surprise. A layer of crushed Oreos can evoke a cookies and cream vibe—delicious!
-
Heat Things Up: For a hint of spice, incorporate a pinch of cayenne pepper or chili powder. The contrasting heat with the sweetness of the Skittles can create a surprising and delightful flavor.
For those adventurous spirits, try pairing it with a slice of decadent cake or adding a scoop alongside your favorite street dessert like Street Corn Pasta for a playful twist. The possibilities are endless!
How to Store and Freeze Skittles Ice Cream
Fridge: Keep any leftover Skittles ice cream chilled in the fridge for up to 3 days. Remember, it’s best enjoyed fresh for optimal flavor and texture.
Freezer: Store the ice cream in an airtight container in the freezer for up to 3 weeks. Make sure it’s well-covered to prevent freezer burn and maintain that delightful creamy texture.
Defrosting: When ready to serve, let the Skittles ice cream sit at room temperature for about 5-10 minutes to soften before scooping. This will make it easier to get those perfect, colorful scoops.
Reheating: If you’ve used any leftovers as toppings or in other desserts, remember to keep those stored properly and use within a week for the best quality!
Expert Tips for Skittles Ice Cream
-
Chill Everything: Ensure that your heavy cream and mixing bowl are very cold before whipping. This helps create stiff peaks for a light texture in your Skittles ice cream.
-
Crushing Skittles: Use a rolling pin or a heavy object to crush the candy; this makes it easier and helps maintain the separation of colors, ensuring your colorful dessert looks fantastic.
-
Gentle Folding: When combining the sweetened condensed milk with the whipped cream, use a gentle folding technique to keep the mixture airy, enhancing the final creamy texture.
-
Layer Creatively: Don’t hesitate to mix the colors a bit for a fun tie-dye effect or keep them separate for a beautiful striped look. Either way, your ice cream will be a visual treat!
-
Freezing Time: Allow adequate freezing time of at least 6 hours to ensure your ice cream sets completely. It’s worth the wait for that scoopable perfection!
What to Serve with No Churn Skittles Ice Cream
Indulging in a scoop of this colorful delight opens up a world of delicious pairings that can elevate dessert time into a truly memorable experience.
-
Warm Brownies: The fudgy richness of freshly baked brownies creates a delightful contrast to the vibrant Skittles ice cream.
-
Wafer Cones: Crisp and light, these cones add a fun crunch, making each bite an exciting textural adventure.
-
Fruit Salad: A medley of fresh, seasonal fruits can balance the sweetness of ice cream, adding a refreshing element to your dessert table.
-
Chocolate Sauce: Drizzling warm chocolate sauce over your Skittles ice cream creates a rich and indulgent experience that both kids and adults can’t resist.
-
Whipped Cream: Light and airy, freshly whipped cream perfectly complements the bold flavors of the ice cream for a beautifully immersive treat.
-
Soda Float: Consider serving this ice cream atop a fizzy soda for a refreshing summertime float that merges creamy and bubbly textures delightfully.
With these pairing ideas, your no churn Skittles ice cream will shine even brighter, turning ordinary gatherings into extraordinary celebrations of flavor!

No Churn Skittles Ice Cream Recipe FAQs
How do I select ripe ingredients for this recipe?
Absolutely! When choosing heavy cream, look for products that are well within the freshness date and preferably labeled as “ultra-pasteurized” for a longer shelf life. For sweetened condensed milk, always check the can for any dents or damage. As for Skittles, pick bright, unblemished bags as dull packaging may indicate older, stale candies.
What are the best storage methods and duration for Skittles ice cream?
Very! Once your ice cream is set, transfer any leftovers into an airtight container. It can be stored in the freezer for up to 3 weeks without losing its delightful texture. For the best results, make sure to cover the surface with plastic wrap before sealing the container—it helps prevent ice crystals from forming on top.
Can I freeze Skittles ice cream and how?
The more the merrier! To freeze your no churn Skittles ice cream, first ensure it’s well-covered with plastic wrap in the loaf pan. Once fully set—usually after 6 hours—transfer the entire block into an airtight container for freezing. This method preserves its texture and flavor for up to 3 weeks. If you ever need to refresh it, pop it back in the freezer after enjoying some for guaranteed freshness!
What should I do if my ice cream doesn’t set properly?
Not to worry! If your Skittles ice cream fails to set, it could be due to insufficient freezing time or the cream not being whipped to stiff peaks. Ensure your heavy cream is very cold before whipping it, and whip until you achieve those lovely peaks—this is crucial for a soft, airy texture. Also, make sure to freeze the ice cream for a good 6 hours; you may need longer depending on your freezer’s temperature.
Are there any dietary considerations I should be aware of?
Certainly! This recipe contains heavy cream and sweetened condensed milk, making it unsuitable for anyone with dairy allergies. However, you can easily make it dairy-free by substituting the heavy cream with coconut cream or a non-dairy whipping cream alternative, and use a dairy-free condensed milk product. Also, Skittles may contain allergens, so double-check the packaging before serving if you have guests with allergies!
Skittles Ice Cream: Whip Up a Rainbow Treat at Home
Ingredients
Equipment
Method
- Place a loaf pan in the freezer for about 10 minutes to help the ice cream hold its shape.
- Separate Skittles by color into five bags and crush each bag until the candies are fine bits.
- In a large mixing bowl, whip the cold heavy cream until stiff peaks form, about 3-5 minutes.
- Gently fold the sweetened condensed milk into the whipped cream until fully combined.
- Divide the mixture into five bowls and add a few drops of gel food coloring to each, mixing until incorporated.
- Layer the colorful mixtures in the loaf pan, swirling for a tie-dyed effect or layering for stripes.
- Garnish with leftover Skittles, cover, and freeze for at least 6 hours until set.
Leave a Reply