
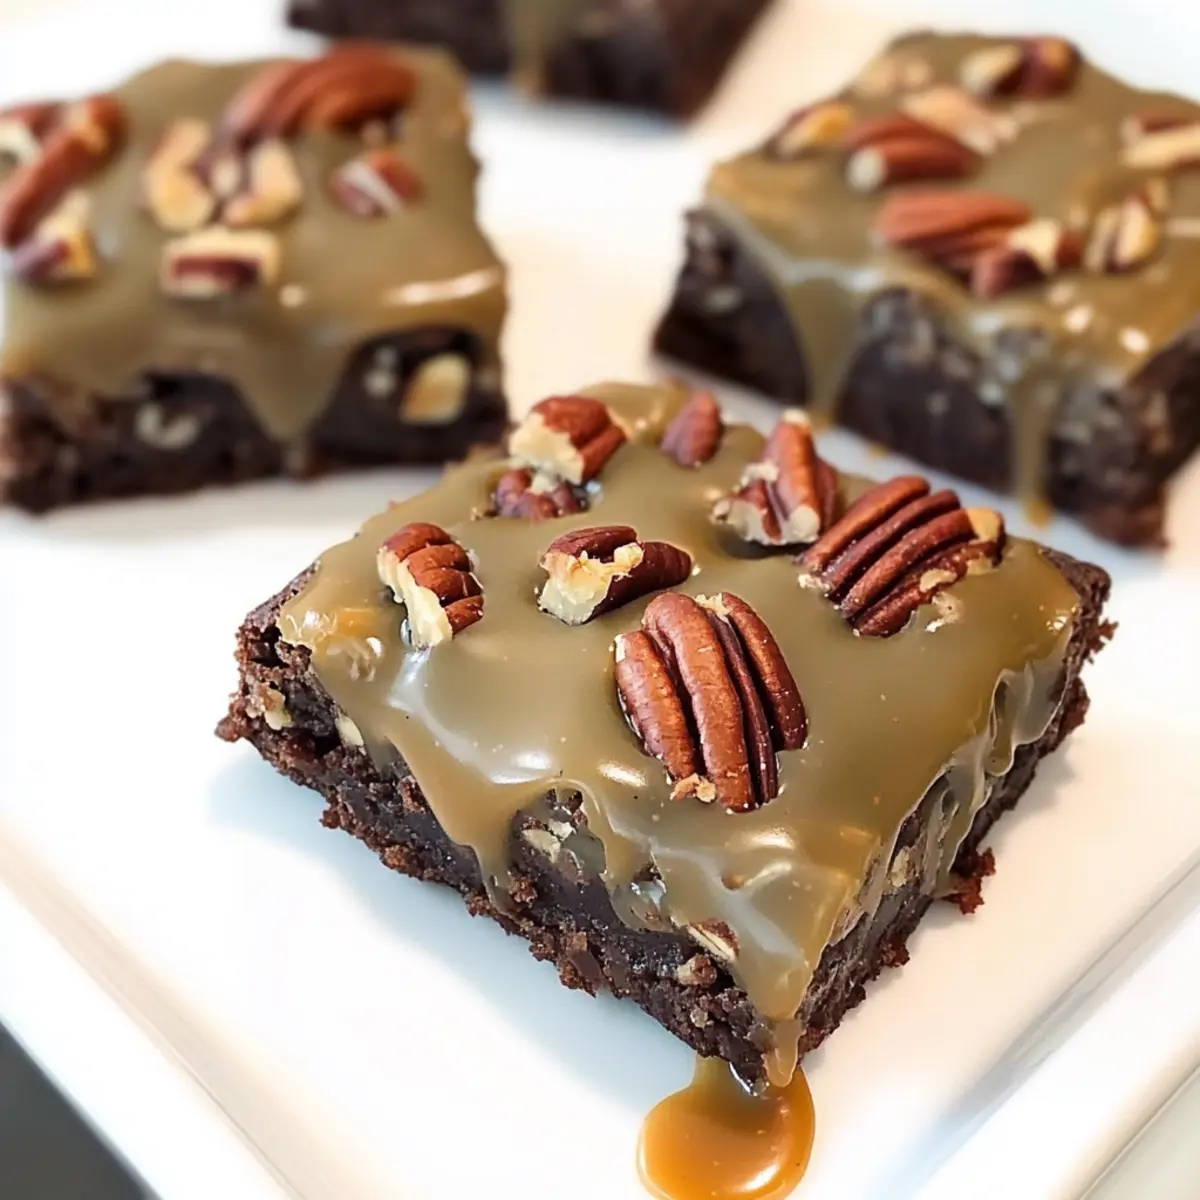
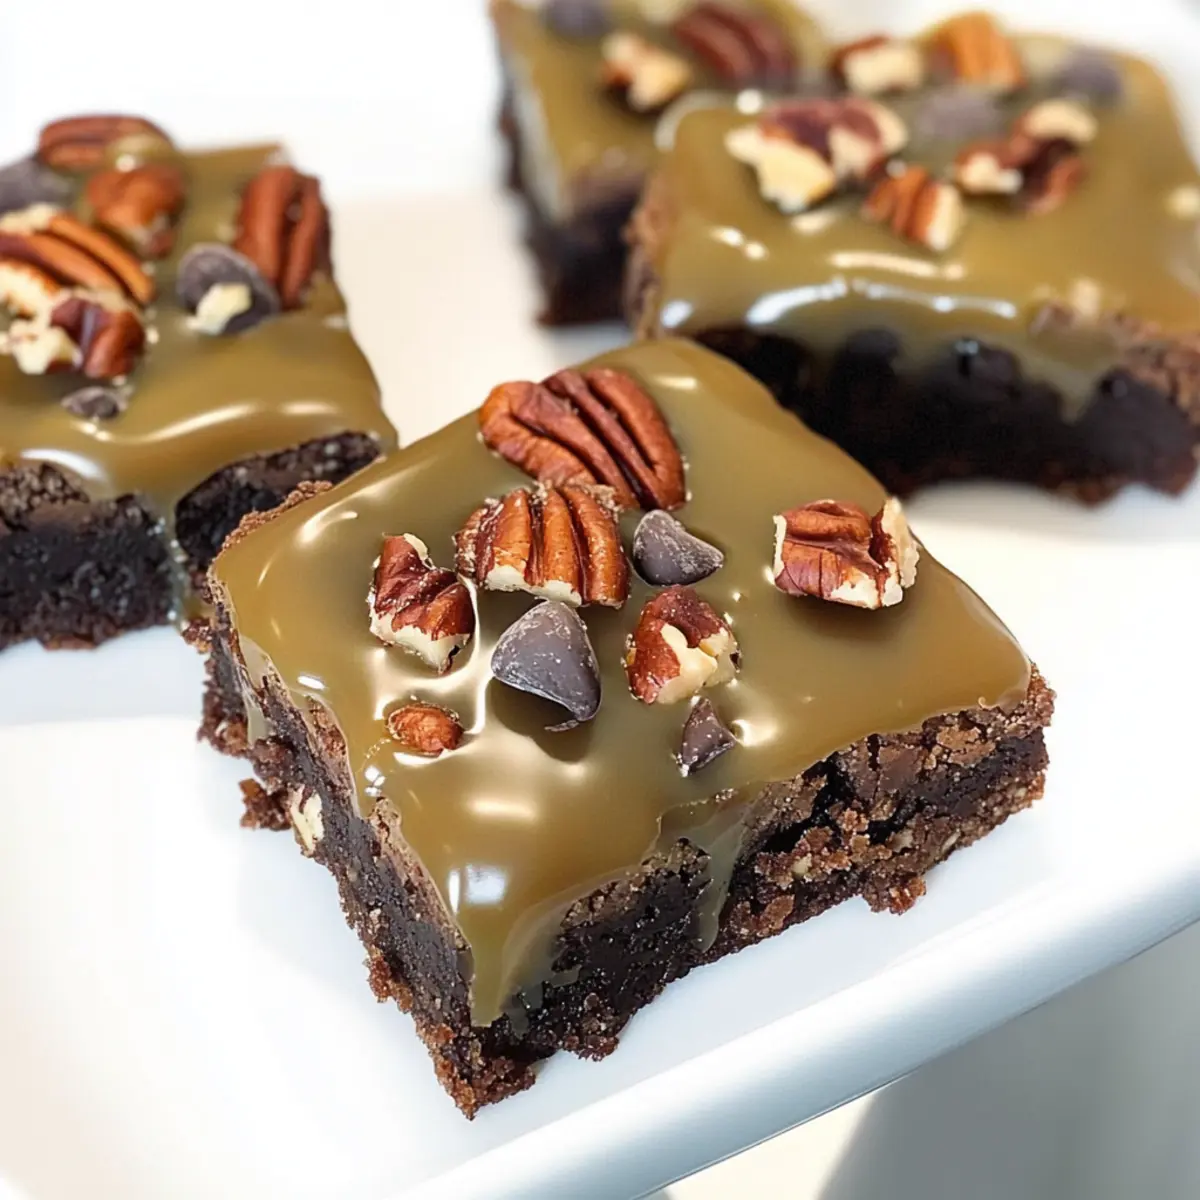
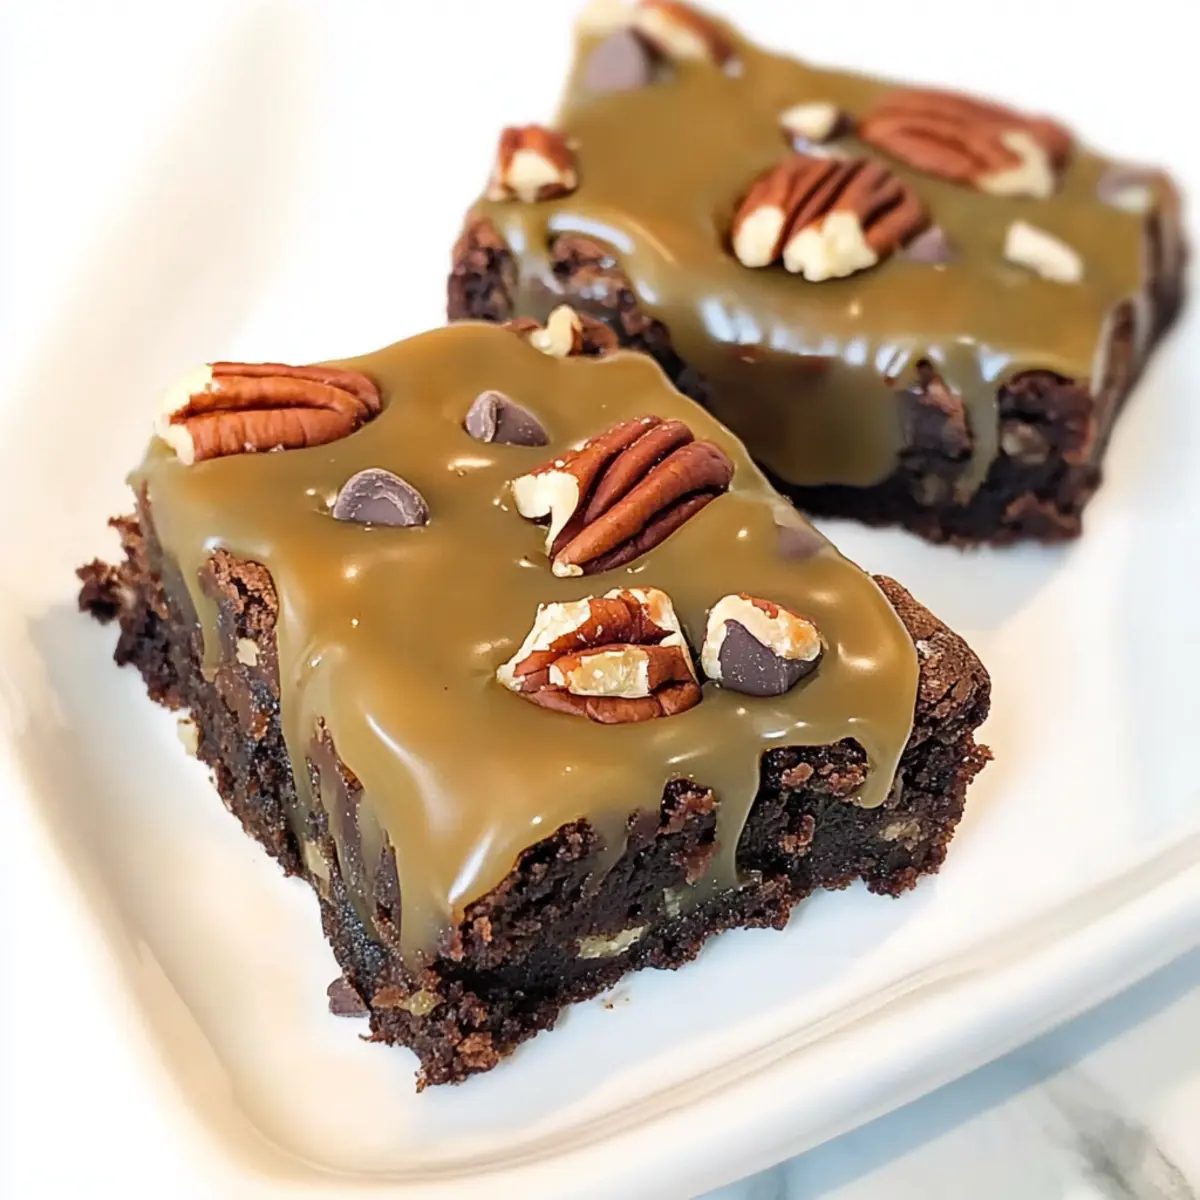
What if I told you that in just 45 minutes, you could transform everyday ingredients into something truly magical? These Turtle Brownies, dripping with homemade caramel and studded with crunchy pecans, are the ultimate answer to your dessert cravings. Not only are they decadently rich and fudgey, but the best part is—you don’t even need a mixer! Whether you’re a seasoned home chef or just looking to impress your family with a sweet delight, this recipe is a guaranteed crowd-pleaser. Each bite delivers a delightful combination of velvety chocolate and satisfying crunch, perfect for any chocolate lover’s heart. So, are you ready to create a little magic in your kitchen with these indulgent Turtle Brownies?
Why are Turtle Brownies a must-try?
Decadent Flavor: Each brownie is bursting with rich chocolate and creamy homemade caramel, making it an indulgent treat.
No Mixer Needed: You can whip these up easily, making them perfect for both beginner cooks and busy chefs.
Nutty Crunch: The optional pecans add an irresistible texture that elevates your dessert experience.
Quick Baking: Ready in just 45 minutes, these brownies are perfect for spontaneous dessert cravings.
Crowd-Pleasing Delight: Serve them at parties or family gatherings, and watch everyone fight over the last piece!
For More Fun: If you love chocolate desserts, don’t miss out on these Spooky Spiderweb Brownies for a playful twist!
Turtle Brownie Ingredients
• Get ready to indulge in some Turtle Brownies!
For the Brownie Base
- Unsalted Butter – Adds richness and moisture; for browning, use light-colored pans to avoid burning.
- Granulated Sugar – Provides sweetness and helps create a chewy texture.
- Light Brown Sugar – Offers extra moisture and a subtle caramel flavor.
- Unsweetened Cocoa Powder – Essential for that decadent chocolate flavor; opt for high-quality for the best results.
- Salt – Balances sweetness, use kosher or sea salt for flavor enhancement.
- Instant Coffee Granules – Enhances the chocolate flavor; feel free to omit if desired.
- Baking Powder – Provides lift; ensure not to substitute with baking soda.
- Large Eggs (cold) – Binds ingredients and contributes to texture; room temperature eggs mix better.
- Vanilla Extract – The ultimate flavor enhancer; always use pure for the best taste.
- All-purpose Flour – Gives structure to brownies; gluten-free flour can be substituted for a different texture.
- Semi-sweet Chocolate Chips – Adds melty chocolate pockets; swap for dark chocolate chips for a richer flavor.
- Chopped Pecans – Provides a delightful crunch and nutty flavor; for nut-free brownies, simply omit.
For the Homemade Caramel Sauce
- Light Brown Sugar – The main sweetener for rich caramel flavor.
- Heavy Cream – Creates a creamy, luscious caramel; half-and-half can work in a pinch, but will be less rich.
- Vanilla (for caramel) – Adds warmth to the sauce; use the same vanilla extract as in the brownies for a cohesive flavor.
Step‑by‑Step Instructions for Turtle Brownies
Step 1: Preheat the Oven and Prepare the Pan
Begin by preheating your oven to 350°F (175°C). Line a 9×9 or 8×8 inch pan with aluminum foil, letting the edges hang over the sides for easy removal. Lightly grease the foil with cooking spray or butter to prevent sticking. This preparation will ensure your Turtle Brownies come out perfectly without any hassle.
Step 2: Brown the Butter
In a medium saucepan over medium heat, add the unsalted butter and let it melt completely. Watch closely as the butter begins to brown, stirring occasionally for about 5 to 10 minutes. You’re looking for a golden caramel color and a nutty aroma; this step is crucial for infusing richness into your Turtle Brownies.
Step 3: Combine the Dry Ingredients
Once the butter is browned, remove it from heat and let it cool for 5 minutes. In a large bowl, whisk together the granulated sugar, light brown sugar, unsweetened cocoa powder, salt, instant coffee granules, and baking powder. Mixing these dry ingredients at this stage helps achieve a well-distributed flavor in your delicious Turtle Brownies.
Step 4: Mix in the Wet Ingredients
Add the cooled browned butter to the dry mixture, stirring until combined. Next, crack in the eggs and add the vanilla extract, mixing until the batter shines and becomes smooth. This glossy texture indicates that your ingredients are perfectly blended and ready for the next step.
Step 5: Fold in the Flour and Mix-ins
Gently fold in the all-purpose flour until just combined, being careful not to overmix. Then, add in the semi-sweet chocolate chips and chopped pecans (if using), ensuring they are evenly distributed throughout the batter. This step will give your Turtle Brownies their delightful chewy texture and delightful chocolatey pockets.
Step 6: Bake the Brownies
Pour the batter into the prepared pan, spreading it evenly. Place the pan in the preheated oven and bake for 20 to 25 minutes, or until the top appears set and a toothpick inserted comes out with a few moist crumbs. Keep an eye on them, as you want your Turtle Brownies to remain fudgy without being undercooked.
Step 7: Cool and Drizzle with Caramel
Remove the brownies from the oven and allow them to cool completely in the pan. Once cooled, prepare your homemade caramel sauce and drizzle it generously over the top of the brownies. Sprinkle with additional pecans and chocolate chips for added indulgence, creating a beautiful presentation before slicing.
Step 8: Chill Before Serving
For the best slicing and to set the caramel, refrigerate the Turtle Brownies for at least 30 minutes. This will allow the caramel to firm up beautifully, making for clean cuts and preventing any messy edges. After chilling, cut into 9 squares and serve your scrumptious Turtle Brownies to eager dessert lovers!

Turtle Brownies Variations & Substitutions
Feel free to add your personal touch to these Turtle Brownies and make them uniquely yours!
- Nut-Free: Omit the chopped pecans for a deliciously nut-free version that everyone can enjoy.
- Different Nuts: Swap pecans for walnuts or almonds to bring in a different nutty flavor that adds delightful crunch.
- Caramel Swirl: Drop spoonfuls of caramel sauce into the brownie batter before baking, swirling it in lightly for a beautiful marbled effect.
- Dark Chocolate Boost: Use dark chocolate chips instead of semi-sweet for a richer chocolate experience that intensifies each bite.
- Spicy Kick: Add a pinch of cayenne pepper or cinnamon to the batter for a surprising and delicious twist that enhances the flavor.
- Gluten-Free Option: Substitute all-purpose flour with a 1:1 gluten-free flour blend for a gluten-free treat that everyone will love.
- Minty Fresh: Incorporate mint extract into the batter for a refreshing mint-flavored brownie that pairs beautifully with chocolate.
- Chocoholic Delight: For even more chocolatey goodness, fold in extra chocolate chunks along with the chocolate chips for an irresistible double chocolate treat.
For even more inspiration, don’t forget to check out our Spooky Spiderweb Brownies to add a bit of creativity to your baking repertoire!
Expert Tips for Turtle Brownies
-
Butter Browning Tips: Watch your butter closely while browning; turn off the heat just as it reaches a deep caramel color to avoid burning it.
-
Cool Properly: For clean slices, let the brownies cool completely before cutting; warm brownies can be crumbly and messy.
-
Quality Ingredients: Use high-quality chocolate and cocoa powder for rich, decadent Turtle Brownies that truly satisfy your chocolate cravings.
-
Mixing Technique: Be careful not to overmix the flour into the batter; this keeps your brownies fudgy and chewy—exactly what you want!
-
Caramel Avoidance: If you’re making homemade caramel, don’t rush; let it cool before drizzling over the brownies for a perfect finish.
-
Pecan Substitution: If you’re aiming for nut-free Turtle Brownies, simply omit the pecans without sacrificing flavor; these brownies are delicious on their own!
Make Ahead Options
These Turtle Brownies are perfect for busy home cooks looking to save time! You can prepare the brownie batter and refrigerate it for up to 24 hours in advance; simply cover the bowl tightly to prevent drying out. Additionally, the caramel sauce can be made ahead of time and stored in an airtight container in the refrigerator for up to 3 days; just reheat gently before drizzling it over the cooled brownies. Once baked, allow the Turtle Brownies to cool completely and refrigerate them for 30 minutes to set the caramel before serving. With these make-ahead tips, you’ll enjoy the same deliciousness with minimal effort on the day you plan to serve!
What to Serve with Decadent Turtle Brownies?
Picture yourself indulging in a blissfully sweet evening with delightful pairings that will elevate your Turtle Brownies to the next level.
-
Vanilla Ice Cream: Creamy and cool, the ice cream melts delightfully over warm brownies, creating an irresistible dessert experience. It’s a classic pairing that never fails to impress!
-
Fresh Berries: Juicy strawberries or raspberries add a refreshing zing, balancing the brownies’ richness with a tart note that brightens each bite. Try a handful on the side for a beautiful contrast!
-
Whipped Cream: Light and airy, a dollop of freshly whipped cream on top adds texture and sweetness, enhancing the decadence of the Turtle Brownies. It feels like a cloud of bliss!
-
Espresso or Coffee: The robust flavors of a freshly brewed espresso bring out the chocolate notes in the brownies, making each bite feel more intense and decadent. Enjoy this duo for a perfect afternoon treat!
-
Chocolate Sauce: For the chocolate lovers, drizzling some extra chocolate sauce over the caramel adds layers of decadence, making each bite thoroughly indulgent. This is a guaranteed way to satiate any sweet tooth!
-
Nutty Toffee Brittle: A crunchy side of toffee provides a delightful textural contrast to the fudge-like brownies, offering a mixture of both sweet and salty that’s simply irresistible. Enjoy it for added richness!
-
Mulled Wine: Sip on a warm glass of spiced mulled wine for a festive touch, its aromatic spices complementing the chocolate flavors beautifully and creating a cozy atmosphere. Perfect for chilly evenings!
How to Store and Freeze Turtle Brownies
Room Temperature: Store in an airtight container at room temperature for up to 3 days to maintain freshness and chewiness.
Fridge: If you want them to last longer, refrigerate the Turtle Brownies in an airtight container for up to a week; this will keep the caramel intact and delicious.
Freezer: For longer storage, freeze the brownies wrapped tightly in plastic wrap or aluminum foil for up to 3 months. Thaw in the fridge before enjoying!
Reheating: To enjoy the brownies warm, microwave for 10-15 seconds, or pop them in an oven at 350°F for about 5 minutes. This will refresh their fudgy texture perfectly!
Turtle Brownies Recipe FAQs
How do I select ripe or quality ingredients for Turtle Brownies?
Absolutely! Start with unsalted, high-quality butter to ensure a rich flavor—look for a pale color and a fresh smell. When it comes to chocolate, opt for semi-sweet or dark chocolate chips with a high cocoa content for that melt-in-your-mouth experience. For brown sugar, choose a soft, moist texture as this contributes to the caramel notes in your brownies. Always check for dry ingredients like flour and cocoa powder to be free of lumps and stored in a cool place to maintain freshness.
How should I store my Turtle Brownies and for how long?
Very! To keep your Turtle Brownies fresh, store them in an airtight container at room temperature for up to 3 days. If you want to prolong their life, refrigerate them in an airtight container for up to a week. Just ensure they’re completely cooled before storing to maintain moisture and texture.
Can I freeze Turtle Brownies, and if so, how?
Absolutely! To freeze your Turtle Brownies, wrap each brownie individually in plastic wrap or aluminum foil, and then place them in a freezer-safe container or a zip-top bag, removing as much air as possible. This way, they can last up to 3 months in the freezer. When ready to enjoy, simply thaw them in the refrigerator overnight or let them sit at room temperature for a couple of hours.
What should I do if my Turtle Brownies turn out too dry?
If your Turtle Brownies turn out a bit dry, it may be due to overmixing or overbaking. Ensure you’re mixing the flour just until combined, and keep an eye on your baking time—take them out when a toothpick has a few moist crumbs attached. To salvage them, you could serve with a scoop of vanilla ice cream or a drizzle of extra caramel sauce; this adds moisture and brings them back to life beautifully.
Can I make Turtle Brownies nut-free?
Absolutely! If you want to make nut-free Turtle Brownies, simply omit the chopped pecans from the recipe. They will still taste incredible and maintain that decadent flavor you crave. Alternatively, you could swap in mini marshmallows or even shredded coconut for added texture and flavor without the nuts.
How do I know when the brownies are perfectly done?
Very! The key to perfectly baked Turtle Brownies is visual cues—look for a shiny top and edges that are set with a slightly soft center. Insert a toothpick into the center; if it comes out with a few moist crumbs rather than wet batter, you’re good to go! Remember, they will continue to cook slightly as they cool in the pan.
Decadent Turtle Brownies: Fudgey Delights Made Easy
Ingredients
Equipment
Method
- Preheat your oven to 350°F (175°C). Line a 9x9 or 8x8 inch pan with aluminum foil and grease it to prevent sticking.
- In a medium saucepan, melt the unsalted butter over medium heat and let it brown for about 5 to 10 minutes until golden caramel in color.
- Remove the butter from heat and let cool for 5 minutes. In a large bowl, whisk together the granulated sugar, light brown sugar, cocoa powder, salt, instant coffee, and baking powder.
- Add the cooled butter to the dry mixture, then mix in the eggs and vanilla extract until the batter is shiny and smooth.
- Gently fold in the all-purpose flour until just combined, then add the chocolate chips and chopped pecans.
- Pour the batter into the prepared pan and bake for 20 to 25 minutes. A toothpick should come out with a few moist crumbs.
- Allow the brownies to cool completely in the pan. Prepare your caramel sauce and drizzle it over the cooled brownies.
- Refrigerate the brownies for at least 30 minutes before cutting into squares and serving.
Leave a Reply